
How to get Bastion in Destiny 2
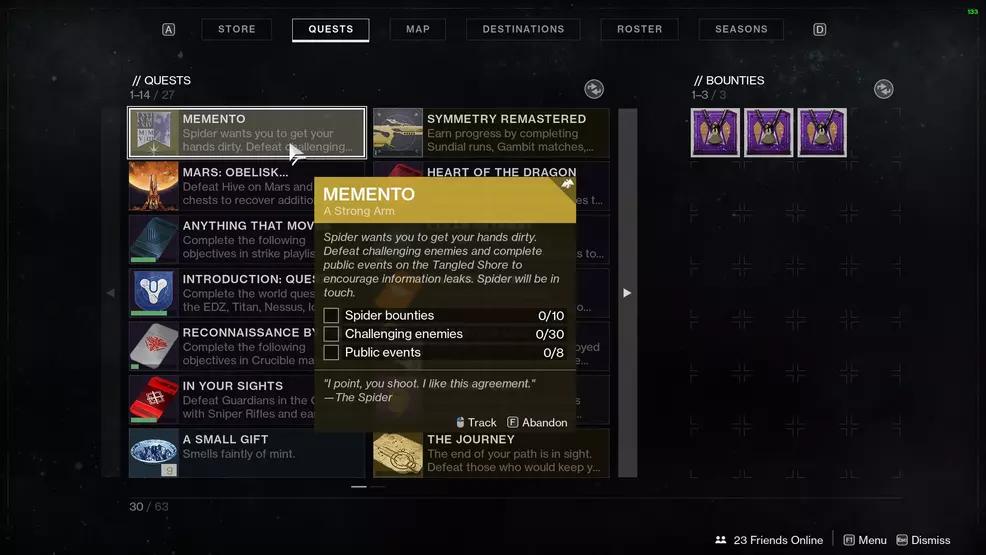
Bastion, an Exotic Fusion Rifle, is now available to unlock in Destiny 2, and it all begins with the quest, Memento.
Bastion, an Exotic Fusion Rifle players have known about for a while now, is finally available in Destiny 2. Anyone that wants to get their hands on this interesting beast will first need to finish the quest, Exploring the Corridors of Time. With that out of the way, a quest called Memento will be the next port of call.
Memento quest – Bastion Exotic Fusion Rifle
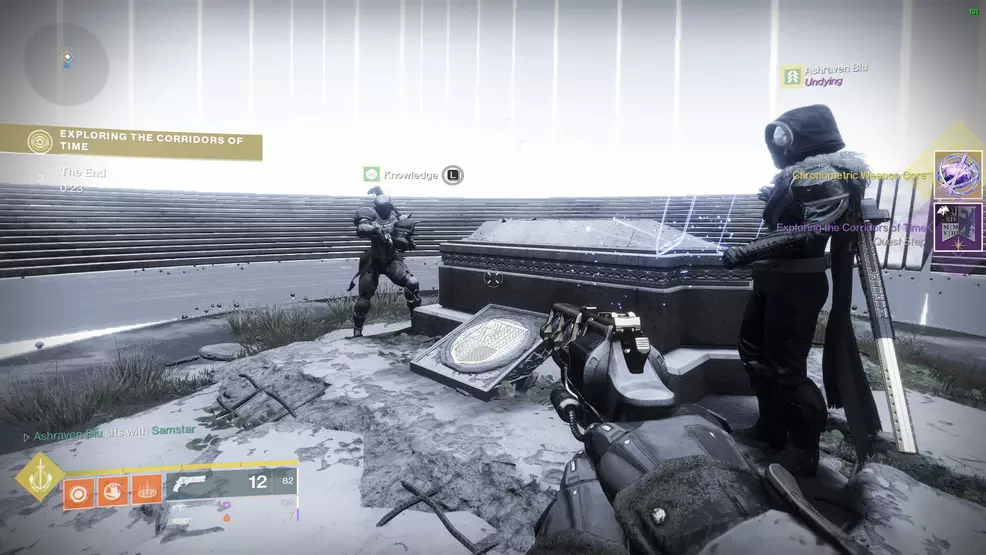
Before we get into covering the Memento quest, it’s important you know how to complete the quest, Exploring the Corridors of Time. This is an extremely easy quest that you must collect from Saint-14. It tasks you with going into the Corridors of Time and, surprise, exploring it.
When you’re in this new area on Mercury, you must go through a sequence of hallways in the correct order. The order is as follows:

After passing through all 30 corridors in the correct order, you will reach a final room. Interact with the grave to receive the Chronometric Weapon Core and complete the quest. Now return to Saint-14 and speak with him to find a new quest: Memento.
This method is only available for a short duration. Once the Corridors of Time collapse, players need only visit Saint-14 to collect the Memento quest.
It's important to note that you must first complete Recovering the Past and An Impossible Task (which also includes Completing an Impossible Task). Once these quest lines are completed, Saint-14 will have your quest for Bastion.
Step 1: A False Refraction – Talk to Saint-14
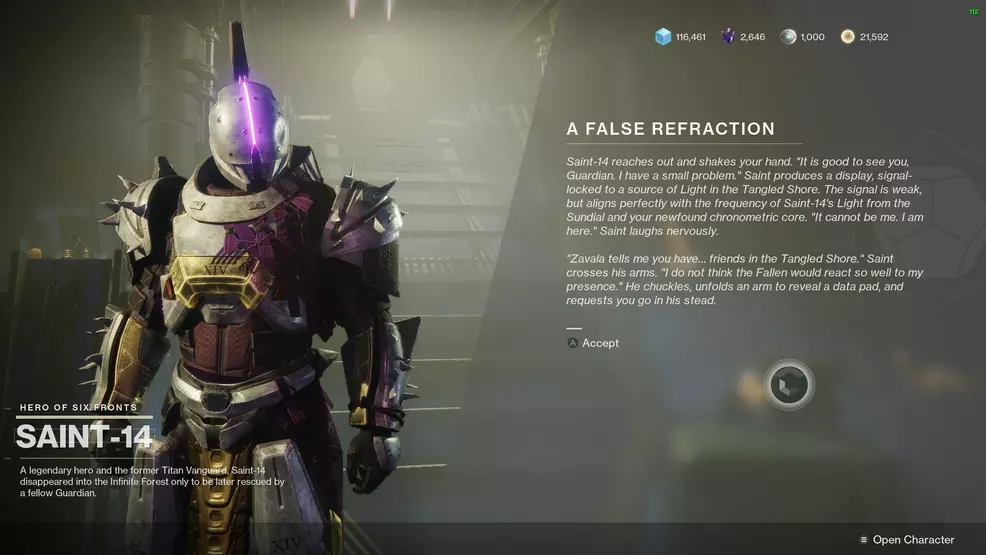
The first step of Memento is to talk with Saint-14. This will automatically happen when you pick up the quest.
Step 2: Spoken Word – Defeat Fallen Captains and Servitors
The next step for the Memento quest is called Spoken Word. For this step, you will need to collect five Fallen intel by defeating Fallen Captains and Servitors.
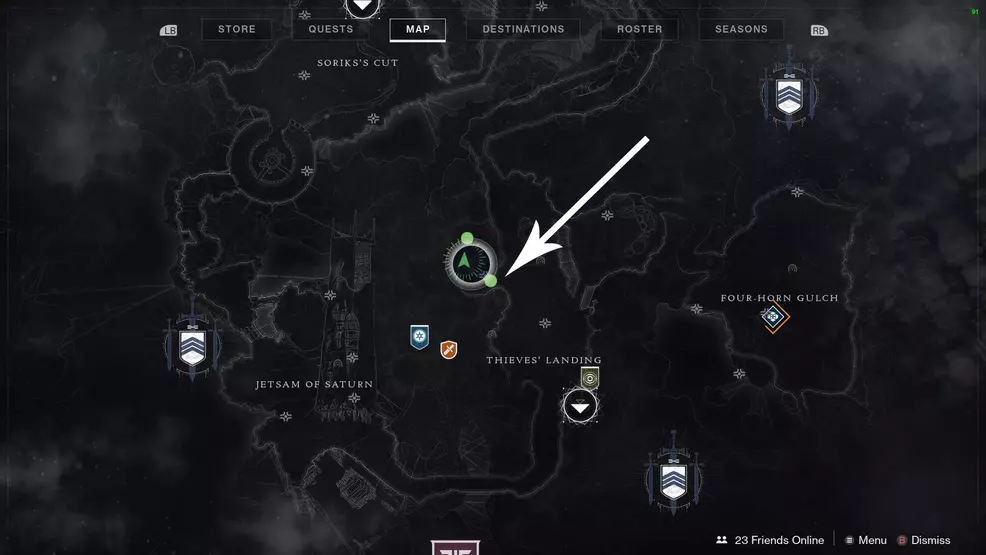
The easiest way to do this is in Thieves’ Landing on the Tangled Shore. From the spawn point, travel to the left side of the area and go up past the Empty Tank Lost Sector. Head left into the path that leads to the Hollowed Lair Strike.
Continue down the path to where the enemies are. A Fallen Captain will always run out. Kill it, run back out to Thieves’ Landing, and then return to kill it again. Repeat this process until you have all 5 intels.
Step 3: Lost Connection – Speak with Spider
With the five pieces of Fallen intel collected, go and speak with Spider.
Step 4: Backroom Brawl – Empty Tank Lost Sector
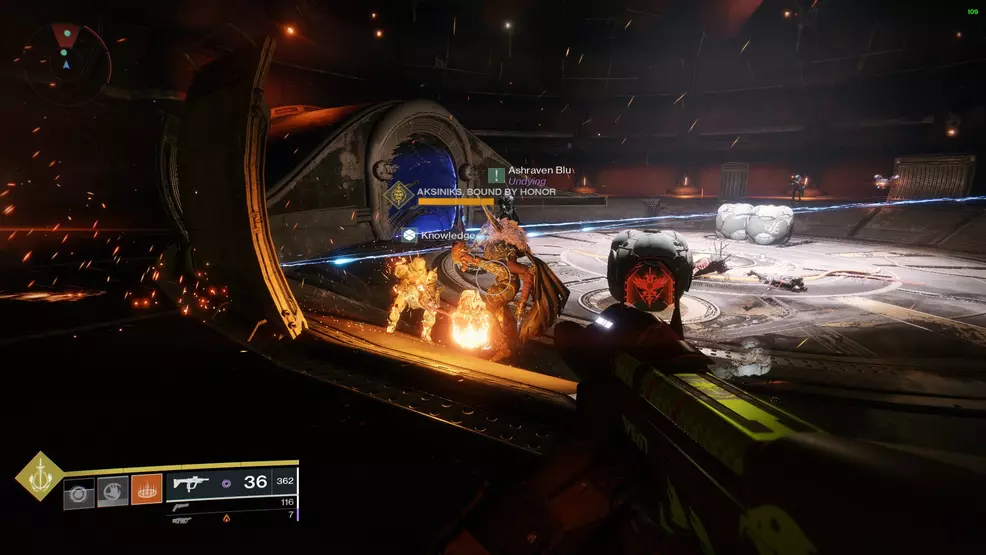
Spider will direct you to go into the Empty Tank Lost Sector and kill an enemy called Aksiniks, Bound by Honor. This is a simple step that will take only a few moments.
Step 5: Talk to Spider
Return to Spider once Aksiniks, Bound by Honor is no more.
Step 6: A Strong Arm – Spider bounties, enemies killed, Public Events
Next up is your classic Public Event grind. You will need to get a lot of kills, do a bunch of bounties, and run around the Tangled Shore doing events:
- 10 Spider bounties
- 30 Challenging enemies defeated
- 8 Public Events
Visit Spider first and grab his bounties as well as his Wanted bounties. Both count towards the total. Check out the Shacknews Destiny 2 guide for Spider’s Wanted bounties so you don’t spend ages searching for your targets.
It’s also worth noting that Heroic Public Events count for 2 points. Make sure you know how to make Public Events go Heroic so you don’t waste time. Similarly, yellow health bar enemies also count as Challenging enemies, and they spawn during Public Events.
Step 7: Rude Awakening – Find a grave in Trapper’s Cave
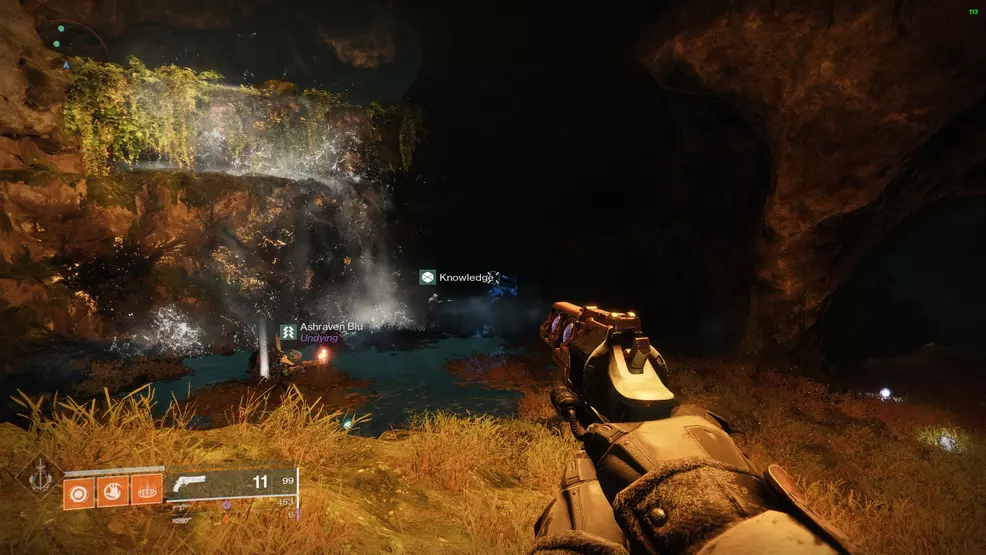
With the main grindy section of the Bastion quest completed, the next step is to go spelunking in a Lost Sector. For this step of the Memento quest, go to Four-Horn Gulch in the Tangled Shore and enter the Lost Sector, Trapper’s Cave. You're looking for a grave, though it doesn't really look like a grave at all.
Continue through the Lost Sector until you come to a drop down with a little waterfall. There will be a blue mist seeping from a corner. Interact with the ground to continue the quest.
Step 8: Altered Chief – Kill a unique enemy in The Hollowed Lair
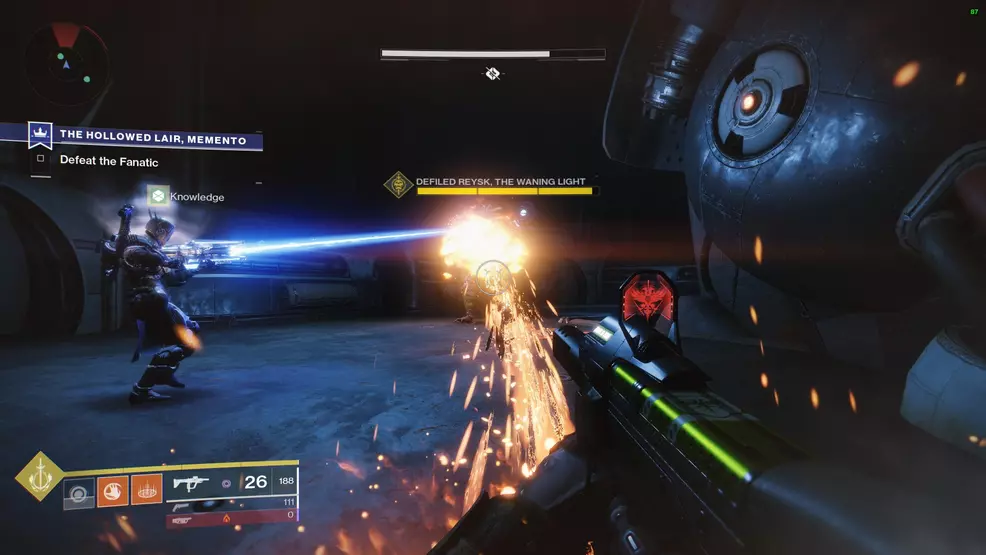
The final part of the Memento quest is to complete a unique version of a Tangled Shore Strike, The Hollowed Lair, Memento. In this Strike is an enemy you must kill called Reysk, the Waning Light.
Reysk spawns in the boss room, right after the boss goes immune for the first time. Look for the on-screen text saying he has appeared. He’s not very difficult to kill, but make sure you don’t accidentally finish the Strike before he dies or else you’ll have to run it again.
Once Reysk dies, you can leave the Strike and return to Saint-14.
Step 9: Speak to Saint-14
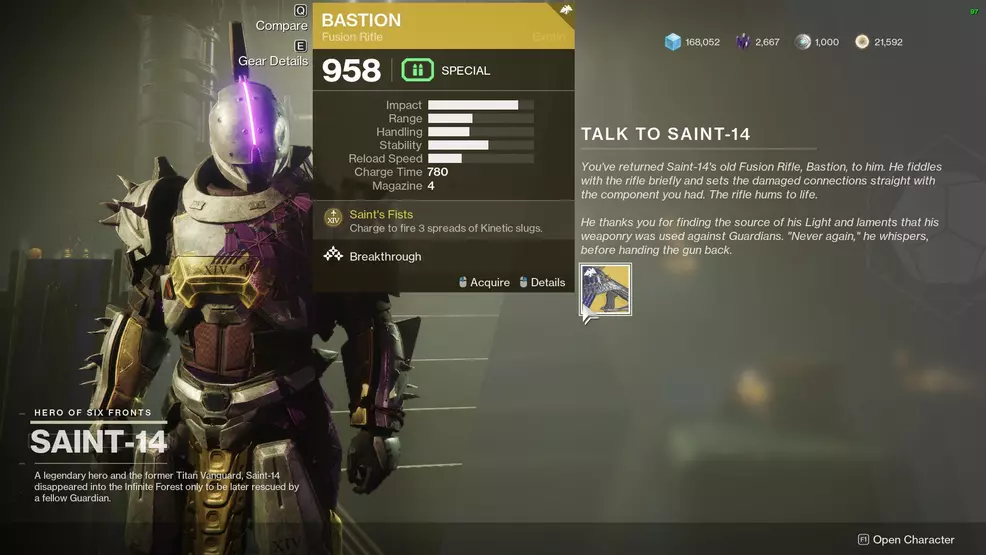
Go to the Tower and speak to Saint-14 to complete Memento and unlock Bastion, the Exotic Fusion Rifle.
Bastion perks
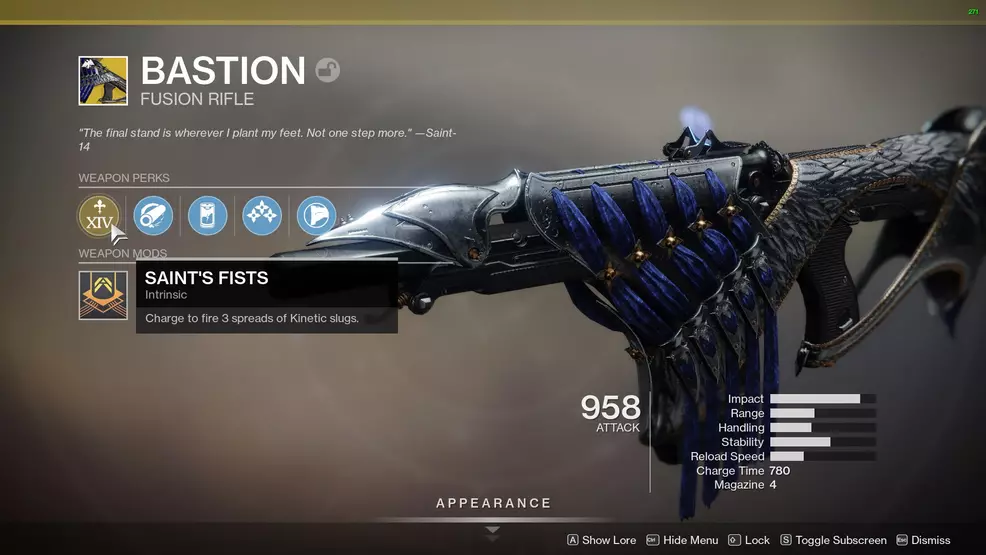
Bastion, as far as Exotic Fusion Rifles go, is fun to use albeit not nearly as potent as other options. It features Hammer-Forged Rifling, Liquid Coils, and Composite Stock as the standard perks. It’s Intrinsic and Trait perks are:
- Saint’s Fists – Charge to fire 3 spreads of Kinetic slugs
- Breakthrough – A portion of this weapon’s damage bypasses elemental shields
Every single round of Bastion fires three bursts of Kinetic slugs. This makes it feel almost like a combat shotgun or a mini Lord of Wolves. The Breakthrough perk means that part of the damage will bleed through elemental shields.
Given it sits in the Primary slot, you will need to weigh up whether it’s worth using it over your favorite Primary.
Though it won’t make a bad player good, it can very easily obliterate unsuspecting opponents and even blow through an opponent’s Super in a single burst. But as mentioned, it has to be in the right hands.
The quest for unlocking Bastion began with the hard work of the Destiny 2 community (such as those over at Raid Secrets) as they solved the puzzle of the Corridors of Time. If you want to get your hands on this new Exotic Fusion Rifle, you will need to complete Exploring the Corridors of Time as well as Memento. For more Exotic weapon guides, check out the Shacknews Destiny 2 complete strategy guide.

-
Shacknews

 reply
replySam Chandler posted a new article, How to get Bastion in Destiny 2
