
How to get Khvostov 7G-0X - Destiny 2
Unlock Khvostov 7G-0X in Destiny 2 and enjoy a throwback to the first weapon you got in the whole franchise.
The Khvostov 7G-0X is now in Destiny 2 and brings everything full-circle. You’ll need to unlock regional chests to get it as well as collect Motes of Light and even visit the location in the old Tower where the Speaker used to chill out. Here’s every step to get Khvostov 7G-0X and some tips if you run into trouble.
How to get Khvostov 7G-0X
There are a few steps in unlocking Khvostov 7G-0X in Destiny 2 but you can get a lot of them done at the same time. For starters, you’ll need to have access to The Pale Heart patrol zone. Once you have access, you can get Lost Encryption Bits and Motes of Light while exploring. Here is what you need to do to get Khvostov 7G-0X:
- Finish The Final Shape campaign
- Start Destined Heroes until you unlock Micah-10
- Complete Micah-10’s Convalescence quests until you unlock Alone in the Dark
- Complete Alone in the Dark missions to unlock all six Cysts
- You should be collecting the Lost Encryption Bits in the Cysts during this part
Once you have done the above, you will have unlocked all the locations that you need. While you’re doing this, you can be finding Lost Encryption Bits and collecting Motes of Light. Try to get the Lost Encryption Bits first, that way you can at least use the Legendary version of Khvostov while you farm the Motes of Light:
- Find 15 Lost Encryption Bits
- Nine are found in regional chests
- Six are found in Cysts
- Collect Legendary Khvostov 7G-0X from the chest in the Impasse (in the Cosmodrome Wall)
- Find 17 Motes of Light
- Nine are awarded from Overthrow bosses
- Eight are from Visions of the Traveler
- Collect Exotic Khvostov 7G-0X at the old Tower
Lost Encryption Bits: Regional Chests
You’ll find nine Encryption Bits in the nine regional chests in the Pale Heart. These are marked on your map, but we’ve gone and found them for you below.
The Landing regional chests
Source: Shacknews
This one requires a bit of tricky jumping to reach. It is behind the waterfall in a hidden room. You can reach this by starting on the grassy ledge looking at the waterfall. Use the tree on the left (where the feather is) to climb up and into the hole in the building.
Source: Shacknews
Another Regional Chest is in the pit beneath eagle mountain. Go through the tunnel and drop down into the hole. There is a ledge far down with the chest tucked away.

Source: Shacknews
The last chest is behind the waterfall below the bridge section on the eastern side of The Landing.
The Blooming regional chests
Source: Shacknews
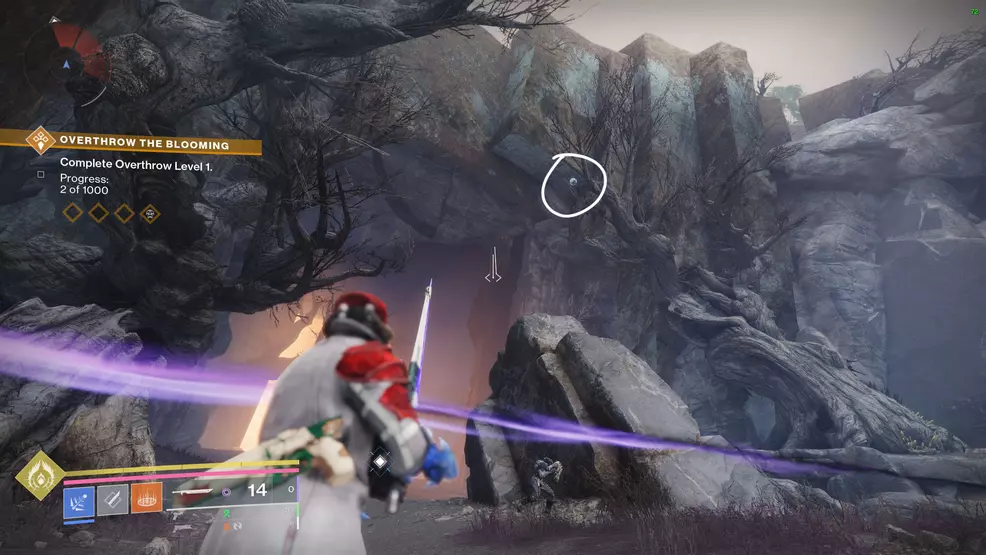
This Regional Chest is in the labyrinth area of The Blooming. Look for it up high on a rocky ledge.
Source: Shacknews
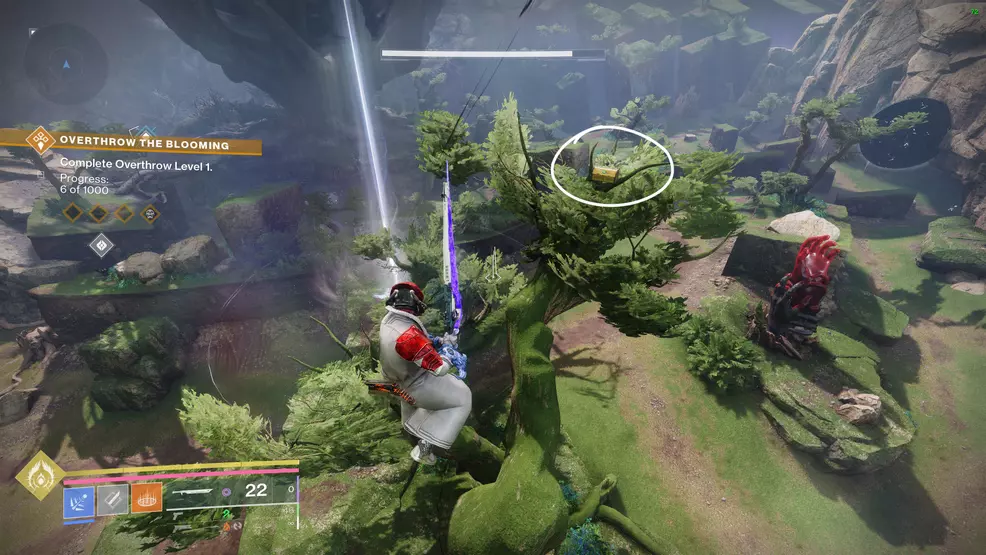
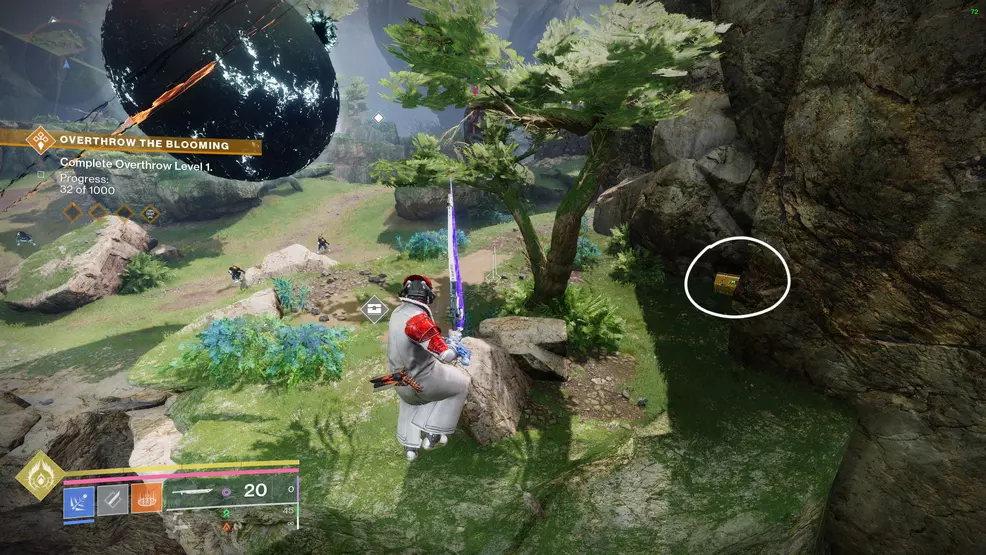
Another chest is in the tree above the beam of Light that starts the Excision mission.
Source: Shacknews
The last one in the Blooming is just tucked near the edge of the map.
The Impasse regional chests
Source: Shacknews
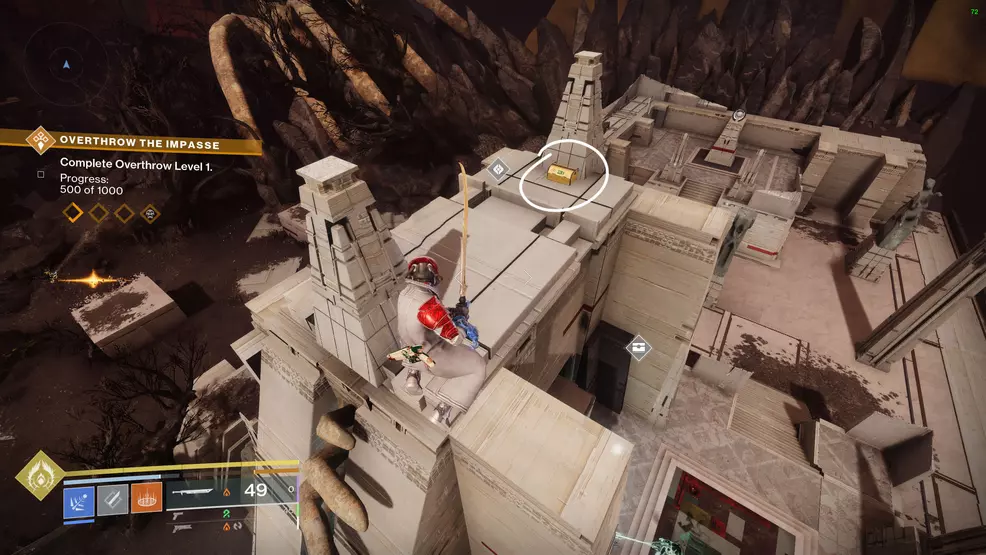
One Regional Chest is on top of the structure to the northeast. Climb to the very top of the building to find it.
Source: Shacknews
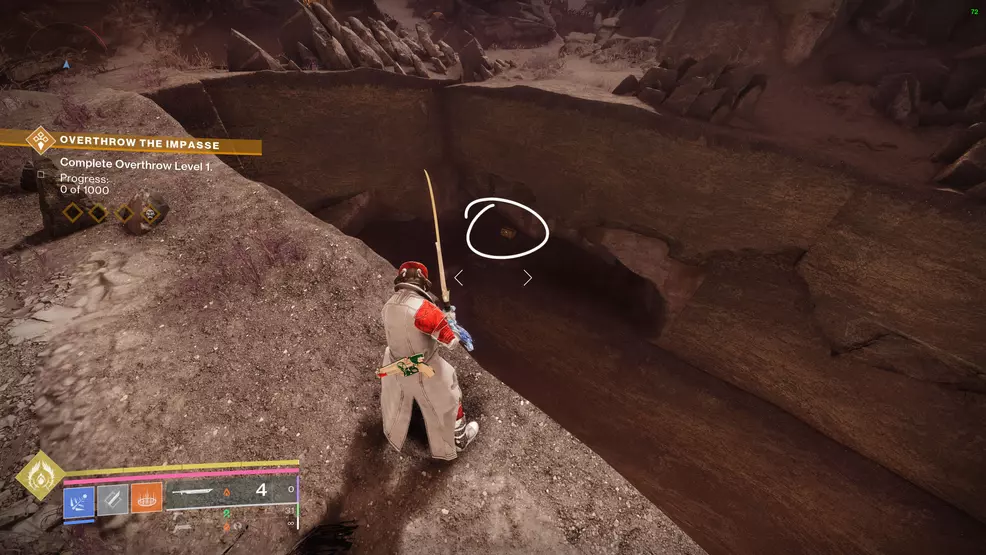
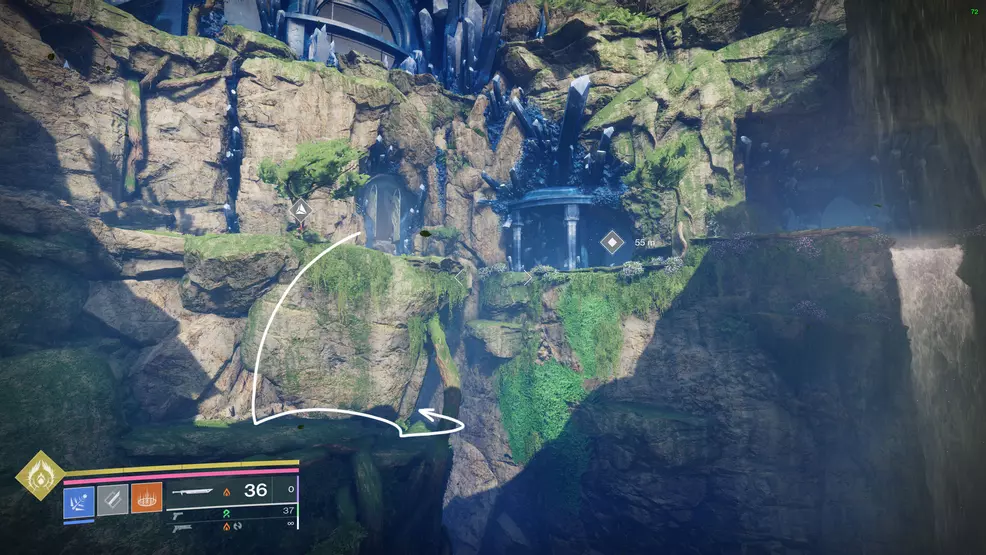
Another chest is in the gully, hidden in a chunk of the wall that’s been cut away. Use the ledges to reach it safely.
Source: Shacknews
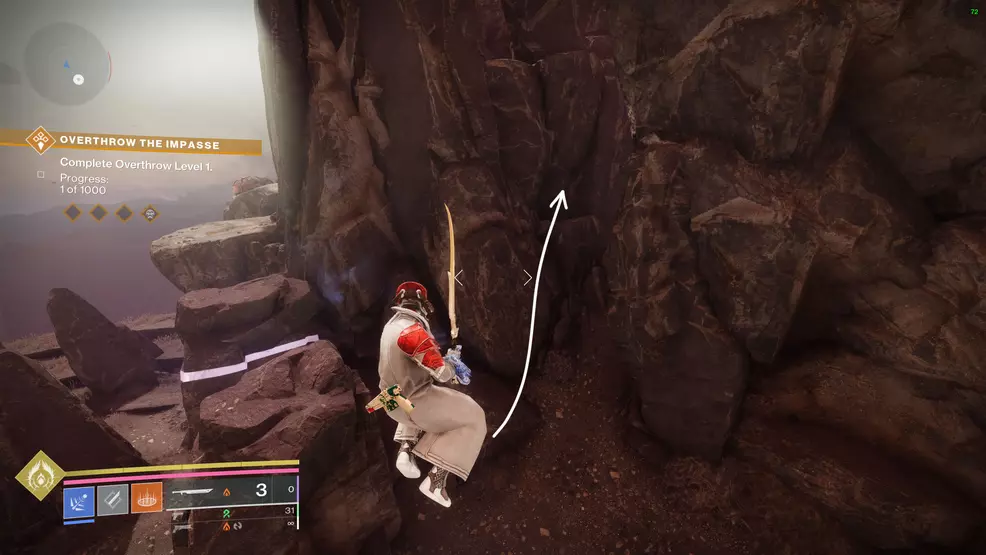
The last one is by the Lost Sector symbol. Instead of jumping up all of the platforms to reach the Lost Sector, go to the right as though you were heading to where some of the public events happen. In the corridor is a small cave opening in the side of the wall.
Lost Decryption Bits: Cysts
Next up, you’ll need to find Lost Encryption Bits in the Cysts. You can either find them while you’re completing Alone in the Dark or after you unlock the Cysts. Once you complete a Cyst as part of Alone in the Dark, it will be marked on your map using the Final Shape icon. Track it to add a waypoint to your HUD. Remember that each Cyst can be one of two potential Cysts. You can swap which one it is by finding the bird in the region (typically it’ll be near the tunnel toward the Cyst) and interacting with it.
Sword Dance
Source: Shacknews
Source: Shacknews
The Sword Dance Cyst has a Lost Decryption Bit not too far into it. Once you get the sword, clear the first room and continue through the tunnels destroying any chitin that blocks your path. You will eventually reach another large cavern with an Ogre and three more crystals – the collectible is in this room. Instead of following the waypoint, drop down to the lower level to find a doorway blocked with more chitin – behind it is the tech.
Moth-Infested Cavern

Source: Shacknews

Source: Shacknews
The Lost Decryption Bit in the Moth-Infested Caverns is right at the start. When you get to the room with the Ogre standing on a platform, defeat it and then drop down below the Ogre. In one of these little caves is the busted tech. You might recognize this area from the Dual Destiny Exotic mission.
Searing Light
Source: Shacknews
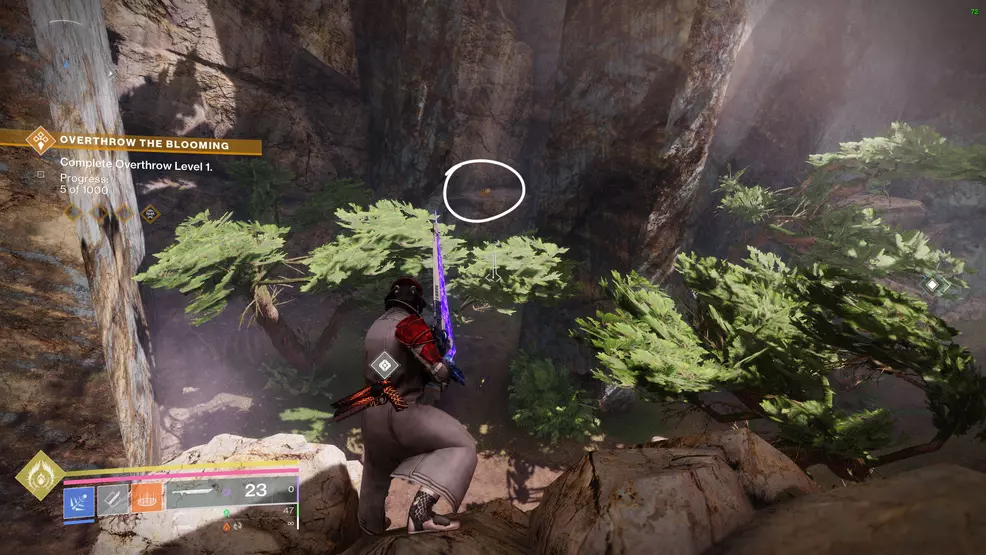
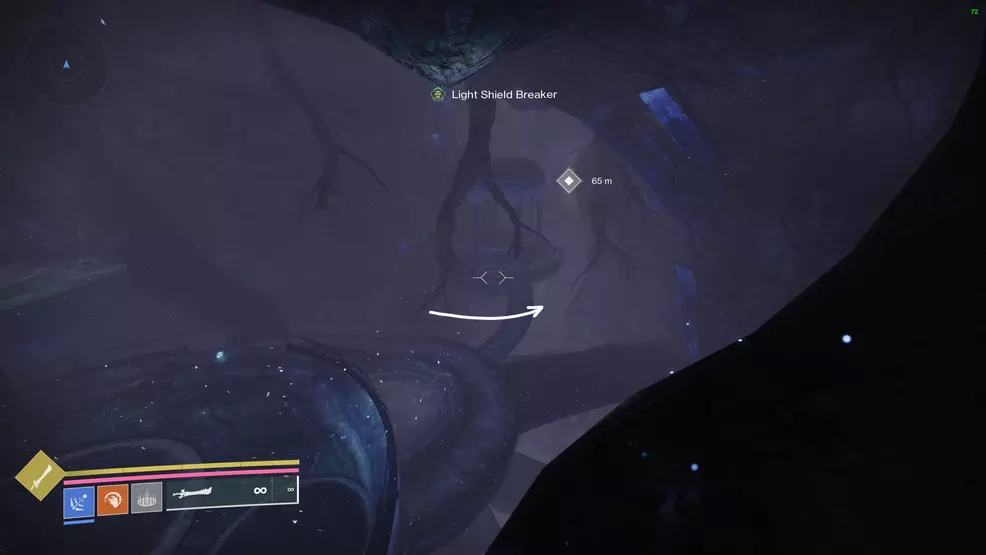
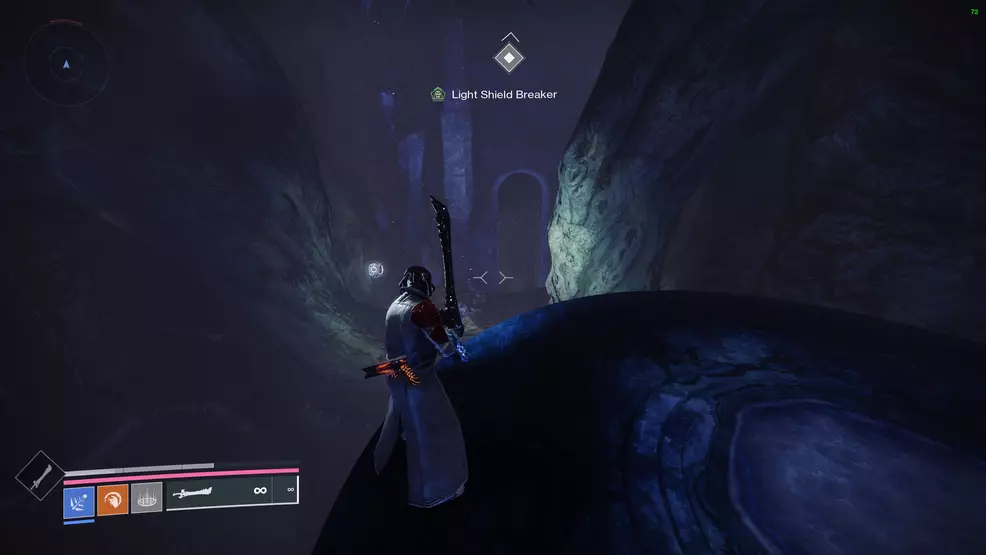
The Searing Light Cyst has a Lost Decryption Bit in the cave with the purple glow. When you defeat the boss, look for the cave opening that has a rock in a cube shape. Inside and to the left is the Bit.
Slayer
Source: Shacknews

Source: Shacknews
The Lost Decryption Bit in the Slayer Cyst is through the tunnel that leads to The Seclusion. From the boss room, go past the tree root into a cavern to find another tree root, behind it is the old tech. While you’re here, this is a Vision of the Traveler through a hole in the wall.
Aerial Ace
Source: Shacknews
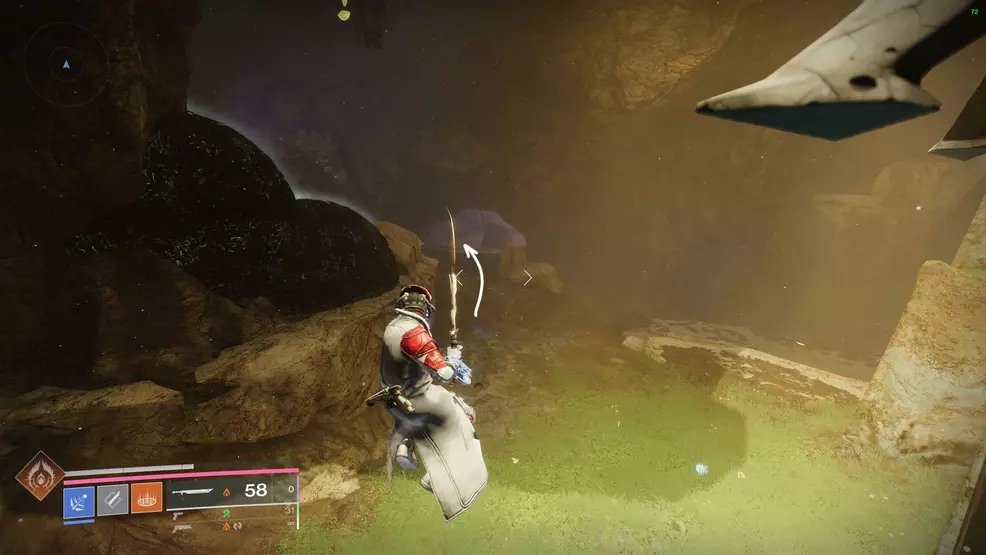
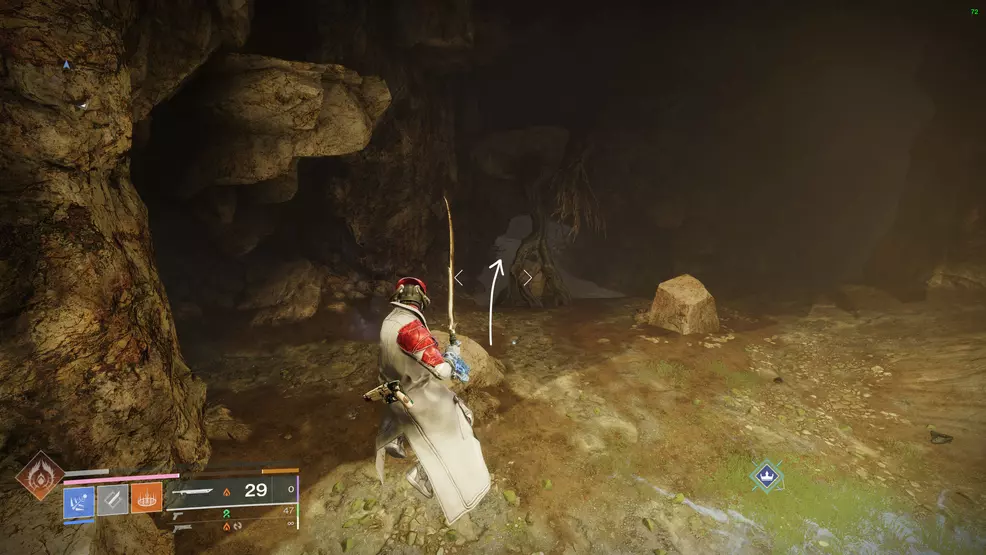
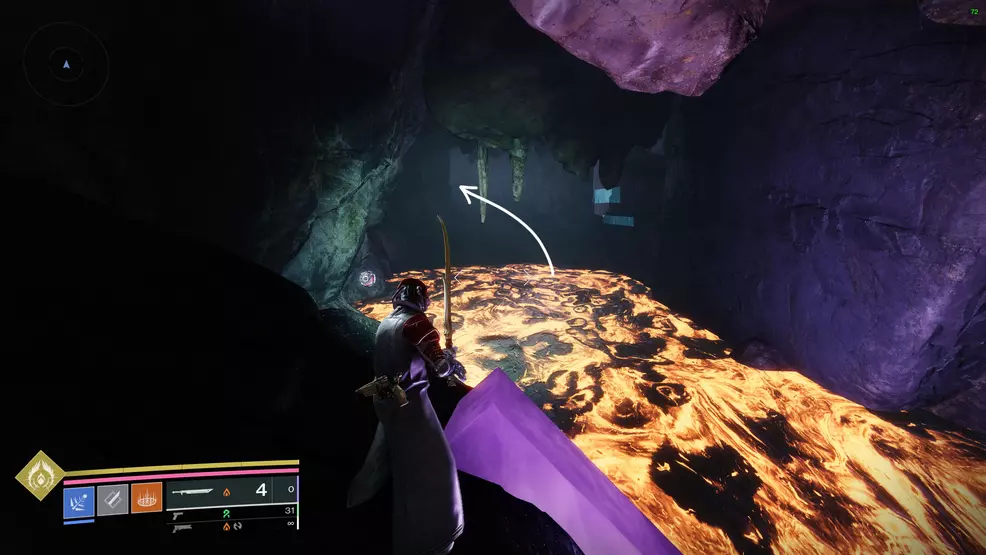
The Lost Decryption Bit in the Aerial Ace Cyst is through a tunnel submerged in lava. Once you defeat the wizard, look for the purple block half-submerged in lava through a tunnel. Jump to this bit of rock and then jump to the next bit of land further along.
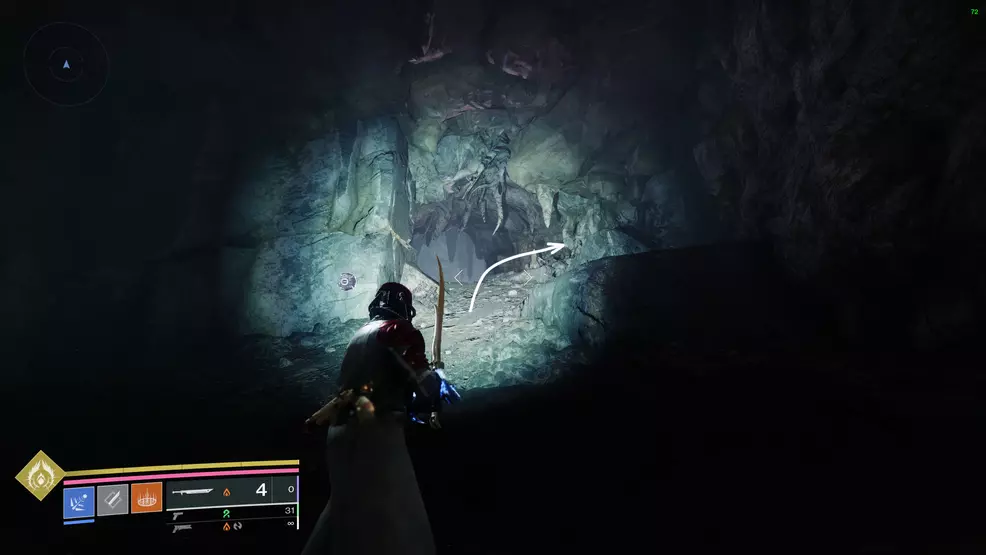
Source: Shacknews
You’ll be at the base of a small hill that leads up to another cave opening with more lava. Don’t go toward the lava, instead, turn right to spot a tiny cave opening that leads to the tech.
Smothering Darkness

Source: Shacknews

Source: Shacknews
At the end of the Smothering Darkness Cyst is where you’ll find another Lost Decryption Bit. Once you defeat the boss, stand on the center platform and look for the large, purple block that is on an angle on the roof. Go through the cave below it to reach a sort of chasm. Drop into the chasm and look on the ground at the back-right to find the tech.
The Divide Khvostov chest

Source: Shacknews
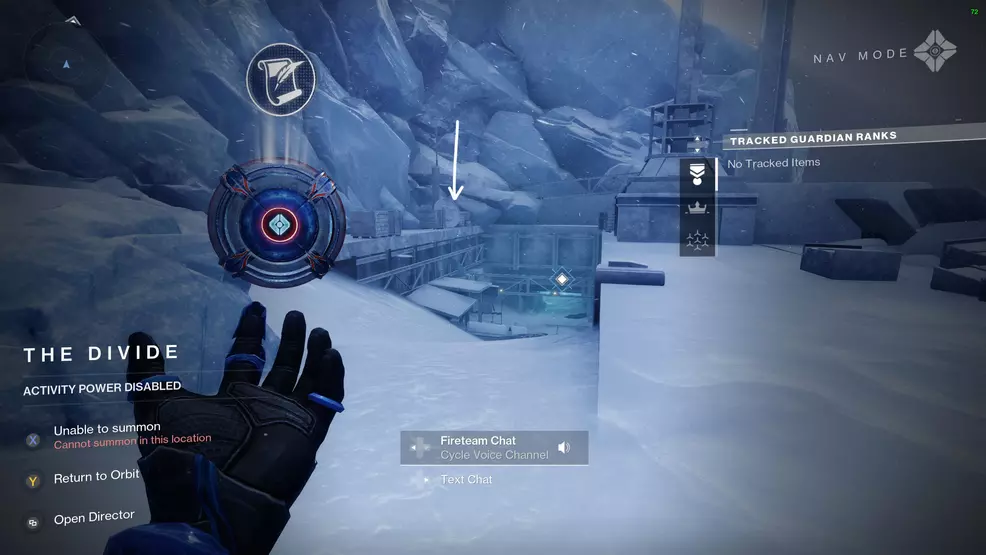
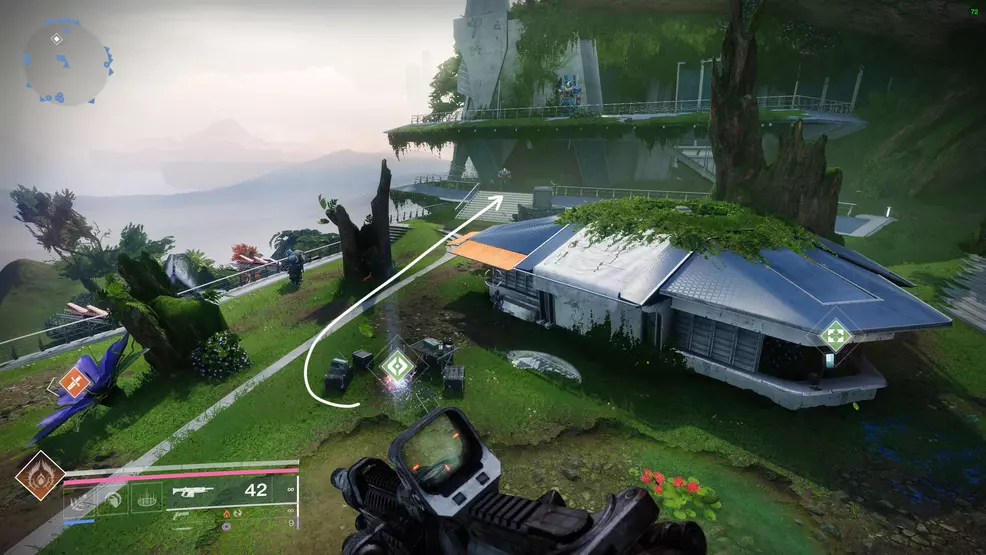
When you have all of the Lost Encryption Bits, it will transform into a Lost Encryption Code. This is used to unlock the chest that is in the Cosmodrome wall you would have traveled through as part of the campaign or to unlock one of the Prismatic Fragments. To find it, start at The Impasse and head toward The Divide. Go up the stairs and follow the path to find the golden chest on a crate.
Unlock the chest to claim the Legendary version of Khvostov 7G-0X. You’ll now need to collect 17 Motes of Light. You might have already gotten some as you explored and completed Overthrow activities.
Nine Motes of Light are available from the final Overthrow bosses. You can get one Mote of Light from each boss (there are nine bosses total, three for each region). What this means is you’ll need to completely charge an Overthrow activity in The Landing, The Blooming, and The Impasse at least three times. Here are the names of the bosses in each region:
- The Landing: Ir Okmarr, Mharuk, and Nolakh
- The Blooming: Kholon, Koftiks, and Voxelos
- The Impasse: Araaxen, Rhaska, and Rhuna
Once you have nine from the bosses, you can get the last eight Motes of Light from the Visions of the Traveler (or you can do it the other way around). The Visions of the Traveler look like little, model Traveler orbs and are hidden throughout The Pale Heart. Collecting them also unlocks the Visionary Triumph.
Vision 1
Source: Shacknews
Source: Shacknews
You’ve hopefully already got this one from the Slayer Cyst, but here it is again. The Slayer Cyst can be reached via The Blooming and the Vision of the Traveler is after the boss fight. Defeat the Ogre and look for the tree root that almost blocks access to a tunnel, in the next cave is another tree root and a hole in the wall. Jump up to the hole to find the Traveler orb.
Vision 2
Source: Shacknews
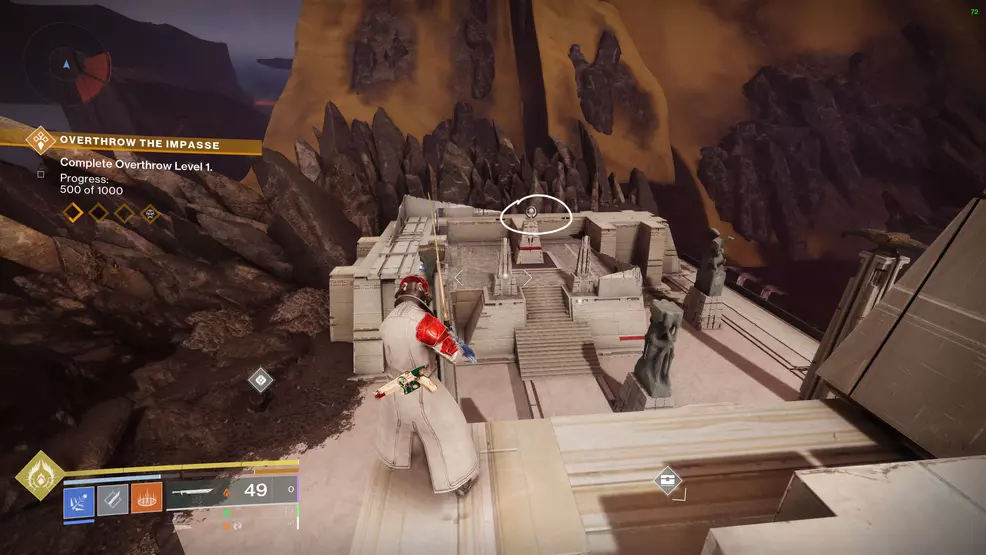
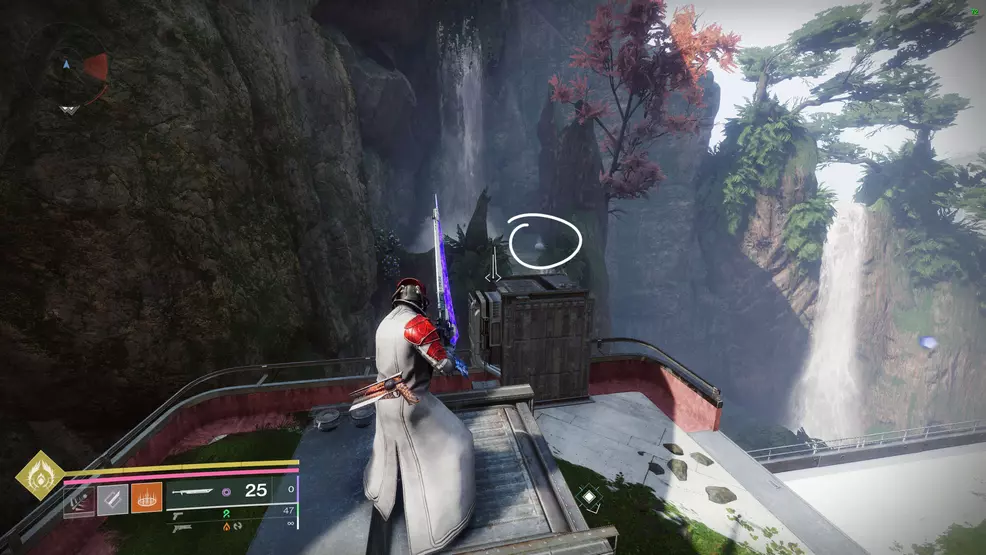
This Vision of the Traveler is in the Impasse at the top-right of the map. It’s in the ring shape on top of the white ziggurat structure.
Vision 3
Source: Shacknews
Source: Shacknews
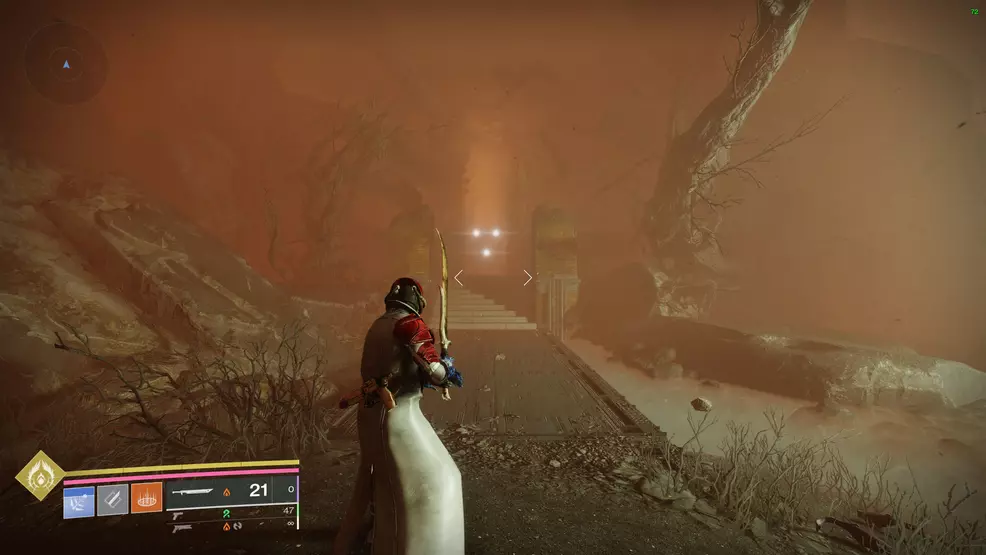
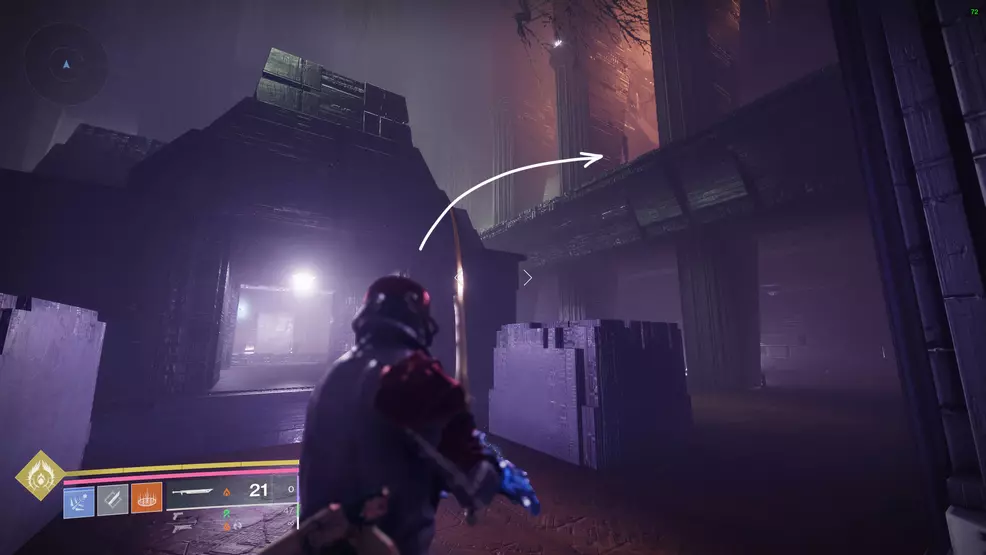
This Vision is found in The Transgression, in the corridors with the intense dust storm. Follow the main path through Transgression until you reach the inside room with the Ghost floating around a structure. Jump up to the balcony and go through a door on your right.
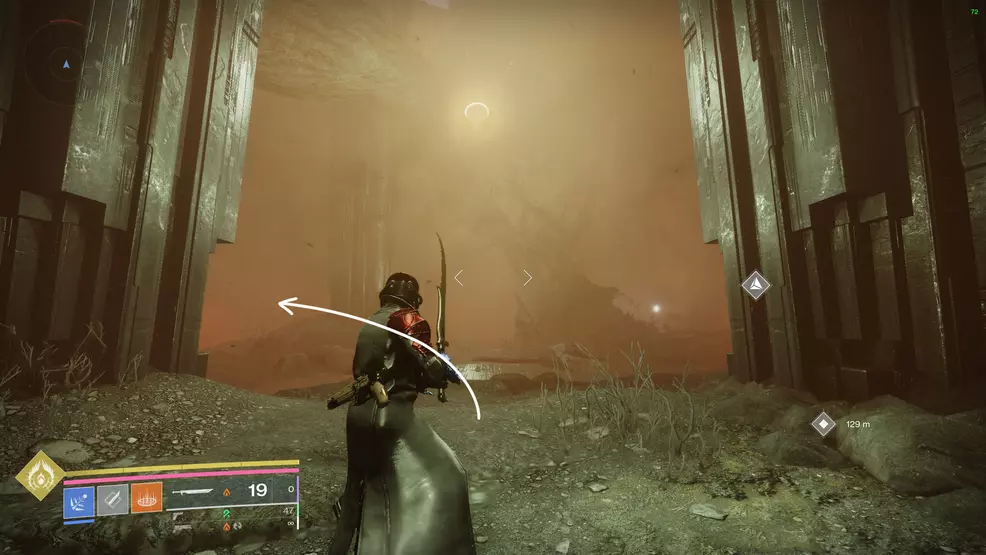
Source: Shacknews
You’ll be in another outdoor area with some dark, blocky structures on your left and right. Continue forward to see the adjacent area that has large pillars with a circular light hovering in the middle. Behind the pillar on the left is a red light and some trees. Behind the tree is the Traveler orb.
Vision 4
Source: Shacknews
At the top of The Divide on the mountain you climbed during The Ascent. When you reach the top you’ll find a building that leads back down into the mountain. Look behind the satellite dish on the left to find the Traveler orb. This is also where you can find a Prismatic chest containing a Fragment.
Vision 5
Source: Shacknews
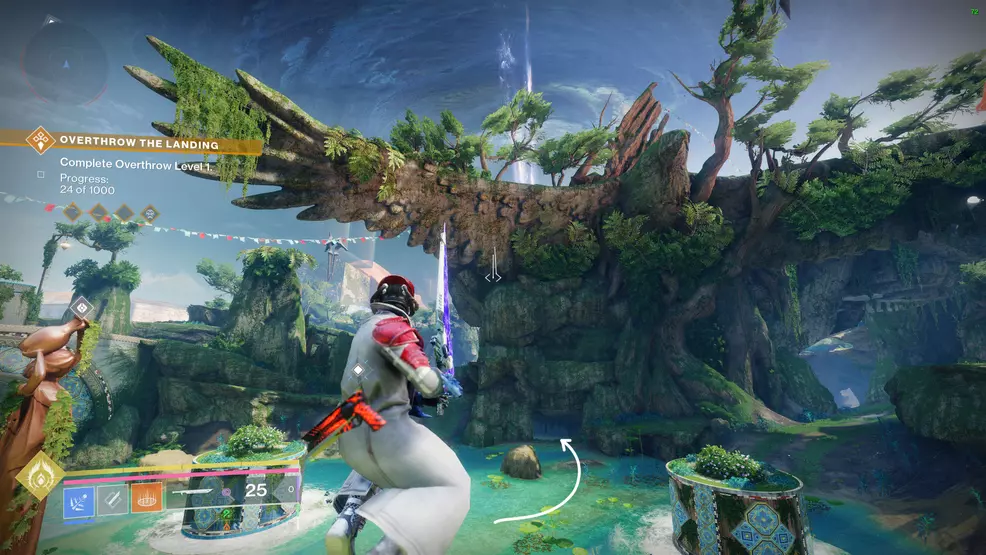
The Blooming has a Vision of the Traveler that is stuck up in a tree. Head toward the cave that leads to The Divide, on the right is a huge tree with the orb up high in its branches.
Vision 6
Source: Shacknews
Source: Shacknews
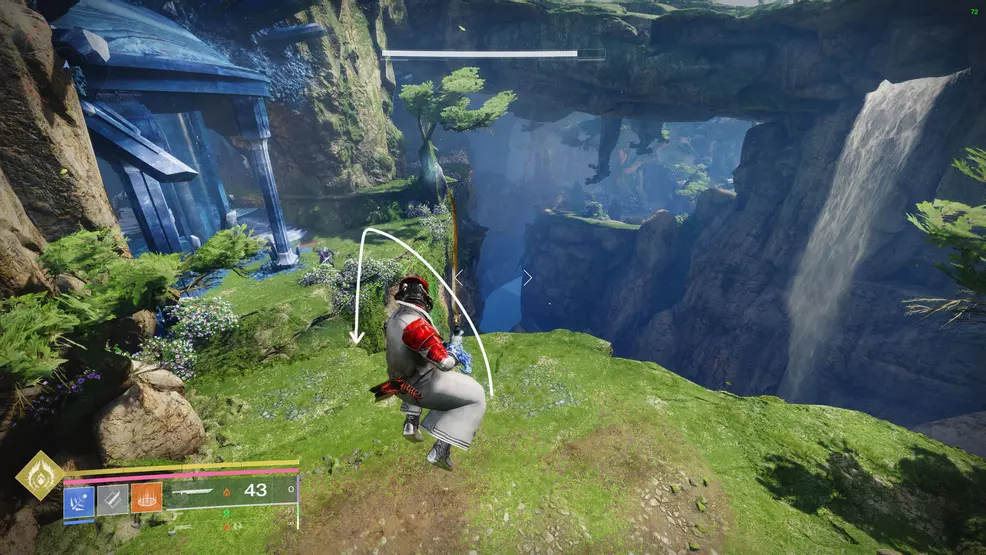
This Vision is located in The Refraction, in the outdoor area after you pass through the caverns. Start at The Landing and head toward The Refraction. Go through the winding corridors until you get to the outdoor area with a waterfall across from you and an Ogre in a temple-like area on your left. Look over the edge to spot some ledges below you that lead to the orb.
Vision 7
Source: Shacknews
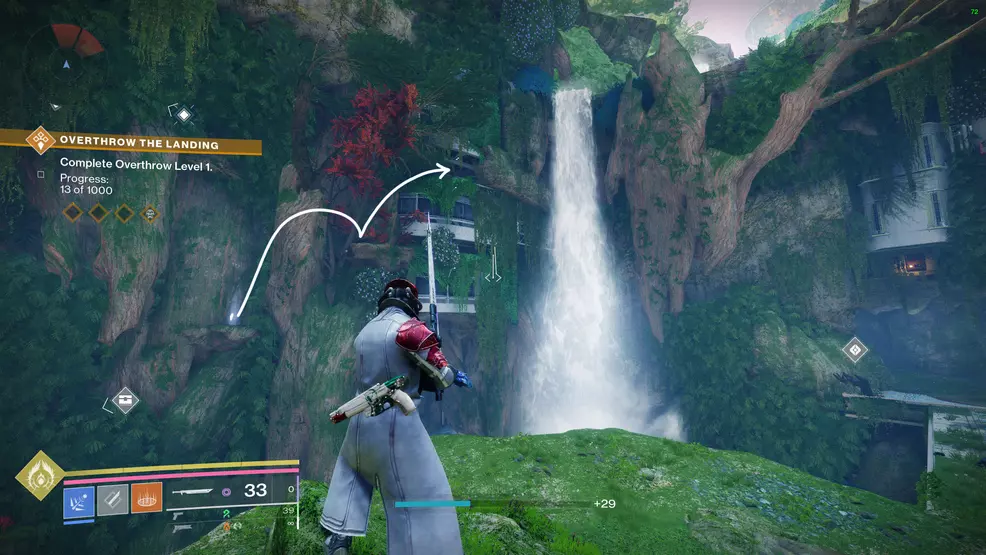
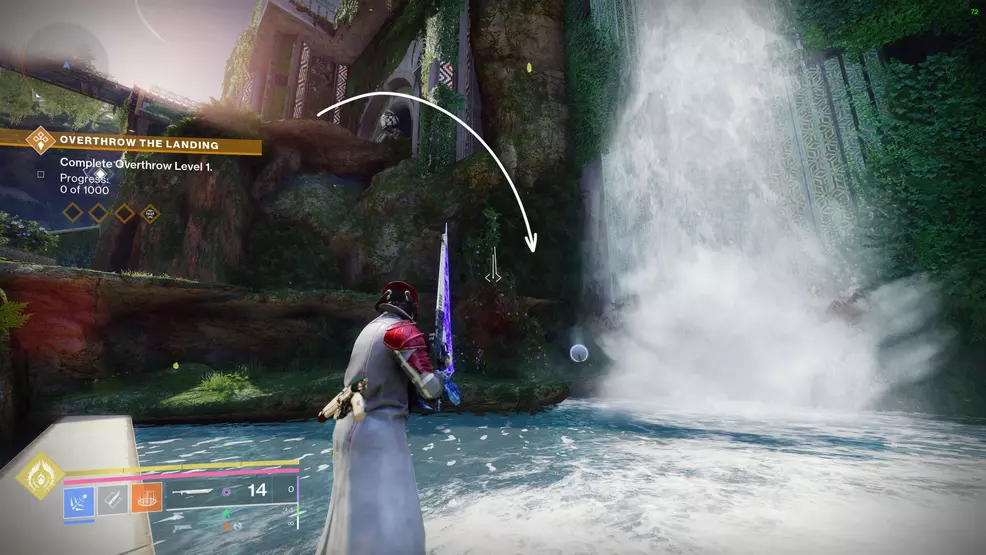
Probably the easiest one to find is in The Landing. Use the fast travel point and then immediately turn left to spot a waterfall. The Traveler orb is on the rocks at the base.
Vision 8
Source: Shacknews
Source: Shacknews
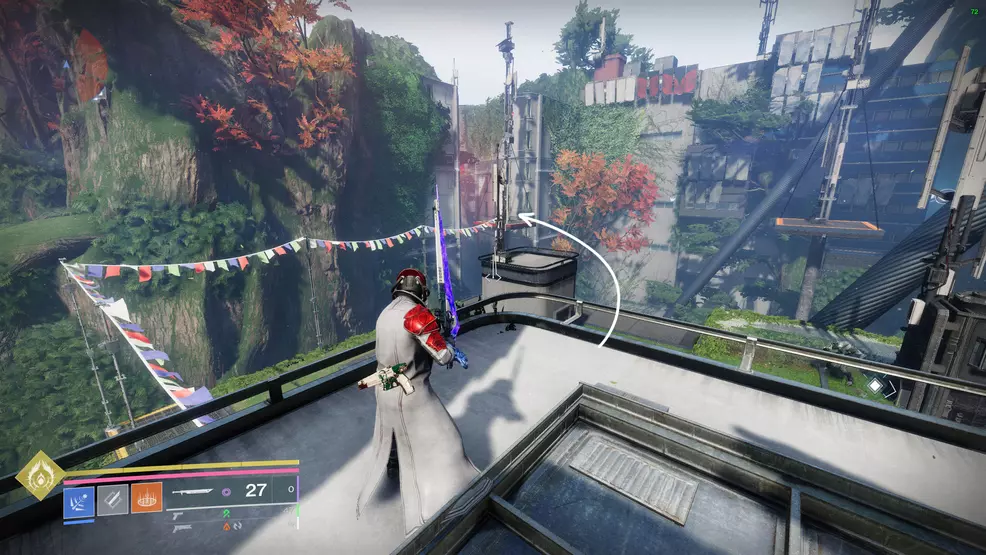
The final Vision is located out the back of the old Tower. Go to where Micah-10 is and drop down the tunnels until you reach the rooftop area. To your right will be two hanging platforms, jump to the one with the red markings and then through to the next area. Look for the waterfall at the far side, the orb will be right there.
Exotic Khvostov unlock location
Source: Shacknews
When you have all 17 Motes of Light, you can head to where Ghost is and then walk over to where the Speaker used to hang out in Destiny. Place each of the Visions of the Traveler on the pedestals to make the chest appear. You can now open the chest to claim the Exotic Khvostov 7G-0X. You might need to circle around the chest to get the button prompt.
Khvostov 7G-0X perks
Source: Shacknews
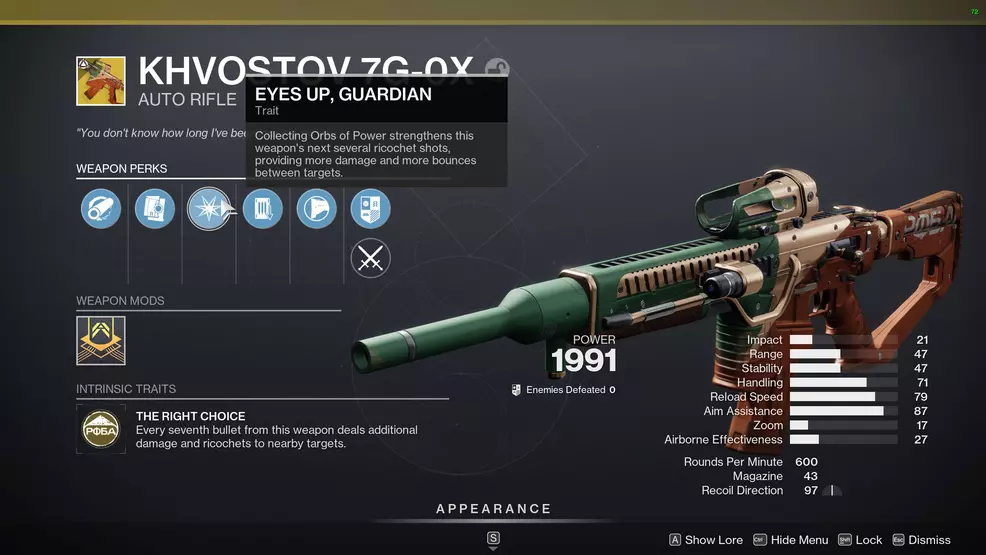
Khvostov 7G-0X might just be one of the best guns Bungie has released in Destiny 2. This thing does a terrific job at slicing through foes, helping it keep pace with some of the other top performers when it comes to add-clear.
- Shoot to Loot: Shooting an Orb of Power picks it up. Shooting an ammo brick picks it up and automatically reloads all of your equipped weapons from reserves.
- Eyes Up, Guardian: Collecting Orbs of Power strengthens this weapon’s next several ricochet shots, providing more damage and more bonuses between targets.
- The Right Choice: Every seventh bullet from this weapon deals additional damage and ricochets to nearby targets.
With Khvostov 7G-0X unlocked, you can finally get back to focusing on some of the other tasks at hand, like farming for weapon patterns, unlocking other Exotics, and getting new armor. Take a look at our Destiny 2 Strategy Guide for more help.

-
Shacknews

 reply
replySam Chandler posted a new article, How to get Khvostov 7G-0X - Destiny 2
