
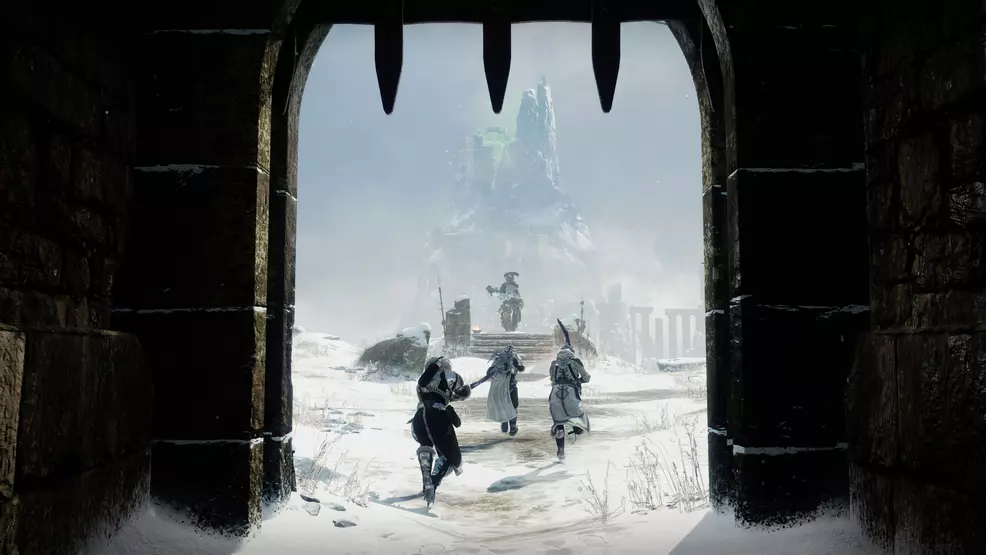
Warlord’s Ruin is the latest dungeon in Destiny 2 added with Season of the Wish. This dungeon launched on December 1, 2023 and took players to a castle high up in the mountains in the EDZ to deal with an Ahamkara threat. This Warlord’s Ruin guide will help you complete the dungeon and offers ideal weapon suggestions, boss DPS strategies, and more.
Warlord’s Ruin dungeon guide
Warlord’s Ruin consists of three boss fights, a prison puzzle, and a few jumping and navigation sections. Use the links to jump to the section you need:
- Rathil, First Broken Knight of Fikrul
- Prison puzzle
- Locus of Wailing Grief
- Hefnd’s Vengeance, Blighted Chimaera
Start Warlord’s Ruin
Before starting Warlord’s Ruin, you must visit Ikora in the Tower and collect the quest, In the Shadow of the Mountain. When you have the quest you will be able to launch the dungeon via the map of the EDZ.
Rathil, First Broken Knight of Fikrul
The first boss fight in Warlord’s Ruin is against Rathil, First Broken Knight of Fikrul. This boss fight introduces Taken totems which must be turned into Stasis totems before the Imminent Wish timer counts down. The more totems you change, the longer the damage phase.
- Clear enemies until you’re teleported into a cage
- Destroy three Acolyte eyes to open cage
- Stand in the radius of the Taken totems until it turns into a Stasis totem
- When Imminent Wish timer ends, deal damage to Rathil
- Repeat the process as many times as necessary
Source: Bungie
This first boss introduces a few different mechanics that will be repeated throughout the entire dungeon. The first mechanic is the Taken totems. Standing within the circle of the totem for several seconds will nullify the Taken element and turn it into a Stasis totem. Every Stasis totem you create will increase the Naeem’s Wish Empowerment buff, which is the damage phase timer.
The next mechanic is the Imminent Wish timer. When this timer ends, the damage phase will begin. You must nullify as many Taken totems as possible before the timer ends.
The last mechanic is the Acolyte Eyes. Shooting Acolyte Eyes will cause something to happen: opening a cage, spawning an enemy, preventing an enemy from moving etc.
To begin the fight, approach or shoot the boss and then clear enemies. When you are teleported into a cage, quickly look around your cage for Acolyte Eyes to shoot. They will be at various elevations. Destroy all three to unlock your cage. When playing with a group, it can be easier to shoot the Acolyte Eyes that are near your friend’s cages, that way you’re not spinning around yours trying to find them.
When you land on the ground, stand within the Taken totems’ circle until it turns into a Stasis totem. If the circles are close or overlap you can stand between them to nullify both at once.
While you are in the cage and then nullifying the totems, the Imminent Wish counter will be counting down. At zero seconds, you will be able to deal damage to the boss. The more totems you cleanse, the longer the damage phase. The damage phase timer is called Naeem’s Wish Empowerment.
As for dealing damage to Rathil, there are a lot of options. He’s got a crit spot that’s easy to hit, he’s on the ground so you can stand near him, and he doesn’t have a lot of health. You could use Sniper Rifles, Shotguns, even Swords to knock him down quickly.
After the fight, you will be teleported to a prison cell where you must solve a puzzle.
Prison puzzle
Source: Shacknews
There are six dials in the prison puzzle that spin when you shoot them. You must have some spinning clockwise and others spinning anti-clockwise. Look for the skeletons on the ground with the tally marks. The number of marks indicates the number of dials that must be spinning a certain direction. The white tally marks correspond to dials spinning clockwise.
As an example, if there are four white tally marks, four of the dials must be spinning clockwise, while the last two dials must turn anti-clockwise. Shoot the dials to start them spinning and shoot them again to stop. Shooting a third time will spin them the opposite direction.
Source: Shacknews
Once all of the dials are spinning in the correct direction, shoot the lock on the wall to open the cells. Grab your loot and then keep moving through the dungeon maze. This maze is straightforward, just follow the main path around, avoid the spike panels in the walls, and jump up through holes in the ceiling.
Locus of Wailing Grief
The second boss is called Locus of Wailing Grief and it keeps the mechanics from the previous fight but adds in Solar Charges. Four Solar Charges must be deposited in the braziers around the boss to begin a damage phase. During the encounter, go near the standards (flags on a pole) to remove the Biting Cold debuff.
- Shoot the Acolyte Eye to start the encounter
- Destroy all Acolyte Eyes to summon the Broken Knights
- Nullify the Taken totems the Broken Knights create (defeat them if you want)
- When the Imminent Wish timer ends, take the Solar Charges and deposit them in the braziers
- Repeat the above steps until all four braziers are alight
- Deal damage to the boss while standing near one brazier until it is extinguished and then go to another
- Repeat the whole process

Source: Bungie
For this boss fight, instead of the Taken totems adding to the damage phase timer, each Taken totem you nullify will create one Solar Charge. You must deposit four of these Solar Charges to begin a damage phase.
While you are defeating Broken Knights and clearing the Taken totems, a debuff called Biting Cold will be counting up to x10. You will die when it reaches x10 stacks. Around the edge of the wall are standards that rapidly remove the debuff when you go near them.
Begin the fight by shooting the Acolyte Eye, this will summon the Locus of Wailing Grief. Defeat enemies and then destroy the new wave of Acolyte Eyes to summon the Broken Knights. Defeat the Broken Knights if you want to, but the main thing you need to do is stand near the Taken totems to turn them into Stasis totems.
Every Stasis totem you create will generate one Solar Charge when the Imminent Wish counter reaches zero. You must then deposit a Solar Charge at each of the four braziers around the boss. Repeat the process until all four braziers are alight.
When the fourth brazier is ignited, the damage phase will begin. You can only deal damage to the boss when standing around a brazier as this will give the Naeem’s Wish Empowerment buff. When the buff ends, move to a new brazier to continue the damage. When all four braziers are used, fall back to the starting position and repeat the process.
In terms of boss DPS against the Locus of Wailing Grief, the current meta damage-dealer is a Strand Titan. Aztecross has a strong Strand Titan build that features Banner of War, Synthoceps, a One-Two Punch Shotgun, and Tractor Cannon. However, for most Fireteams, the best option when it comes to damage will be Dragon’s Breath, Legendary Rocket Launchers (like Apex Predator), and even Sniper Rifles (like The Supremacy).
Finally, do not forget about the Biting Cold debuff. This will be constantly ticking when the Imminent Wish counter is going. Fall back to the edge of the wall and go near the standards (flags on a spear) to warm yourself and remove the debuff.
When this encounter is done, you’ll just need to get through a couple more jumping puzzles before the last boss.
Hefnd’s Vengeance, Blighted Chimaera
The final boss in Warlord’s Ruin is against Hefnd’s Vengeance, Blighted Chimaera. This fight keeps the Taken totems but introduces a “tag” mechanic. You’ll fight around the outside of the arena while dealing damage, and then do a proper damage phase at the top before repeating the process. Destroying the boss’ Acolyte Eyes extends the damage phase.
- Destroy the Taken Blight to start the fight
- Destroy the Acolyte Eyes around the boss to spawn the Broken Knights that summon the Taken totems
- Stand near the Taken totems to turn them into Stasis totems
- Melee Corrupted Hex-Drinkers to give them Hex of Vengeful Corruption (don't let them tag you back)
- When the Imminent Wish expires, deal damage to the boss
- Repeat the process or jump up to the next area (anti-clockwise) and do the steps again
- At the top of the arena, stand on one island and deal damage to the boss
- Jump to another island when the boss moves location and continue the damage phase
- Repeat all the steps until the boss reaches the last chunk of health
- Keep damaging the boss until it dies – there is no time limit

Source: Bungie
The fight against the Blighted Chimaera takes place on fracture land masses that spiral up into the sky. You must deal enough damage to the boss at each major island to push it to the next one. After dealing damage three times, it will reach the top and you will have a larger damage phase spread out across three small sections of land. During this final section, destroying the boss’ Acolyte Eyes will extend the damage duration.
Begin the fight by destroying the Taken Blight. At this point, the boss will summon Acolyte Eyes and Taken Blights. The blights will poison the ground, but you can destroy them to cleanse the area. Destroying the Acolyte Eyes will summon the Broken Knights, which in turn summon the Taken totems.
Stand near the Taken totems until they turn into Stasis totems. More Stasis totems means a longer duration of the Naeem’s Wish Empowerment buff (damage phase buff). While this is happening, you will receive a 17 second debuff called Hex of Vengeful Corruption that will kill you when it reaches zero. Melee a Corrupted Hex-Drinker to give it the deubff – it will try to melee you to give it back.
When the damage phase begins, unleash enough damage on the boss to knock it down to the threshold on its health bar. If you don’t reach this mark, the boss will not move to the next section of the mountain and you must repeat the steps. When it does move, jump up to the next section and repeat the process. You will have three of these island damage phases before you reach the top of the mountain – which is where the real damage phase begins.
At the top of the mountain is a ring of three islands. Like the previous boss fight’s braziers, once you stand on an island, it is considered “used”, even if the boss isn’t facing that island. Coordinate with your team so you all go to the right area.
Stand on a section of the land and start dealing damage to the boss. During this, the boss will be summoning Acolyte Eyes – if all of the Acolyte Eyes are up at once, the boss will go immune and move to another section. The trick is to try and destroy any Acolyte Eyes to essentially increase the duration of time you can stand in one spot.
When the boss moves, jump around to another piece of the island and keep damaging it and destroying the eyes. After all three land masses are used, you will be teleported to the bottom to do the whole process again. This will continue until the boss’ health hits that last, small segment – this is the final stand.
The final stand portion is different to a raid boss’ final stand: there is no time limit. You will be teleported to the top of the floating islands and will have as long as you need to defeat the boss. Unlike before, defeating the Acolyte Eyes doesn’t do anything special, it just cuts down on the number of things shooting you.
In terms of DPS, because the boss is floating at a distance you want to avoid using things like Shotguns or anything that relies on melees. During Season of the Wish, Rocket Launchers are performing extremely well, especially Apex Predator, as well as Sniper Rifles like The Supremacy. Consider using Sunshot to help deal with enemies and to efficiently take out the Acolyte Eyes.
Once Hefnd’s Vengeance, Blighted Chimaera is defeated, a chest will pop up right in front of you. Remember to grab the Ahamkara bone from beside the chest. This is one of the 10 Ahamkara bones you need to unlock one of the dungeon Title Triumphs. Take a look at our Destiny 2 Strategy Guide for more dungeon and raid help.

-
Shacknews

 reply
replySam Chandler posted a new article, Warlord's Ruin guide - Destiny 2
