
Vault Puzzle solutions for Vaulted Obstacles Triumph - Destiny 2
How to complete all three Vault Puzzles in Zero Hour for the Vaulted Obstacles Triumph for the Vimana Junker ship in Destiny 2.
Vaulted Obstacles is one of the many Triumphs players can unlock during Into the Light. This Triumph tasks players with solving three Vault Puzzles in Zero Hour. Completing each of these will unlock one additional level of The Corruption Spreads for Outbreak Perfected in Destiny 2, not to be confused with the bonus perks or the Exotic catalyst. It will also grant access to the Vimana Junker ship schematic.
Note: You must use Outbreak Perfected to shoot the symbols.
Vault Puzzle 1
Source: Shacknews
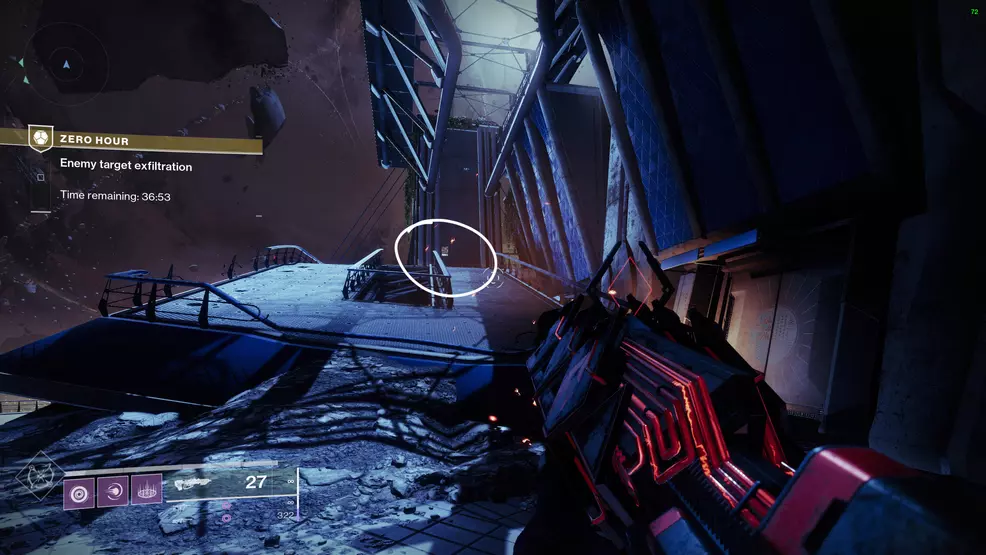
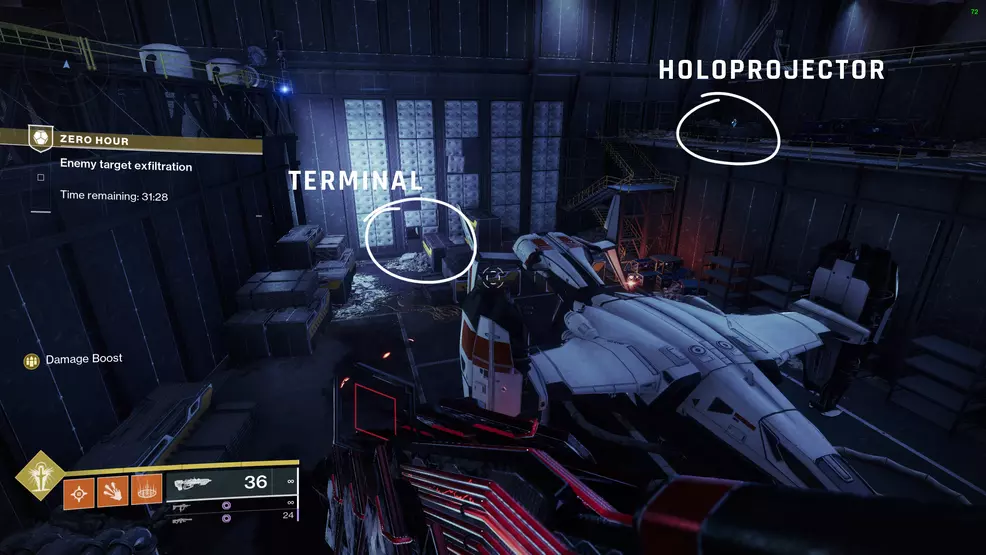
Vault Puzzle 1 is started in the second area where to fight a Brig, Shanks, and Vandals. Clear out the enemies and then go above the debris where you entered. Activate the panel on the wall to get a buff called Temporary Clearance Granted – you have 30 seconds to shoot the symbols in the correct order.
Source: Shacknews
Source: Shacknews
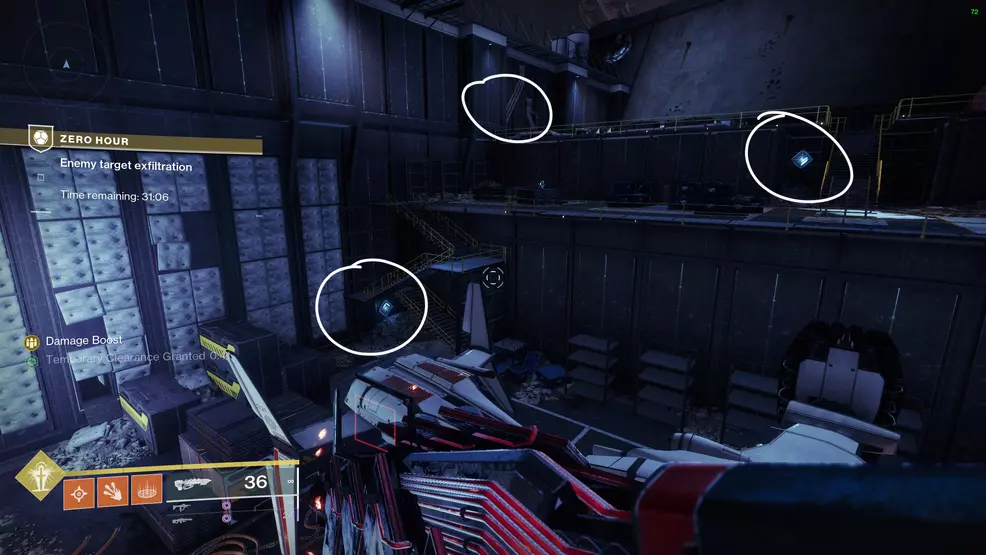
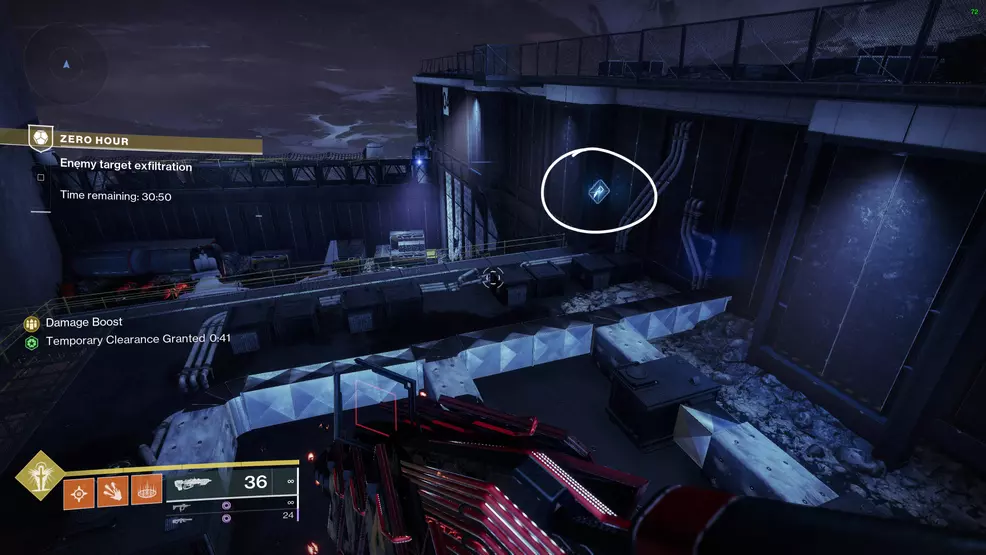
The symbols are all located in the same spot, but the order will be different each time. You can refer to the panel to see what to shoot next or a small holoprojector found near the exit ramp. You’re basically building the SIVA symbol. The symbols can be found:
- Attached to the side of the wing near the stairs
- On the kiosk where Tess was
- Near the exit ramp to the next area
Source: Shacknews
Fight through the level until you get the Cryptarch Vault. This is where the real Vault Puzzle begins.
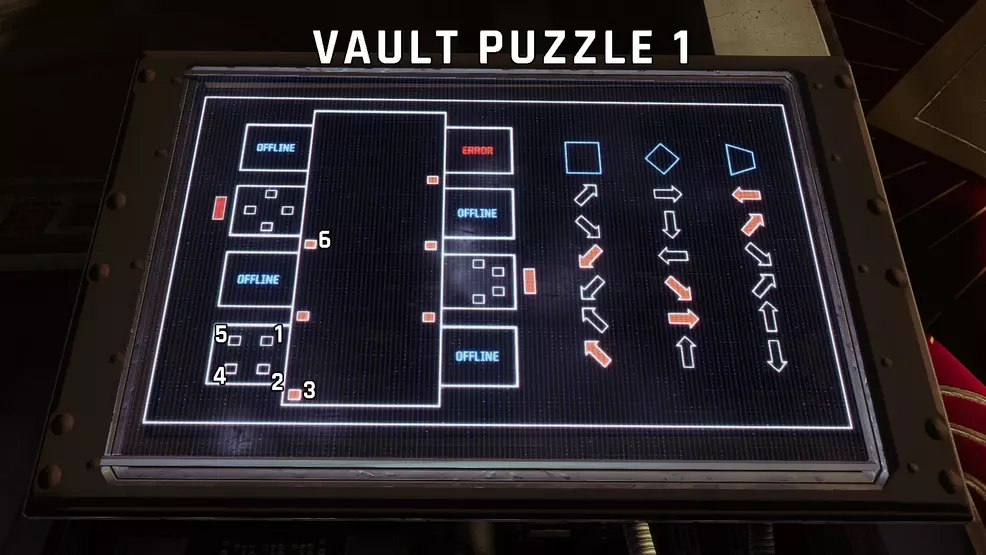
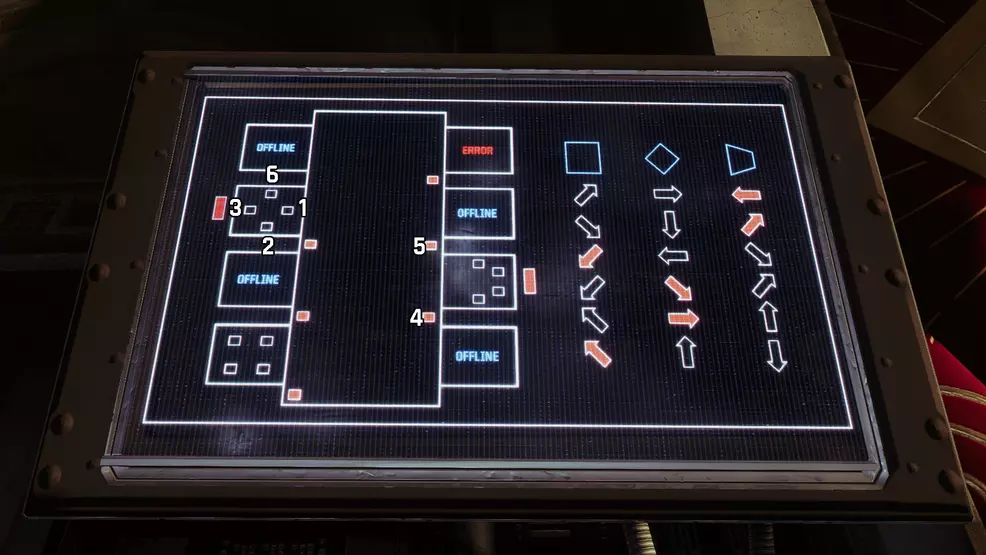
Go to the left of the Vault and look at the television. The left side of the screen has a layout of the vault and the right side has three shapes with a series of arrows below them. The shapes correspond to the layout of the terminals on the walls inside those rooms (note that the lower left room looks like a square, the top left room looks like a diamond etc).
Source: Shacknews
The arrows below a shape show the order the panels must be activated. A black arrow is for a terminal inside the room and an orange arrow is for a terminal in the main vault (the orange squares you can see on the layout).
For Vault Puzzle 1, read from the top to the bottom. So it would be: Activate the top right terminal in the room, activate the lower right terminal in the room, activate the lower left terminal in the hallway, lower left terminal in the room, upper left terminal in the room, and upper left terminal in the hallway.
Once the last panel is activated, you will get The Corruption Spreads 2 and part of the Vimana Junker schematic.
Vault Puzzle 2
Source: Shacknews
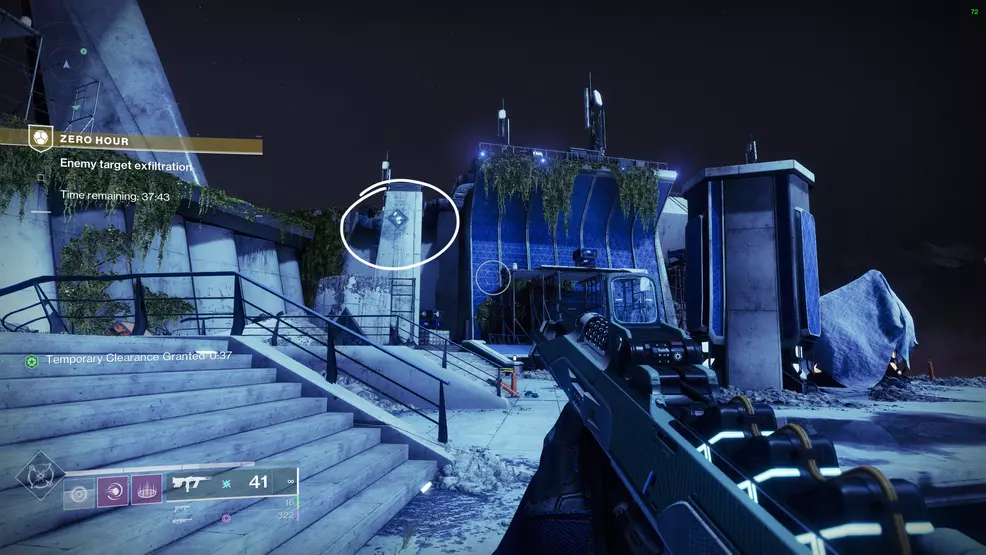
Vault Puzzle 2 starts in the landing pad with the plane. Instead of going under the nose of the plane (or through the vent), look behind the vehicle to find a new vent. Activate the terminal inside to get the Temporary Clearance Granted buff. You have about 40 seconds to find and shoot the symbols in the correct order using Outbreak Perfected.
The symbols can be found in the following spots. The order you must destroy them depends on the image on the terminal or the holoprojector on the upper level. You are basically building the symbol, adding segments to it that match the projector:
- Beneath the stairs on the same level as the plane
- On the middle level, beside the stairs
- On the upper level, attached to the wall
Source: Shacknews
Source: Shacknews
As you approach the terminal, take note of the portion of the symbol – that will be the first one you must shoot. Once you shoot one, look at the holoprojector to see which part of the symbol appears next and then shoot the symbol that best matches that configuration. If you entered it correctly, you will get a “Sequence accepted” message in the feed.
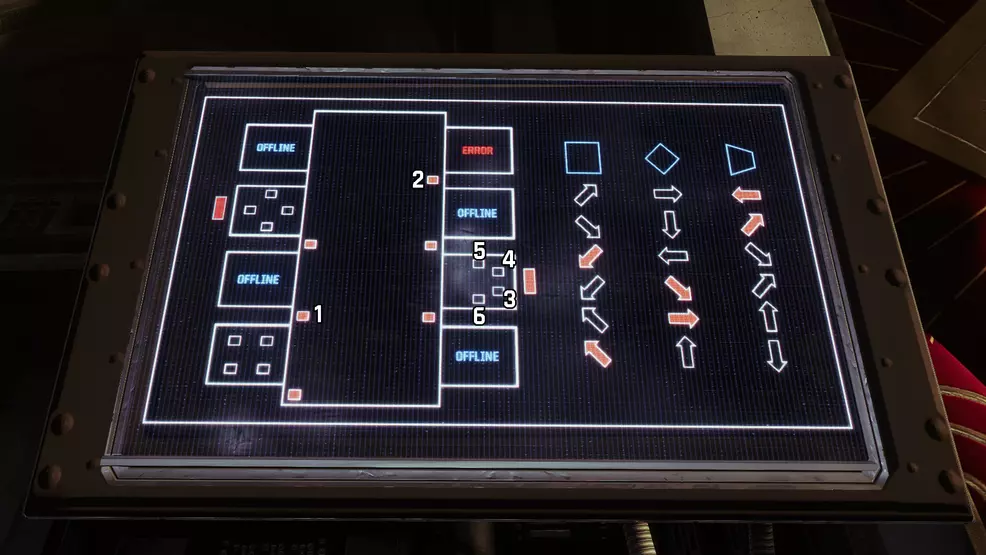
Continue through the mission until you get to the vault room. As with the first puzzle, you must decipher the television screen. The room without the red bar next to it is the one that is active. For Vault Puzzle 2, you want the upper room on the left where the terminals are laid out in a diamond shape.
Source: Shacknews
You must now activate the terminals in the order matching the arrows that are beneath the diamond on the right-side of the television. So the input would be: Activate the right terminal in the room, activate the lower terminal in the room, activate left terminal in the room (this one is up higher), activate the lower-right terminal in the hallway, activate the middle terminal in the hallway, and activate the upper terminal in the room. If done correctly, you will receive The Corruption Spreads 3 and another piece of the Vimana Junker Schematic.
Vault Puzzle 3
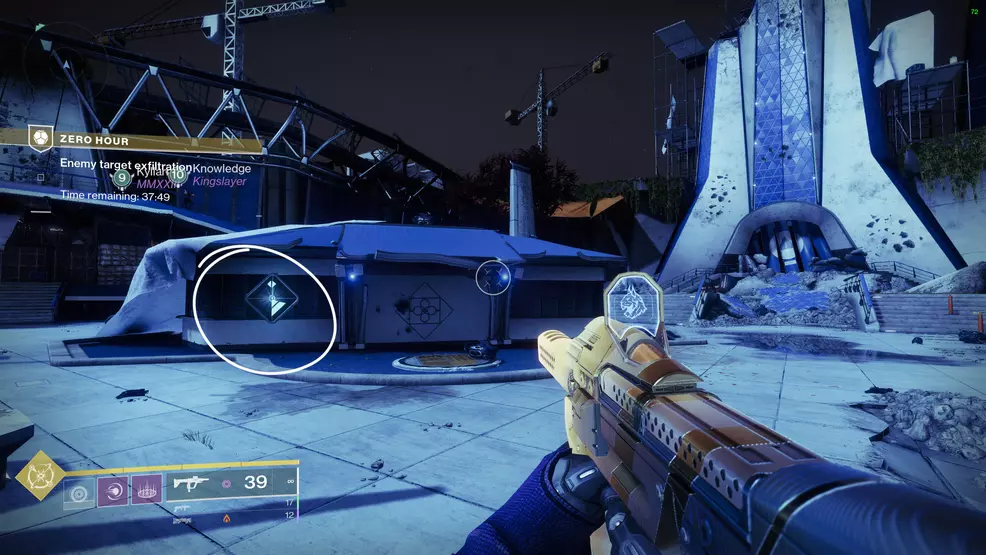
Vault Puzzle 3 starts in the hallways where TR3-VR roams around. All of the switches are along the left side of his area.
- In the left corner of the main path
- In the left corner of the first switch path on the left
- On the wall in the middle chasm
Source: Shacknews
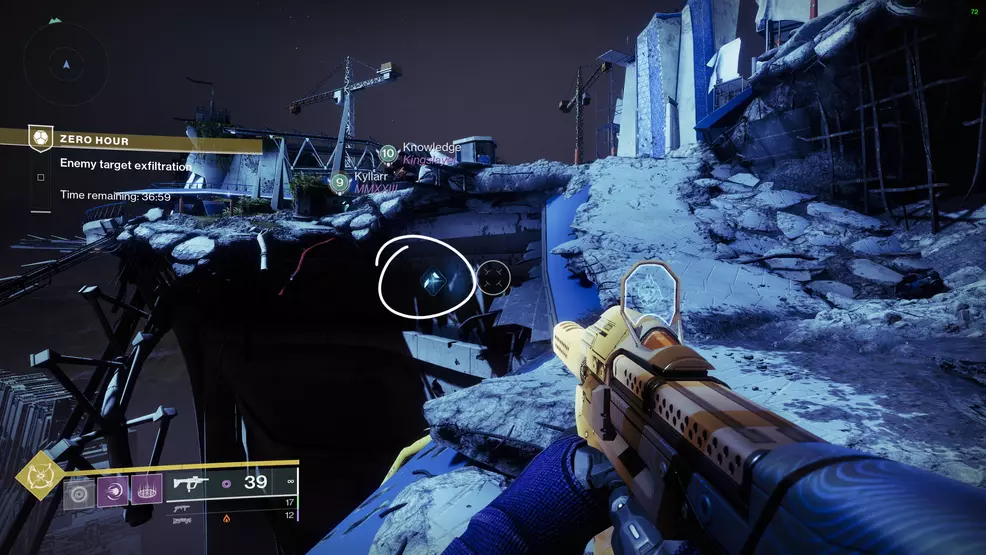
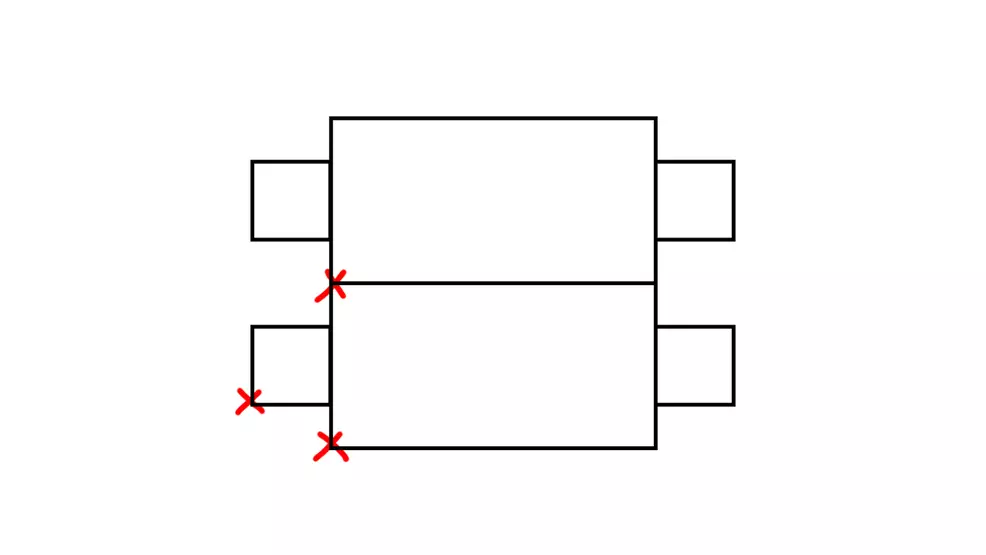
Here’s a quick look at the layout of the room. The red crosses are where you will find the symbols. Remember that the order will be different each run, so check the holoprojector along the left path to see which one you need to shoot. Once the symbols are activated in the correct order, continue on until you get to the cryptarch vault.
Source: Shacknews
Activate the symbols following the order shown in the image above. So that would be: Activate the middle terminal in the main hallway, activate the top right terminal in the main hallway, activate the lower right terminal in the room, activate the upper right terminal in the room, activate top terminal in the room, activate the bottom terminal in the room. If you entered it correctly, you will receive The Corruption Spreads 4 and the last bit of the Vimana Junker Schematic.
The Vaulted Obstacles Triumph can be a bit confusing at first, especially with the Vault Puzzle room. However, once you know how to read it the first time, all subsequent Vault Puzzles will be simple to complete. Take a look at our Outbreak Refined quest guide for info on how to unlock the additional perks and our Exotic catalyst guide for info on how to acquire its Exotic catalyst. As always, find more tips and guidance on our Destiny 2 Strategy Guide.

-
Shacknews

 reply
replySam Chandler posted a new article, Vault Puzzle solutions for Vaulted Obstacles Triumph - Destiny 2
