
PC graphics settings guide - Halo Infinite
Microsoft and 343 Industries have released the multiplayer portion of the next Halo game early. Here's what you need to know to get the best possible performance from your PC.
This has been a big week for the Xbox brand and the Halo franchise. It marked the 20th anniversary of the original Halo: Combat Evolved release for the Xbox console back in 2001 and the birth of the Xbox ecosystem. To help celebrate the occasion, Microsoft and the team at 343 Industries gave series fans a big surprise by opting to launch the multiplayer portion of Halo Infinite nearly a month ahead of the game’s scheduled December release date. Available for the Xbox One, Xbox One X, Xbox Series S, Xbox Series X, and PC, Halo Infinite marks the widest release for a Halo game in history and Microsoft is banking on its success.
The PC version of Halo Infinite Multiplayer is available through the Windows Store, Xbox Game Pass, and Steam. All versions of the game use the Xbox Live network for communications and matchmaking. The team at 343 Industries has been hard at work over the last few years building a new Halo for PC players from scratch using knowledge gleaned from their work on the Master Chief Collection port. Infinite features all the features and customization options one would expect from an exemplary PC port, including a wide range of graphics settings that allow players to dial in that perfect balance between visual fidelity and performance.
Disclaimer: Halo Infinite is a complex game. It is impossible to definitively test all scenarios, especially in online environments, so the performance and settings recommendations contained within this guide are based on our own findings. All systems vary and the game may perform better or worse depending on your exact hardware configuration. Use these recommendations as a starting point for your graphical experimentation rather than a definitive authority.
Halo Infinite PC graphics settings guide

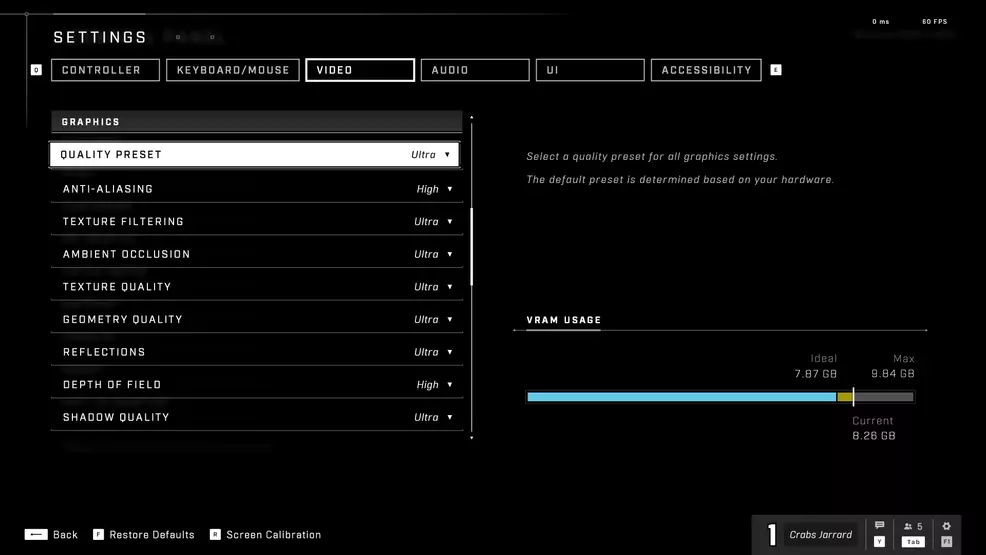
The graphics settings menus in Halo Infinite can be accessed from the main menu by pressing F1 and then selecting ‘Settings’ and then the ‘Video’ tab. Some additional graphical options such as Chromatic Aberration, Bloom, and Parallax Occlusion Mapping, are accessible via the ‘UI’ tab within the main settings menu. The menu can also be accessed during gameplay by pressing Escape. The Halo Infinite engine appears to support instant graphics settings alterations (excluding Texture and Effects Quality) so you can monitor the visual and performance impact of your settings changes in real-time. For easy frame rate monitoring, you can also enable a basic fps counter within the game’s ‘UI’ settings menu.
Display Section
Field of View - This option allows players to define their desired Field of View setting for the first-person cameras. Halo Infinite uses a horizontal FoV scale. Lower values provide a smaller viewport into the game with the potential for slightly better performance. Higher values reveal more objects on screen, particularly from the widest edges. Players who have issues with motion sickness should try adjusting this setting first.
Borderless Fullscreen - The toggle determines whether Halo Infinite runs in a normal window or a borderless fullscreen window. The game does not support exclusive fullscreen operation.
Resolution Scale - This slider determines the game engine’s internal resolution rendering scale. When set to 100%, the game is rendered at the full quality of your current desktop screen resolution. This setting can be lowered to pick up extra performance at the cost of overall sharpness and clarity. Players on 4K displays should be able to set this slider to the 85% mark (roughly 3200x1800 resolution) to pick up a 5-10% performance boost with no material difference in visual quality.
Minimum Frame Rate - This setting tells the game engine the minimum fps target you have for gameplay. The engine will then dynamically adjust the internal rendering resolution in an attempt to maintain the value set with this option.
Maximum Frame Rate - This setting will place a hard cap on how many frames per second the game engine will render. In most situations, you’ll want this value to match the refresh rate of your monitor or display, even if your PC has enough headroom to run the game faster. Using a hard cap with additional processing headroom often results in the smoothest possible frame times.
V-Sync - This option determines if the game engine will sync every frame before outputting to your display. This will eliminate any screen tearing issues you may have at the cost of some input lag. Players using displays with variable refresh rate technology (G-Sync or Freesync) should leave this option disabled.
Limit Inactive Frame Rate - This toggle determines if the engine will limit rendering frames when the game client is no longer in focus on your PC. Enabling this option could potentially save some energy if you often leave the game running in the background for extended periods of time.
Graphics Section

Quality Preset - This toggle offers the simplest way to adjust graphical settings. Four total presets are offered here, with Low offering the best possible performance with the lowest visual quality while Ultra offers the best visual quality at the cost of performance. In my limited testing at native 4K resolution, swapping between the Ultra and Low presets can offer as much as a 40% performance boost while in a full server. Unless your PC falls on the weaker side of the Infinite system requirements, we recommend using the Medium preset for a nice mix of quality and performance.
Anti-Aliasing - This toggle determines the overall quality of the temporal anti-aliasing solution in Halo Infinite. Anti-aliasing works to remove jagged edges from intersecting polygons and the temporal solution in Infinite can also alleviate shimmering artifacts in things like leaves, powerlines, or other smaller or near-transparent objects. We suggest leaving this on High unless you have a weaker GPU.
Anisotropic Filtering - This setting adjusts the quality level of anisotropic filtering. In most games, textures on flat planes near the camera can lose details when viewed at an angle. Anisotropic filtering can resolve finer detail in such textures, offering a cleaner overall picture. Unless you are running at 4K with less than enthusiast-class equipment, we recommend leaving this on High or Ultra.
Ambient Occlusion - This setting enables the use of screen-space ambient occlusion and its various quality levels. Ambient occlusion adds dark shading and some shadows to places within the game environment where two planes or objects intersect. This helps to make items look like they are a part of the world rather than flat videogame objects littered about. We recommend using the High or Ultra setting for most PCs.
Texture Quality - This toggle determines the quality level of in-game textures. The lowest option uses the least amount of VRAM, but the textures will be more blurry. The Ultra setting has the best-possible sharpness (but also requires the installation of the Multiplayer High-Res Texture Pack DLC) at the cost of the highest VRAM usage. We recommend the High setting for most players. Those who want to play at native 4K with Ultra Quality textures should use a GPU with more than 8GB of VRAM available. The performance cost of this setting is mostly tied to available VRAM. If you have some to spare, you might as well crank things up for the best image quality. The Video settings menu features a helpful VRAM allocation bar to show you how much memory your current graphics settings are estimated to use.
Geometry Quality - This setting controls the global level of detail for in-game objects like rocks, trees, and weapons. It also determines the distance at which higher-quality assets are rendered near players. Higher quality settings mean higher polygon counts and less pop-in. While you can save a frame or two by dropping this setting, most powerful PCs will have no issues with the Ultra option.
Reflections - This toggle determines the quality level or screen-space and cube map reflections within the game environment. This includes things like puddles of water and polished floors, but also extends to specular highlights on items like guns or other metallics. Reflections can be disabled outright, but we think it comes at too big of a hit to the visual quality. Try the Low or Medium setting for the best mix of visuals and performance. As this is one of the most taxing individual options in the game, we only recommend High and Ultra options for those with enthusiast-class GPUs.
Depth of Field - Players can choose to enable or disable the blurring of in-game objects or environments when they fall out of focus. This can occur during cutscenes or when aiming down weapon sights. Higher settings improve the quality of the bokeh depth of field simulation. The performance hit for this option is decidedly low. Using it comes down to personal preference.
Shadow Quality - This setting determines multiple parameters surrounding in-game shadows. The Low setting offers the best possible performance, but removes nearly all shadows from the game world, greatly affecting image quality. The Medium setting is the best bang for your processing buck here. Higher levels offer sharper shadows, better filtering, shadow cast distance, and the total number of shadows cast in a scene. Opting for the Ultra setting also adds soft shadows, but it comes with a hefty performance hit. We only recommend this setting for enthusiast-class GPUs.
Lighting Quality - This toggle regulates the game engine’s use of light sources and how they cast shadows. At higher quality settings, this toggle can push out the maximum distance at which light sources will render, along with how many shadows they can cast on a scene. While it is not quite as performance intensive as the Shadow Quality toggle, we still recommend using Medium or High for all but the best PC hardware.
Volumetric Fog Quality - This option determines the resolution and depth of volumetrics at intermediate ranges. Higher settings mean that fog will have fewer rendering artifacts at its edges or where it intersects static objects in the game world.
Cloud Quality - This toggle allows players to specify the shading quality and resolution of the volumetric clouds in-game. If you couldn’t imagine playing next-gen Halo without the most fluffy, accurately lit clouds around, then you’ll want to set this one to Ultra. Most everyone else can live with the Medium or High setting to pick up a spare frame or two.
Dynamic Wind Quality - According to the in-game tooltip, this setting controls the quality of wind simulation and its effects on the game world. Presumably, this would only affect the CPU, but I didn’t notice any real difference in performance when playing with this toggle. Perhaps this setting will come into play more for the Halo Infinite campaign and its highly-touted dynamic weather and time-of-day systems.
Ground Cover Quality - This setting governs the rendering quality for things like bushes, grass, and smaller rocks. Higher quality settings will also increase the density of these objects. On high-end PCs, we recommend using Ambient Occlusion and Parallax Mapping in conjunction with the Ultra quality setting for Ground Cover for the best possible image quality.
Effects Quality - This toggle governs the quality levels of things like explosions, dynamic lights, and similar effects. Lower settings will cut down on the maximum number of on-screen effects and can help improve your framerate. As with most of these settings, the Medium option probably offers the best mix of visuals and performance.
Decal Quality - This setting determines the quality level or dynamic decals in the game world (think explosion scorch marks, bullet holes, tire tracks). Higher quality levels increase the maximum possible decals that can be rendered on-screen at once. This option has a negligible performance impact.
Animation Quality - This setting offers two options, Auto and Max. This toggle determines the quality of animations from other players and NPCs. To help save some impact on your CPU, the Auto setting can dynamically lower the frame rate or speed of non-player animations. Using the Max option forces the highest-quality animations in all situations. How this option affects your final performance comes down to the quality of your CPU.
Terrain Quality - This option regulates the rendering complexity of the bigger parts of the environment such as boulders, distant mountains, trees, and structures. Lower settings will use less polygon for models while the highest settings offer the best models and the least amount of LOD pop-in.
Simulation Quality - This toggle governs the complexity of various game systems, including how detailed the calculations for vehicle suspension and audio are. Like the Animation Quality option, your PC’s CPU will be the biggest determining factor in performance between the settings available here.
Flocking Quality - Yes, 343 Industries have included the first-ever (to my knowledge) bird quality toggle in PC gaming history. This governs the simulation quality of flying bird flocks or even those yardbirds seen hanging out near your team’s spawn. This doesn't seem to have any appreciable impact on performance, so go nuts here. You didn’t spend $2700 on a $800 GPU this year to not have the best bird physics.
Async Compute - This allows users to enable parallel computing instructions to be sent to GPUs that support such tasks. It can offer a slight performance boost to compatible PCs.
Sensory Section
Blur - This slider allows for fine-tuning of the game engine’s radial motion blur. This effect is applied to rapid camera movements, cutscenes, or when sprinting. This setting comes down to user preference on motion blur. As Halo Infinite has pretty high-quality motion blur effects, we recommend playing with this option enabled. This setting has no effect on object-based motion blur (such as a vehicle or object moving across your field of view quickly).
Screen Shake - This slider determines how intense the full-screen shake effects are shown when players come under fire or find themselves near exploding grenades. Another personal preference, this can be enabled or disabled with no performance hit.
Exposure - This setting controls the simulation of exposure effects on the game’s camera. Higher values will make highlights such as flashes or explosions more intense and have more dynamic range.
Full Screen Effects - This slider controls the opacity of full-screen effects such as shield recharge, vignetting in cutscenes, and more. I noticed no measurable performance impact.
Speed Lines - This toggle enables or disables the white lines in the corner of your screen when sprinting.
Sharpening - This slider allows players to fine-tune the amount post-process sharpening is applied to the final image. Halo Infinite uses temporal anti-aliasing, which is known to combat shimmering and aliasing at the cost of slightly blurring the overall image. This slider can help to regain some of the original crispness of the image without sacrificing anti-aliasing.
UI Visual Effects Section (found under UI tab in Settings)
Chromatic Aberration - This toggle enables or disables the use of chromatic aberration effects on the in-game UI. Chromatic aberration attempts to simulate camera lens distortion by altering colors on the edges of the screen. This option has no performance hit and comes down to user preference.
Bloom - The Bloom setting allows for intense light sources to be presented with a simulated glow. This only applies to the in-game UI. Like Chromatic Aberration, this option comes down to user preference.
Parallax - This option again only applies to the in-game UI. When enabled, it offers a simulation of parallax effects on UI elements. This can help to make them appear more 3D and less flat.
That about covers things for Halon Infinite’s vast array of graphics settings and toggles. Hopefully, you can use some of the information provided in this guide to get the most out of your own PC and the time you spend in Halo Infinite. You can also refer to one of our other Infinite guides for an overview of the game’s controls and default keybindings. Look out for more Halo Infinite coverage here at Shacknews ahead of and after the game’s wide release on December 8.

-
Shacknews

 reply
replyChris Jarrard posted a new article, PC graphics settings guide - Halo Infinite
