
Safe locations and dial lock codes in Resident Evil 2
Become the master of unlocking with our list of all safe, dial lock, and portable safe combinations and codes in Resident Evil 2.
There are a lot of locks in Resident Evil 2, and all of them can be difficult to unlock without the right combination or code. There are dial locks used on lockers, traditional safe locks, as well as portable safes which use a light-up sequence. Players looking to get the Master of Unlocking Achievement or Trophy will need to spend some time hunting for hints and clues for these codes, or just refer to our helpful list!
Safe, portable safe, and dial locks codes and combinations
There are nine locks to open in Resident Evil 2 and they are a mixture of safe combinations, portable safe light sequences, and dial lock codes. Finding the solutions to these safes is simple enough, but it does require a lot of backtracking and the portable safes require trial and error. While this is all good and well on a first playthrough to experience the game, players looking to shave off precious minutes of a speedrun will want to have all the codes and combinations on-hand. All safes contain an upgrade for a weapon, though not all upgrades are found in a safe. Check out guide on guns and upgrade locations for a complete list of every weapon and part.
Leon’s Desk – West Office, 1F
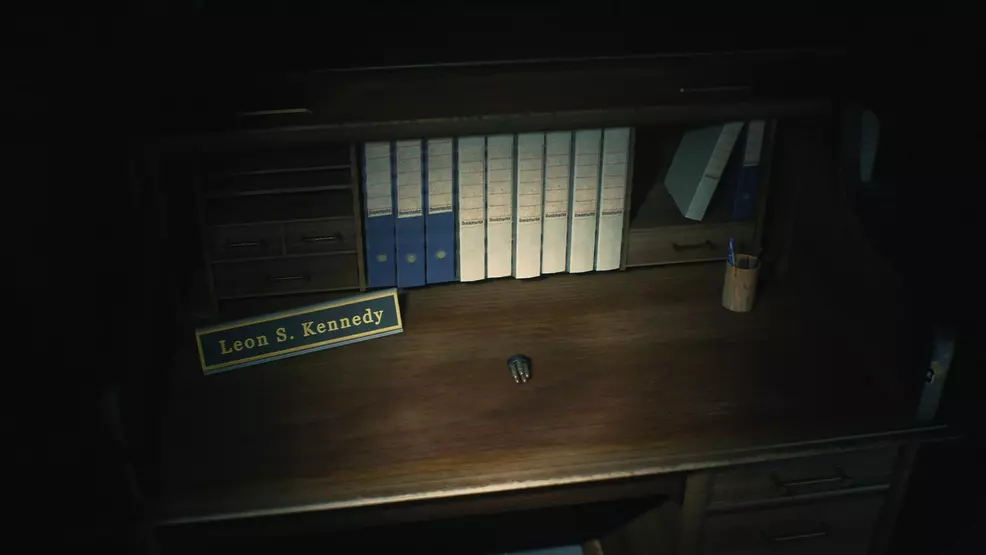
After first arriving at Raccoon City, players will find Leon’s desk locked in the West Office. The officers have left a clue for Leon that directs him to figure out everyone’s first name and use the initials to unlock the desk.
- Code location: Hint found in letter on Leon’s desk
- Code: NED – MRG
- Reward: Extended clip (Matilda) or Speed Loader (SLS 60)
Portable Safe – Shower Room, 2F
This portable safe can be found in the Shower Room on the second floor (2F) of the police station. Leon and Claire appear to have different sequences. Players can technically start at any number, so long as the order is in the right sequence. Example, start at 6 and go 7, 8, 1, 2, etc.
Leon’s code:

Claire’s code:

Reward: Spare part for keypad
Dial lock – Shower Room, 2F
The Shower Room on the second floor (2F) of the police station holds a few items worth collecting, and both are secured behind a lock. Though not critical, the Shower Room locker will provide a nice bump in ammo, which can be saved until later in the game.

- Code location: written on a dry-erase board in the room behind the Operations Room (1F)
- Code: CAP
- Reward: Ammo
Safe – West Office, 1F

The safe in the West Office can be opened at any time, as long as the safe combination is known. This is a safe worth opening, as it offers a valuable hip pouch.
- Code location: S.T.A.R.S. Office (2F) on a desk
- Code: Left 9, right 15, left 7
- Reward: Hip pouch
Dial lock – Locker, 3F
This locker is located at the top of the stairwell at the back of the police station. This stairwell goes to the third floor (3F), the locker is at the end of the hall before the room with the statue and the spade key.
- Code location: Found by developing a roll of film
- Code: DCM
- Reward: Ammo
Portable Safe – Linen Room, 2F
Another portable safe (containing the other spare part for the keypad) can be found in the Linen Room on the second floor (2F) of the police station. Gaining access to the Linen Room requires finding the diamond key.
Leon’s code:

Claire’s code:

Reward: Spare part for keypad
Waiting Room Safe

The safe in the Waiting Room (2F) can be opened fairly early as the safe code can be input without finding the combination, players need only have access to the room,.
- Code location: Observation Room
- Code: Left 6, right 2, left 11
- Reward: Muzzle Brake (Matilda) or High-Capcity Mag (JMB Hp3)
Control Room Locker, Dial Lock
The Control Room locker is in the Upper level of the Sewers.

- Code location: Workers’ Break Room in the Upper level of the Sewers. Look for the jazz flier, the circled letters spell out the code.
- Code: SZF
- Reward: Ammo
Treatment Pool Room Safe

The Treatment Pool Room safe is found outside the Monitor Room in the Middle level of the Sewers. Exit the safe room, use the button to lower the bridge, cross it, and follow the path around to locate the safe.
- Code location: The hint is found beside the cable car in the Treatment Pool Room. The code itself is written on the side of the safe in chalk.
- Code: Left 2, right 12, left 8
- Reward: Shotgun Stock (W-870) or Reinforced Frame (SLS 60)
Unlocking all the safes, dial locks, and portable safes in Resident Evil 2 can be tricky, especially when first starting out. Players looking to speed through the campaign to achieve an S-Rank will want to keep the various safe codes on-hand until they’re memorized! Head over to the Shacknews Resident Evil 2 guides for more walkthroughs and collections.

-
Shacknews

 reply
replySam Chandler posted a new article, Safe locations and dial lock codes in Resident Evil 2
