
The Ghosts of the Deep dungeon is Season of the Deep’s big piece of content new to Destiny 2. This dungeon can be considered a raid-like activity intended for three-player fireteams, or even solo if you’re feeling up to the task. This guide will break down each encounter and give you suggestions for builds and weapon loadouts to use.
Last updated: Saturday, June 2, 2023, at 2:50 p.m. EDT.
How to start Ghosts of the Deep
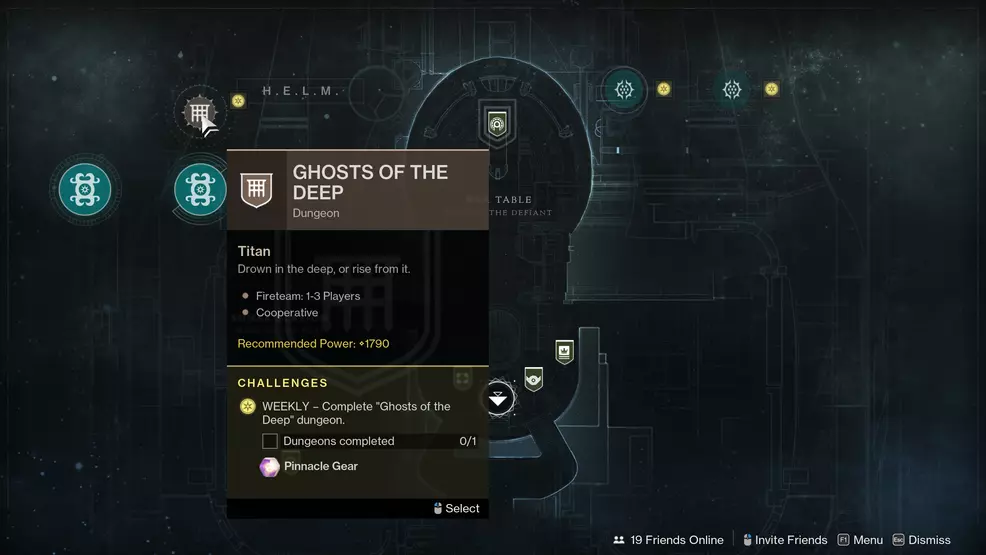
To start Ghosts of the Deep, you must first visit Hawthorne in the Tower and pick up a quest called Rise. This quest will require you to complete the Ghosts of the Deep dungeon. To launch the Ghosts of the Deep dungeon, you must use the Director to open the H.E.L.M., at which point you’ll see the dungeon on the map. Ghosts of the Deep (normal mode) has a Power suggestion of 1790 as of Season of the Deep. The Master version of Ghosts of the Deep has a recommended Power level of 1840, but all Guardians will be capped at 1820. There is no benefit to being above 1820 when completing the Master version of Ghosts of the Deep.
Required reading:
Ghosts of the Deep dungeon guide
Source: Bungie
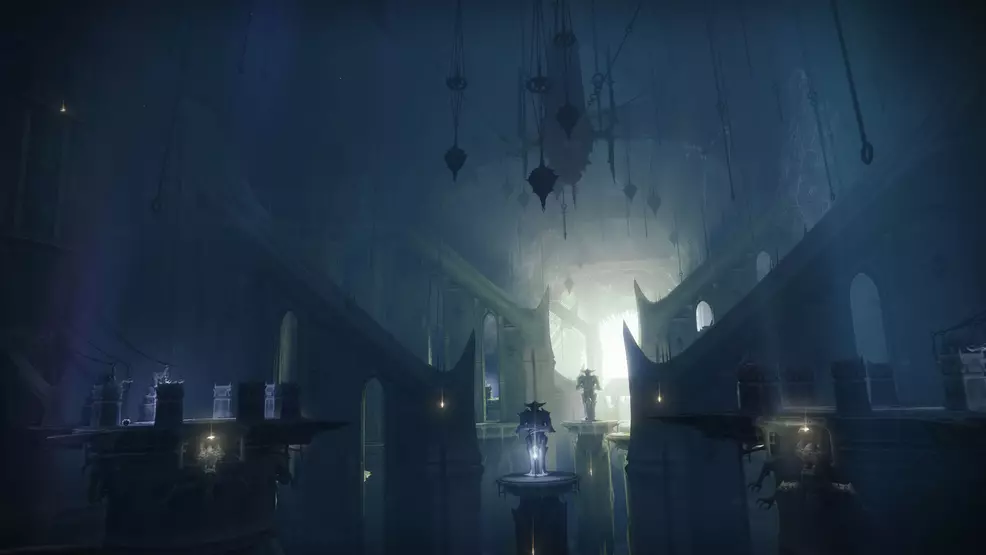
Ghosts of the Deep launched on May 26, 2023, during Season of the Deep. The dungeon takes place on Titan, a location that has come back to the game after several years of being sunset.
Ghosts of the Deep Master changes
There are a few differences players can expect when loading up Ghosts of the Deep on Master difficulty. Firstly, players have come to expect Artifice armor from Master dungeons and the same holds true here. However, no Artifice armor drops from the opening encounter, Hive ritual disrupted. Here's what you can expect:
- Player Power is locked at 1820, 20 below the dungeon's Power of 1840
- Artifice armor only drops from the boss encounters
- Unstoppable Ogres replace regular Ogres in the opening (Hive ritual Disrupted) and Ecthar, The Shield of Savathun boss fight
- Barrier Knights replace the three standard Knights in the Simmumah ur-Nokruk, Lucent Necromancer boss fight
- Vorlog, Risen in Heresy has an Arc shield
While the Barrier Knights pose a threat in the final fight, they do offer an opportunity to use Aeon Exotics to generate Heavy ammo. This is also true for Vorlog. You can keep killing him with Finishers while wearing Aeon Exotics to replenish your allies' Heavy ammo.
Hive ritual disrupted

Source: Bungie
The first encounter of Ghosts of the Deep will require you to disrupt a Hive ritual to open a door. To do this, several statues need to be imbued with a Vestige of Light. First I'll give you a bullet breakdown of what you must do, then explain it in more detail below.
- Kill the two Hive enemies by the door
- Kill the Soulfire Binder Ogre
- Follow the green goo to a Hive rune
- Take note of the rune symbol and remember it
- Kill all the enemies at the Hive rune
- Follow the green goo to a second and third Hive rune
- Kill the Lightbearer at the third Hive rune
- Finish the Lightbearer’s Ghost to get Vestige of Light
- Whoever finishes the Ghost gets the buff, nobody else
- Take the Vestige of Light buff back to the door
- Kill the Veilweaver Wizard
- Reveal the illusion to acquire Deepsight
- Imbue the correct statue with the Vestige of Light
- Repeat three more times (four total) to open the door
Start the encounter by killing the two Hive by the door you’re trying to open. Killing these two will spawn a Soulfire Binder Ogre. When you kill the Ogre, you’ll see some green goo appear on the ground and a message in the bottom left corner of your screen that says, “The way forward is revealed…” Follow that green goo, keeping your eyes peeled for a Hive rune in the sky, taking note of which rune it is. You will need to remember this. Once you see the rune, head to that location and some enemies will spawn. A couple of the enemies will also be called Soulfire Binders. When you kill the Soulfire Binders at the rune location, more green goo will spawn on the ground showing you the path forward.
Continue forward until you find the second Hive rune, which will be the same symbol as the first. Kill all the enemies, including the Soulfire Binders, and a third instance of green goo will spawn that you must follow. When you arrive that the third rune location, kill all the enemies, including the Lightbearer. As soon as you kill the Lightbearer, kill its ghost. The person that does this will receive the Vestige of Light buff with an 80 second counter. You will also see in the bottom left that a Veilweaver Wizard is revealed.
Return to the door where you began the encounter. To speed things up, use your sparrow. When you arrive, kill the Wizard and you will see an illusion on the ground. Any member of your fireteam can approach this illusion and reveal it, giving you Deepsight for 20 seconds. With Deepsight active, the member of the fireteam that has the Vestige of Light buff must approach the statue with the same Hive symbol you tracked through the area and interact with it when prompted to “Imbue with Vestige of Light.” If you get the wrong statue, that member of your team will die, and you’ll have to begin again without having made any progress. If you get it right, you’ll hear the satisfying sound of success and see a message that “A ritual statue manifests.”
Repeat this process four times and the door will open, granting you a reward chest. If you’re curious what can drop out of that chest, we have a Ghosts of the Deep loot table you can browse. When you’ve collected your loot, head inside and make your way forward to the second encounter.
Secret Chest #1
The first secret chest can be found near the “Reach the Wreckage” objective. You’ll hop into the water and move forward, dropping off a cliff. There are two entrances to the area with the secret chest, and quite a few Hive waiting for you at the bottom entrance furthest from the chest. As you emerge from the water, the top entrance will deliver you directly to the chest, while the bottom entrance will require you to fight some Hive. Either way, the secret chest is right at the entrance. If you go through the bottom, which is common, kill the Hive and then loop back around to find the chest almost directly above where you emerged through the bottom entrance.
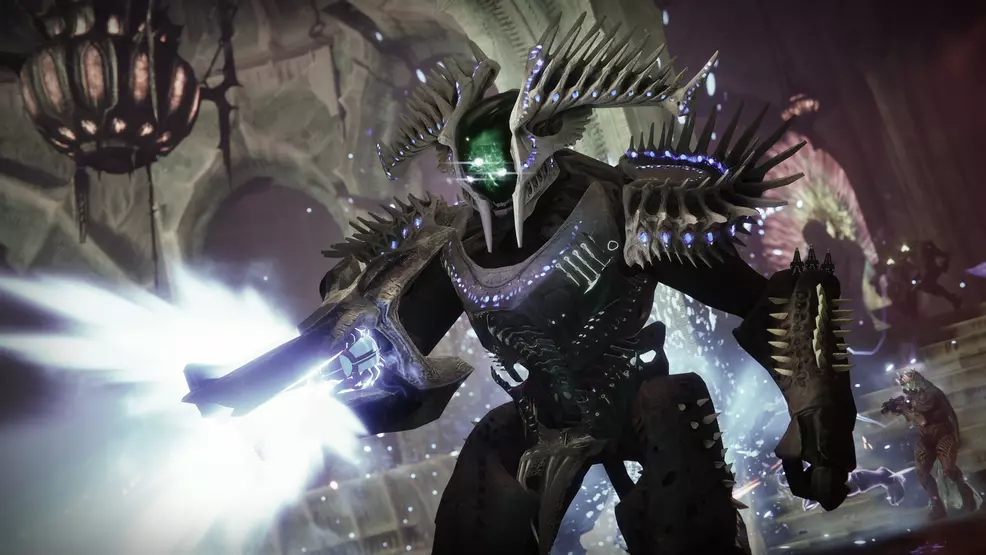
Defeat Ecthar, the Shield of Savathun
Source: Bungie
The second encounter is a big bump in difficulty over the first, and Guardians would be wise to have a Well of Radiance on the team. My team included a Well of Radiance, Shadowshot, and Gathering Storm, which worked well. Use what you're comfortable with. Riskrunner is a hero in this encounter, as are Arc Resistance mods in your Chest Armor. Don't be shy about using your Supers, just be sure you have them back for the damage phase. Lastly, the difficult part is staying alive in the main room, and evading the boss while finding the runes underwater is the easy part. Split the roles in a way that makes sense for your team.
- Kill the praying Acolytes
- Kill the Blistered Knights
- Kill the Keeper of the Deep Ogre
- Reveal the illusion to gain Deepsight
- Note the three Hive rune symbols on the wall
- One fireteam member goes underwater
- That person finds the matching runes and touches them
- That person returns to the surface
- Kill the Lightbearer Wizard and its Ghost
- Whoever kills the Ghost gets Vestige of Light
- Take the Vestige of Light to a statue and imbue it
- Repeat this for a second and third Lightbearer Wizard
- Kill the Wellkeeper Knight
- Step into the pool it spawns where it died and take down Ecthar's shield
- Damage Ecthar and repeat until he’s dead
Begin the second encounter by killing the four Acolytes praying near the fountain. This will spawn the boss, Ecthar, the Shield of Savathûn, into the room. It will also spawn a bunch of adds and three Blistered Knights. Kill the Blistered Knights to spawn a Keeper of the Deep Ogre. Once you kill that Ogre, wherever it is, an illusion will appear near the fountain. Any member of your team can reveal the illusion to grant the entire team 20 seconds of Deepsight.
While you have Deepsight, look at the left and right walls of the room to see eight Hive runes, four on each side. Three of these runes will be lit up. You must take note and remember all three of the rune symbols.
At this point, one member of your team (minimum) must hop into the water, ideally through the smaller holes on the left and right. This will bring the boss with them, leaving the two remaining members of the fireteam in the room to kill adds. The person underwater must then track down the three symbols that appeared on the walls and choose the option to “Touch Rune” when you spot it underwater. Once you have correctly touched all three runes, while maintaining your Pressure Resistance and evading the boss, return to the surface and reunite with your team.
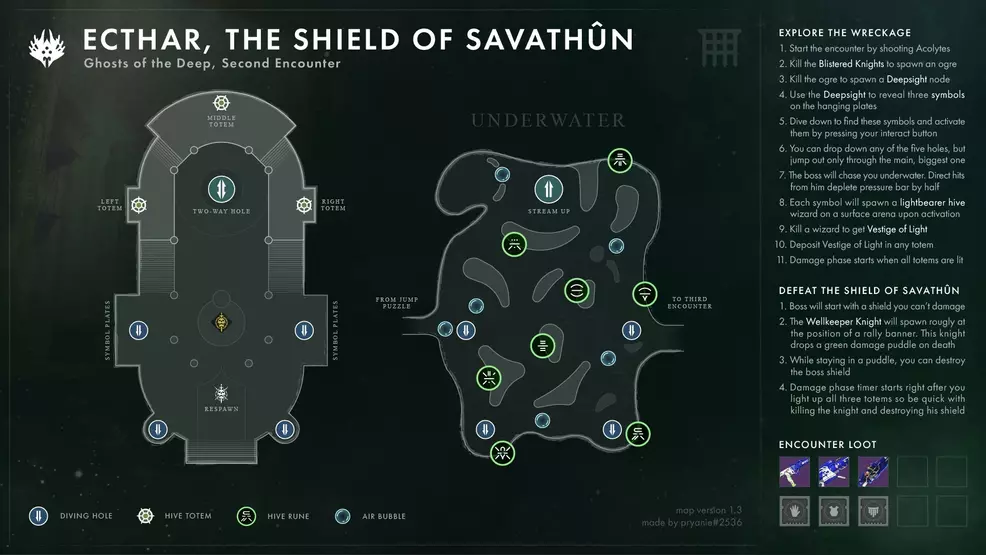
Source: pryanie
At this point there will be Lightbearer Wizards in the main room. When you kill one, be sure to kill its Ghost. The person that gets the kill on the Ghost will get the Vestige of Light buff. That person must go to one of the three statues in the room, all of which are up the stairs, and choose the option to “Imbue with Vestige of Light.” There is one statue on the left stairs, one on the right, and one at the back in the middle. Once your team has killed three Lightbearer Wizards and their Ghosts and imbued the three statues with the Vestige of Light, you’re ready to kick off the damage phase.
The moment the last statue is imbued with the Vestige of Light, a Wellkeeper Knight will spawn just in front of where the fountain is. Kill this Knight and it will drop a pool at its feet. Step into the pool and begin your damage phase by taking down Ecthar's shield. Once the shield is down you don't need to stay in that pool the Knight dropped if you don't want to. In this tight of space, Rocket Launchers are not advised. What works is a Warlock with a Well of Radiance, and even a Hunter with the Gathering Storm Super. The Well of Radiance is almost mandatory to keep you alive. Hit the boss with everything you have and when he becomes immune, repeat the process until the boss is dead.
As additional advice, it should be noted that any number of players can go underwater to complete the rune section. If you want to have three, that's fine. It's also noteworthy that once a single rune has been touched, a Lightbearer Wizard will spawn, so you could have a member of your fireteam kill that Wizard and imbue a statue before you're even finished with the underwater section to speed things along.
Secret Chest #2
The second secret chest can be found shortly after the second encounter, and just before you enter the arena to fight Simmumah ur-Nokru, Lucent Hive. When you get to a section where you must hop from one platform to the next, killing Shriekers as you go, you're in the right area. At some point an Ogre will spawn and walk towards something that resembles a gazeebo. Kill the Ogre, then hop up onto the gazeebo to find the secret chest. This is the last secret chest in the dungeon.
Defeat Simmumah ur-Nokru, Lucent Hive
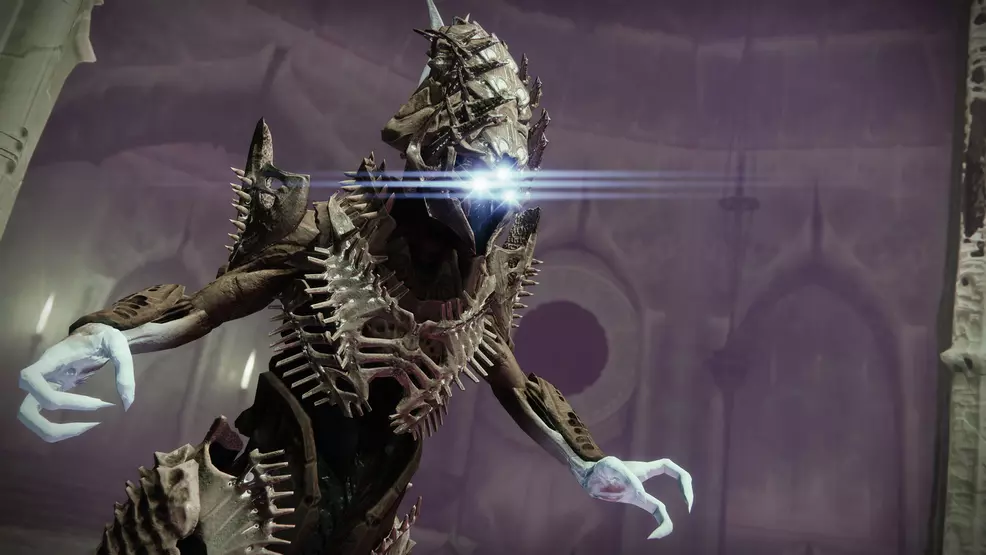
Source: Bungie
The final encounter is a tricky one, and definitely has the toughest mechanics, but once you get the hang of it you should be fine.
- Approach the Ghost and crush it to begin the encounter
- Approach the illusion and Reveal it to gain Deepsight
- Note the three locations with orbs which are connected
- Head
- Left hand
- Right hand
- Heart (always one of the three locations)
- Knee
- Foot
- Head to one of the locations and stand near it so it glows at your feet
- Kill Vorlog, Risen in Heresy while standing at the glowing location
- Heart must be completed last during this sequence
- A lens will spawn in the sky
- Look through the eyeglass towards a Hive symbol to reveal a rune
- Repeat steps 5 through 7 at the two remaining locations
- Head through one of three chambers full of water to find a Lightbearer
- Note the Hive rune symbol in that room
- Kill the Lightbearer and its Ghost to get Vestige of Wizard/Knight/Acolyte
- This buff will last 60 seconds and must be imbued within that time
- If the timer on the buff runs out, you die
- Return to the main area
- Reveal the illusion to gain Deepsight
- Imbue the correct location with the Vestige of Light
- The order does not matter here
- Repeat steps 10 through 16 until all three locations are imbued
- Begin the damage phase
- Repeat until Simmumah ur-Nokru, Lucent Necromancer is dead
Begin the encounter by crushing the Ghost near Simmumah, ur-Nokru, Lucent Necromancer. Reveal the illusion to grant your team Deepsight. Use Deepsight to note three locations in the main area that have dark orbs on them. These three locations will be connected by a string of light. Move to one of the locations and stand close enough so that the ground glows beneath your feet. Wait until Vorlog, Risen in Heresy appears, and kill him while you’re standing at the location, with your feet inside the glowing area. This will spawn a lens in the sky. Look through that lens, aiming your weapon at the symbol of the Hive, to reveal a Hive rune.
You must repeat the process two more times, once at each of the two remaining locations. The only difference is you don’t need Deepsight each time. Deepsight, for the time being, is only used so you can see the three active locations. Once you know where they are, you only need to lure Vorlog, Risen in Heresy to each location, kill him while standing at the glowing locations, and then use the lens to reveal the Hive rune. You must complete the heart location last only during this sequence. Once all three runes have been revealed, you’re onto the next part of this encounter.
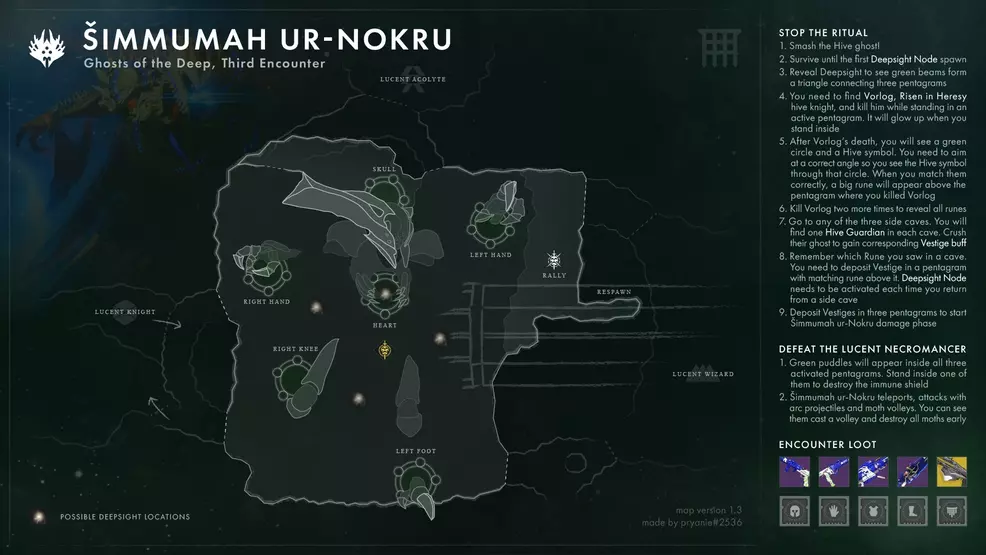
Source: pryanie
With all three Hive runes revealed, enter one of the chambers, pass through the water section, and emerge in a back chamber where you’ll find a Lightbearer. This could be a Wizard, Acolyte, or Knight. Kill the Lightbearer and its Ghost to get the Vestige buff, take note of the Hive rune symbol, then return to the main chamber. You will need to reveal the illusion to get Deepsight, then approach the Hive rune that matches the one you saw in the chamber and imbue that location with the Vestige of Light. This process must be repeated three times, at which point you’ll enter a damage phase.
When the damage phase begins, you'll need to stand at one of the three locations, inside the pool, and lower the boss' shield. This is best accomplished with a shot from Arbalest, which will drop the shield with a single projectile. Do not shoot rockets and throw your Super at the boss until the shield is down. Once the shield is down, move around as required. If the battlefield is littered with Heavy Ammo, move around and pick it up if you feel that's going to help to chunk more of the boss' health. A good strategy is to have one teammate with Gjallarhorn, and two others with strong Legendary Rocket Launchers (my Adept Hothead is my baby here). The Gjallarhorn user fires rockets at the boss, which grants nearby teammates Wolfpack Rounds. This does an incredible amount of damage. Consider gathering up at the head to complete your damage phase, as it gives you a great view of the field and the boss can't crush you like at the heart location.
When the damage phase ends, repeat the entire process until you get another, and until the boss is dead. Take note that the locations that must be imbued will change after each damage phase, so you will need Deepsight to identify them. The heart location will always be one of them. Throughout this encounter, you must have the Deepsight buff to see the three active locations, and you must have the same buff to imbue each location with the Vestige of Light.
Once again, a Well of Radiance is great here. Simmumah, ur-Nokru, Lucent Necromancer will move around the main area to the last location you revealed a Hive rune and can wreck you in seconds. Arc Resistance mods are great, and Void Hunters will love invisibility here. Titans have lots of options for surviving, but I wouldn’t hate a Ward of Dawn here if your team is struggling to stay alive. For damage, consider Rocket Launcher with Tracking Module if you’re not hitting your shots.
Once the boss is dead, the dungeon is complete. For more help, visit our Destiny 2 strategy guide.

-
Shacknews

 reply
replyBill Lavoy posted a new article, Ghosts of the Deep dungeon guide - Destiny 2
