
How to go fishing & Gone Fishin' quest - Destiny 2
We'll walk you through the Gone Fishin' quest and add tips so you can master fishing in Destiny 2.
Bungie has gone and added fishing to Destiny 2, and I for one am here for it. This new activity is certain to be a favorite among Guardians, and I’m going to outline everything you need to know about the Gone Fishin’ quest and catching fish in Destiny 2.
Gone Fishin’ quest
Players can get the Gone Fishin’ quest by working their way through the first week of the seasonal campaign, Into the Depths. You’re thrust into this campaign when you load into the game for the first time during Season of the Deep, or by opening the map to the H.E.L.M. Once you’ve worked your way through that, you’ll receive the Gone Fishin’ quest. Here are the steps to complete it:
- Speak to Suraya Hawthorne in the Tower Bazaar
- Collect 20 Bait
- Catch 5 fish in the Outskirts of the EDZ
- Catch 5 fish in The Cistern on Nessus
- Catch 5 fish in the Miasma in Savathûn’s throne world
- Release your caught fish at the aquarium in the H.E.L.M.
- Return to Suraya Hawthorne in the Tower Bazaar
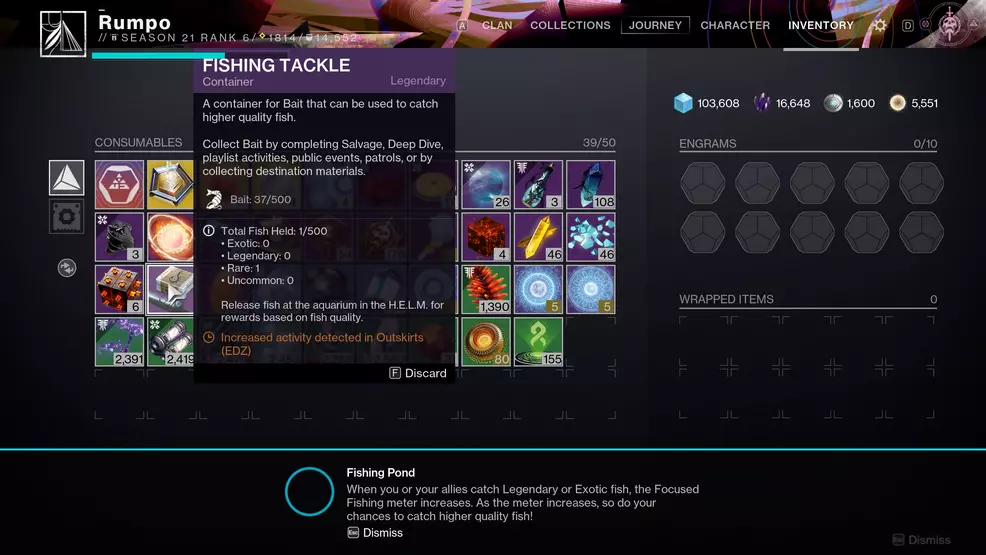
The quest itself is straightforward enough. After you speak to Hawthorne, she will give you Fishing Tackle, something that you can find in your inventory once you pick it up from her. The Fishing Tackle is what will hold your Bait, and you can hold a maximum of 500 Bait at any given time.
Guardians can get Bait in the following ways:
- Completing Salvage
- Completing Deep Dive
- Playlist activities (Crucible, Vanguard Operations, Gambit)
- Public events
- Patrols
- Collecting destination materials
How to go fishing in Destiny 2
To go fishing you’ll need the Fishing Tackle from Hawthorne and some Bait. Two runs of Salvage rewarded me with 38 Bait, or 19 per run. To advance the quest you must collect 20 Bait in total, but how you do it is up to you. Once you have the Bait, you’re off to the EDZ to go fishing.
Make your way to the Outskirts, taking note of the beam of light shooting into the sky. That’s how you can identify the nearby fishing spot. As you approach, the game will begin to explain the mechanics of fishing, but I’ll do it again here in case you missed it and need a refresher.
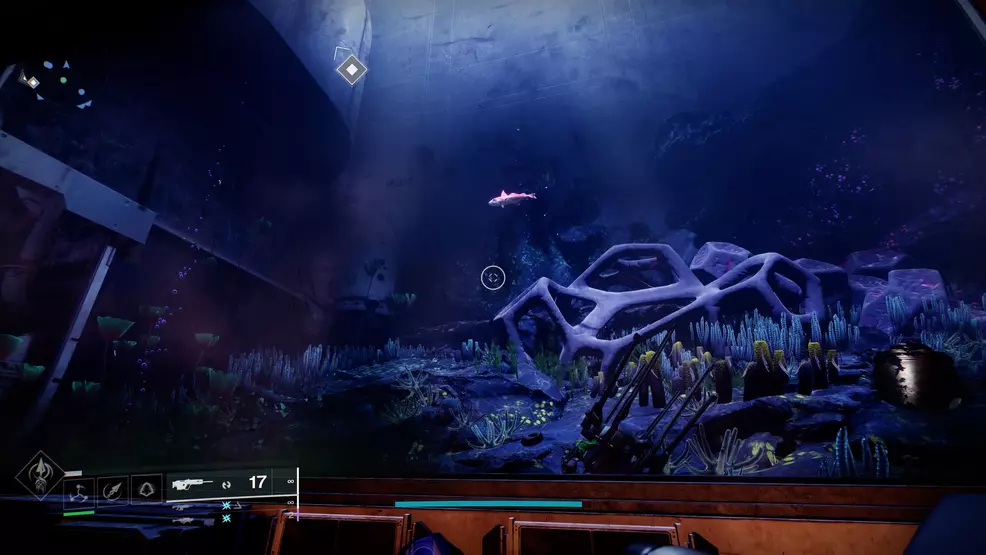
Approach the pond and hold the corresponding button to go fishing. For PC this is E, for Xbox it’s X, and for PlayStation it's Square. Once you cast your line into the water, keep a close eye on your bobber. When your bobber gets pulled underwater, press the interact button again as quickly as you can. If you press the button right as the bobber goes underwater, you’ll perform a Perfect Catch, increasing the chances of catching a high-quality fish.
If you get the timing right, you’ll yank a fish from the pond. It doesn’t just pop into your inventory, though. You’ll need to pick the fish up from the water or ground around you. Most of the time it’s just in front of you, but every now and then it might land behind you. Just make sure you grab the fish, then you can repeat the process by casting again. You’ll use a single piece of Bait for every cast, so a couple of runs of Salvage and you can make fishing your full-time job in Destiny 2. It’s also worth noting that you can fish without Bait, but you won’t be able to catch higher quality fish so there really isn’t much point.
When you catch your first fish, take note of the Focused Fishing meter on the left side of your screen. When you or your allies catch Legendary or Exotic fish, the meter will fill. The more the meter fills, the better chance you have at catching higher quality fish. It pays to go fishing in groups.
The Gone Fishin’ quest will take you to two more locations once you’re done in the EDZ. You’ll be catching fish on Nessus and in Savathûn’s throne world. Once the quest is complete, however, you can return to any of the fishing spots in the game and fish your heart out. When you catch new species of fish that you’ve never caught before, you’ll be able to return to the H.E.L.M. and release them into the aquarium, then watch them swim around. You’ll also unlock rewards based on the rarity of the fish you turn in.
Before you do that, open your Fishing Tackle again while you still have fish you haven’t turned in. You’ll see the number of fish that you currently have in your possession listed, broken down by rarity, and a little tip at the bottom of the description for the Fishing Tackle. That description will give you a hint telling you where there is increased activity, so you should absolutely head to the specified location and try your luck. You never turn down a good fishing tip, Guardian.
If you’re looking for a list of all fish and rarities in Destiny 2, we have that, and we’ve got our famed Destiny 2 strategy guide for you to check out as well.

-
Shacknews

 reply
replyBill Lavoy posted a new article, How to go fishing & Gone Fishin' quest - Destiny 2
