
How to merge accounts - Overwatch 2
Follow these steps to merge your accounts into one Battle.net profile and enable cross-progression in Overwatch 2.
Overwatch 2 supports cross-progression, which means that players can merge their previous Overwatch accounts on console and PC into one Battle.net profile. Merging accounts allows players to retrieve their Hero items, stats, and credits from the original game and bring them into Overwatch 2. This guide will walk you through the steps to merge your accounts in Overwatch 2 and enable cross-progression on your platforms of choice.
How to Merge Accounts
Before you can merge your accounts, you will want to set up a Battle.net account, even if you have not used one in the past. Your Battle.net account is the profile that you will tie all of your other accounts to and is required for playing Overwatch 2. You can only merge one account per platform, and console accounts can only be linked to one Battle.net account at a time. Make sure you are logged into the accounts you intend to play on before merging.
Source: Shacknews
Merge Accounts on PC
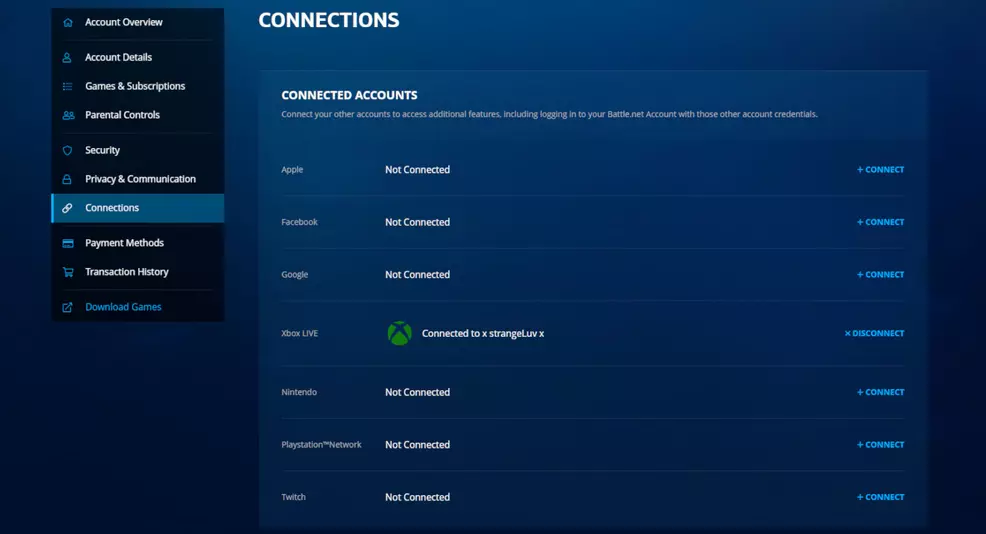
One way to merge accounts in Overwatch 2 is by logging into your Battle.net account on PC and then connecting to your console accounts from within the settings. To merge accounts on PC, follow these steps:
- Log into Battle.net on your web browser.
- Click on your name in the top right corner and select Account Settings from the drop-down list.
- Select Connections from the list on the left. This is where you can connect and merge your console accounts.
- Choose the platform you want to connect to your Battle.net account and select +Connect.
Once you select a console account to connect, you will be sent to the corresponding website to log in to your profile and complete the connection. You can merge accounts from Xbox, PlayStation, and Nintendo Switch to your Battle.net account on PC. After connecting an account, you must wait through a 365-day cooldown period before you can change it again, so make sure you are connecting to the right ones.
After you have connected to the desired console accounts in Battle.net, you will need to confirm everything on the console side. Launch and log into Overwatch 2 on your connected console and select the Account Merge option. Press Continue and follow the prompts to confirm the accounts being connected are correct. Once you have done this, you should have successfully merged accounts in Overwatch 2. Your stats and items might not show up in your game right away, so just be patient and check back later.
Merge Accounts on Console
Alternatively, players can connect to their Battle.net account from the console side as well. This also works for players who did not previously have a Battle.net account. To merge accounts on console, follow these steps:
- Log into Overwatch 2 on console and follow the prompts.
- When presented with a QR code, scan it using your mobile device.
- Enter the code shown on console to create or connect to your Battle.net account.
- Close the game and log in again to confirm your connected accounts and complete the merge.
Once you have successfully merged your accounts in Overwatch 2, you will have access to your account history as well as any skins and items you had unlocked in the original Overwatch. Those with unused credits from the first game will also gain Legacy Credits after merging accounts. Head over to our Overwatch 2 page for more guides and tips.

-
Shacknews

 reply
replyLarryn Bell posted a new article, How to merge accounts - Overwatch 2
-
There are so many videos about merging accounts but none showed how to do it from pc. Thank you for this video legend!
https://www.youtube.com/watch?v=UJ1MsHiv_Is
and https://asmallworldcup.com - play one of the most exciting soccer game.
-
