
How to get Dead Man's Tale - Destiny 2
Find the Intercepted Distress Signal, complete The Voice on the Other Side and Presage quests, and unlock the Dead Man's Tale Exotic Scout Rifle in Destiny 2.
This guide will show players how to unlock Dead Man’s Tale, an Exotic Scout Rifle introduced to Destiny 2 during the Season of the Chosen. We’ll show you how to start The Voice on the Other Side quest, and help you solve the puzzles during the Presage quest players must complete to unlock their new toy. Let’s get started.
How to get Dead Man’s Tale - Destiny 2

For players to obtain the Intercepted Distress Signal they must first load into The Arms Dealer Strike in Destiny 2. This can be started from the Strike playlist, the Nightfall, or even selecting the Strike by opening the EDZ location from the Director and choosing it manually.
Once The Arms Dealer Strike is active, take care of the first batch of enemies that greet players as soon as they can move around. Normally, players would head to the left and out the door to face more enemies, but to find the Intercepted Distress Signal, they should go straight from where they spawn and through a previously inaccessible door.
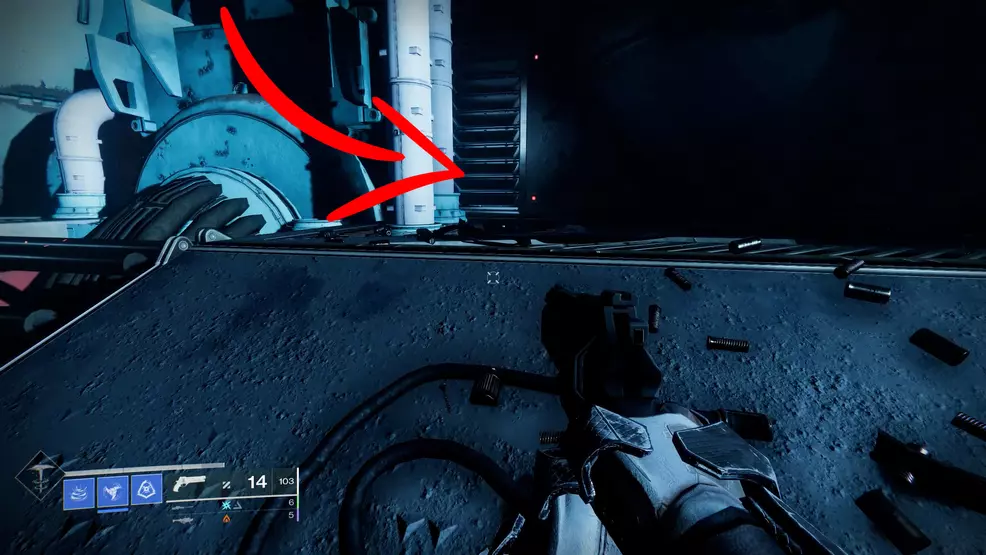
Fight through the Honored Scorpius turrets and back outside, then deal with more turrets and a yellow-bar Cabal named Than’Grot, Loyal to Caiatl. With the area clear, jump to the platform on the right as you walk out the door, then grab the Intercepted Distress Signal inside the container. There should even be a waypoint to guide you.

The next step is to visit Zavala in the Tower. Once you see him, he’s going to give players an Exotic quest called The Voice on the Other Side. To begin this quest, head to The Tangled Shore via the Director and load into an Exotic quest called Presage directly from the map. That’s where the real fun begins.
Presage Exotic quest - Destiny 2

The Presage Exotic quest is one of the coolest quests ever created in Destiny 2. It's full of puzzles and fights and jumping and everything else that makes Destiny 2 great. Below you'll find a thorough walkthrough to help you complete this quest and get your hands on Dead Man's Tale.
Objective: Board
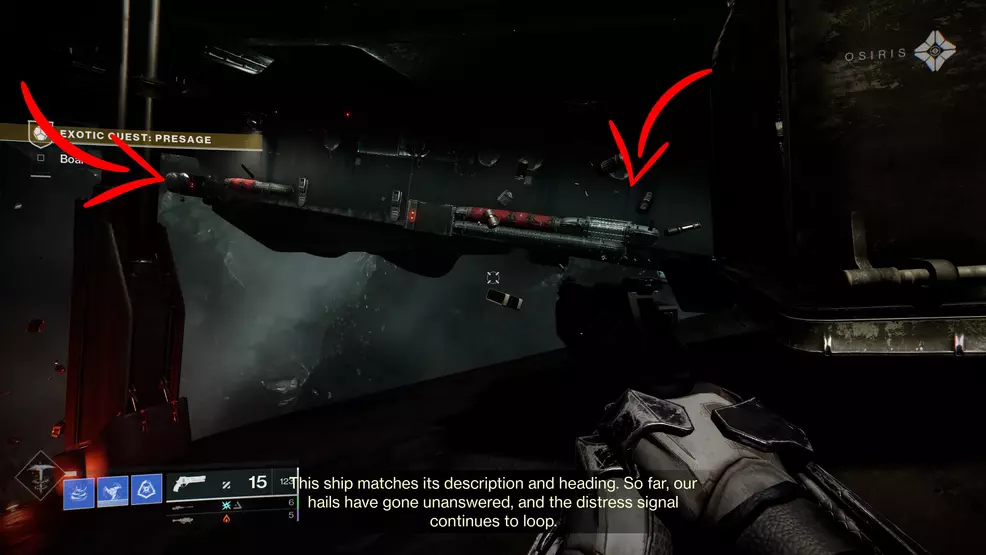
When players spawn into the Presage quest they'll be facing a large door that's closed. This door cannot be opened right now. However, while looking at the door, head to your seven o'clock – over your left shoulder – and jump to the platform across the gap. When you land on the platform, head to the left and follow the only path available as it loops around the corner. Continue to jump from platform to platform until you see a small platform a good jump away. Jump over and you'll be able to head inside the ship.
Objective: Explore the Glykon
Once you step foot in the ship you'll be funneled through some vents. Follow the vent until you reach a spot where you can go straight or left, go straight. You will be forced to go right, then left, at which point you'll see another grate. Shoot the grate to pass through it. As you're forced to turn right there will be a grate on your left which you can ignore. Shoot the grate at the end of the vent on the right and drop down into the room. Along the left wall, behind some pipes and wires, will be another grate that players can shoot to pass through.
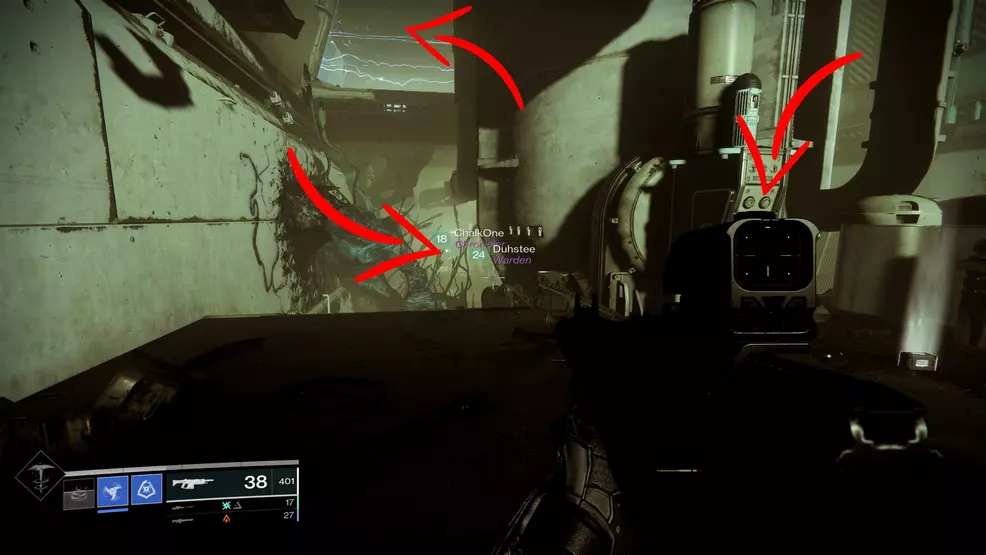
Head into the next room and turn left. Duck under the pipe, then look up and behind you. Jump up and follow the only path forward until you reach the end of the line. Shoot the grate on the floor and drop down two levels. Walk forward and notice a lever next to a large door. You can pop that lever, opening the door you couldn't get through when you originally began the mission outside the ship.
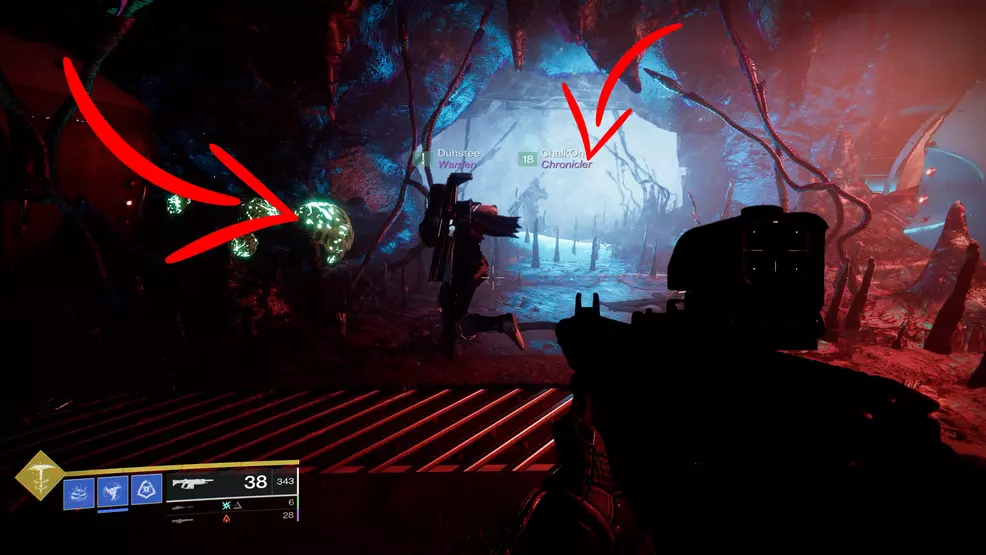
Opposite the large door that leads back to where your ship is docked is a blocked off door. If you try to run through it you will die. To the left of that door are some glowing spores. If players stand close to those spores and shoot them, they will receive the Egregore Link, a buff that will last 14 seconds. This buff will allow players to pass through the door that was previously inaccessible, so long as they make it through before the buff expires.
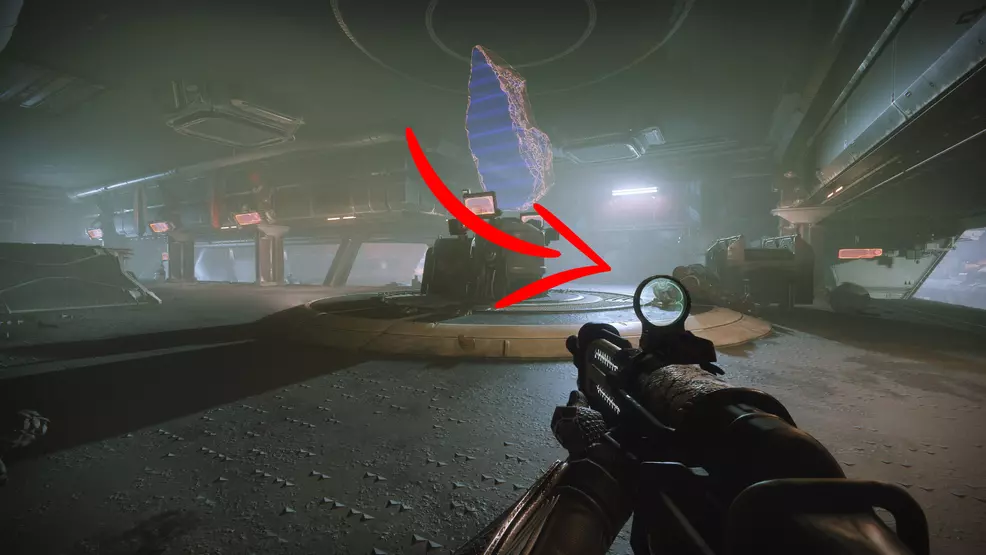
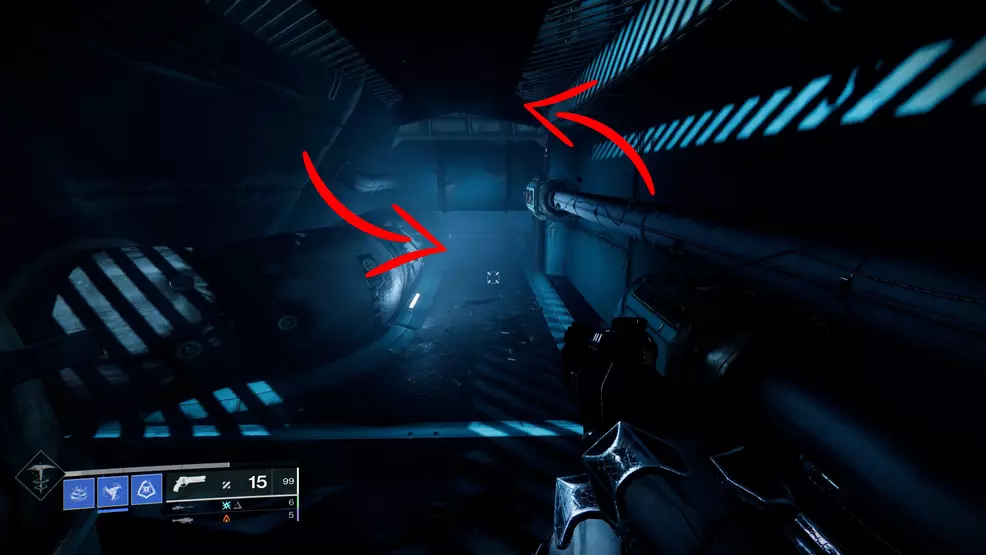
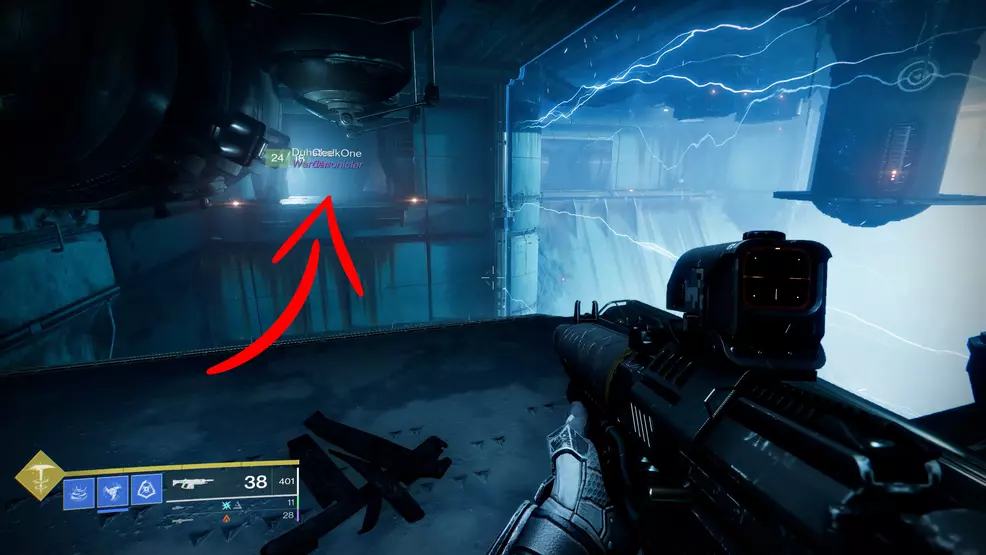
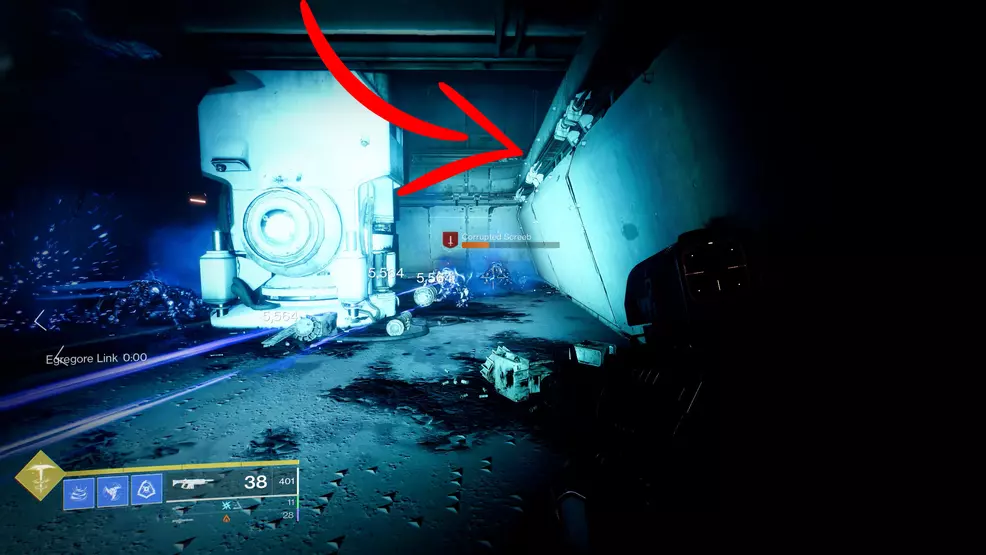
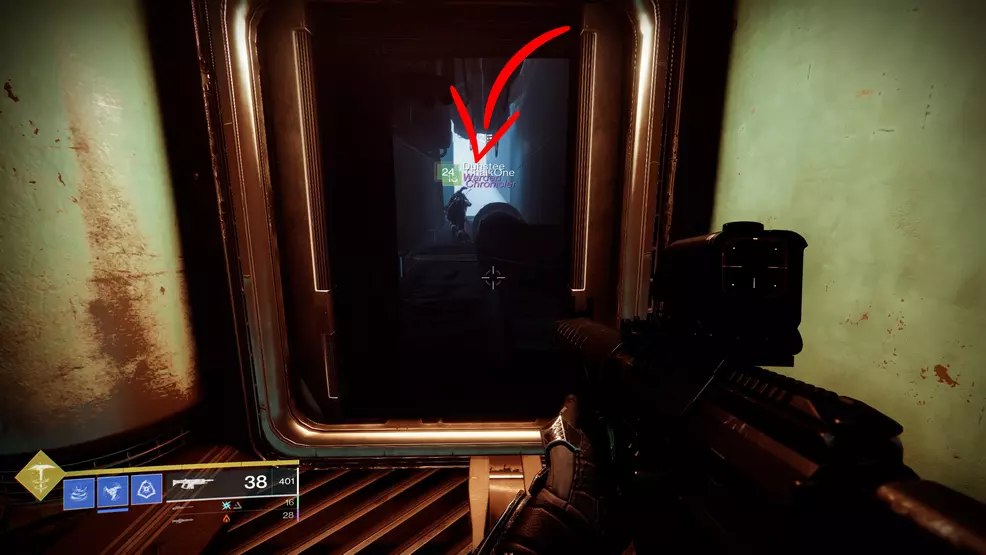
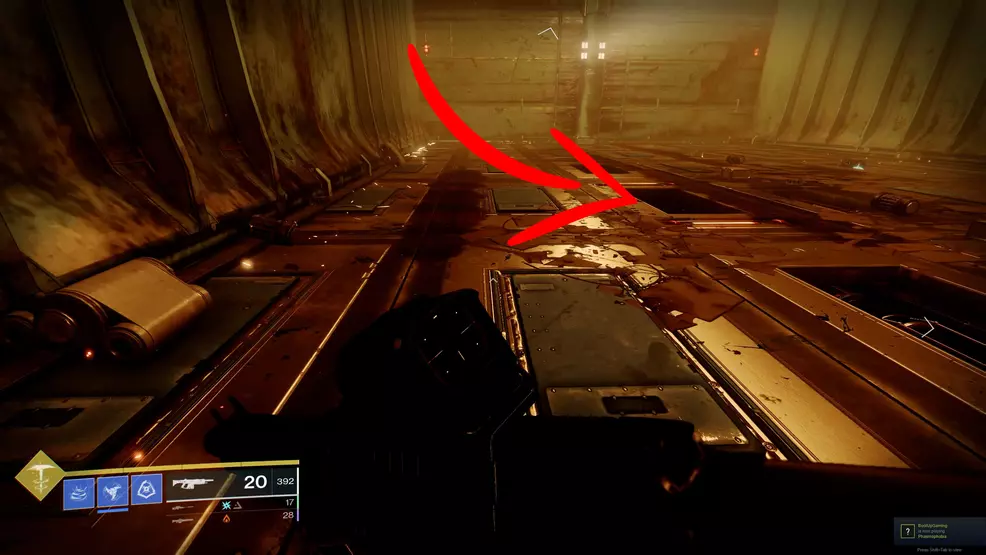
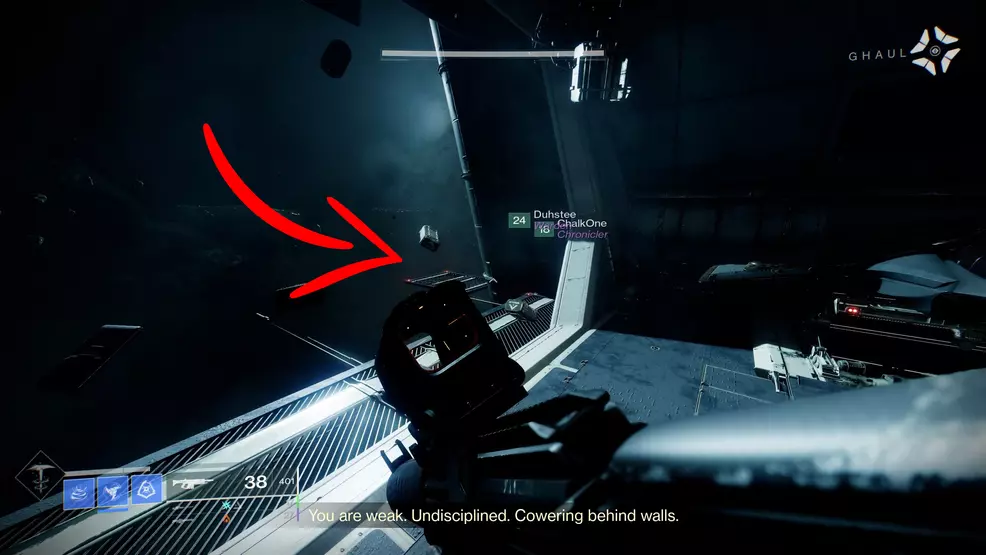
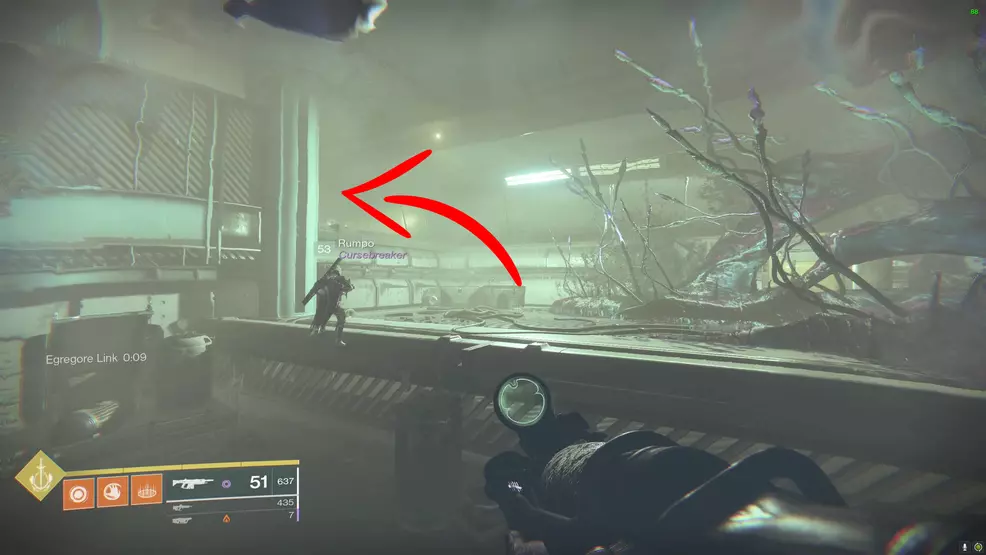
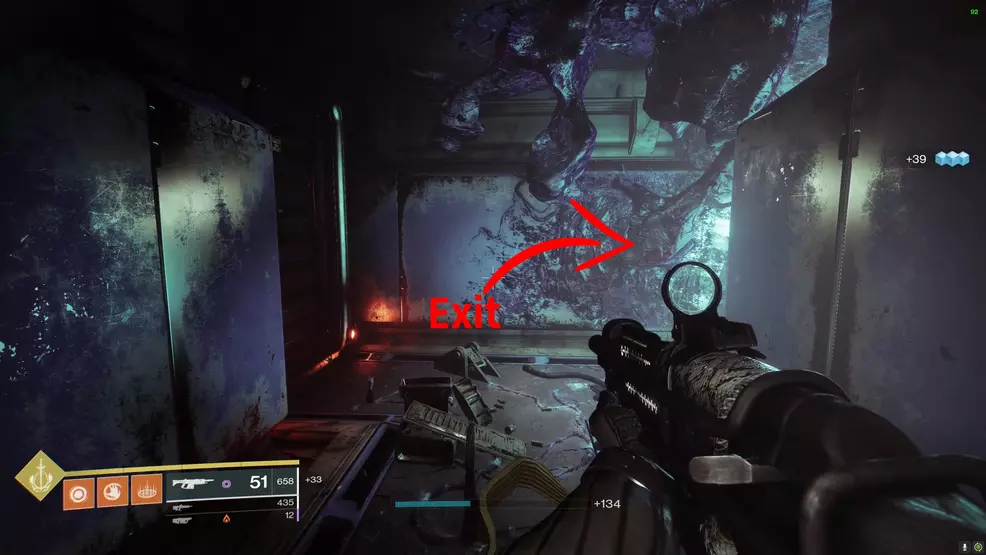
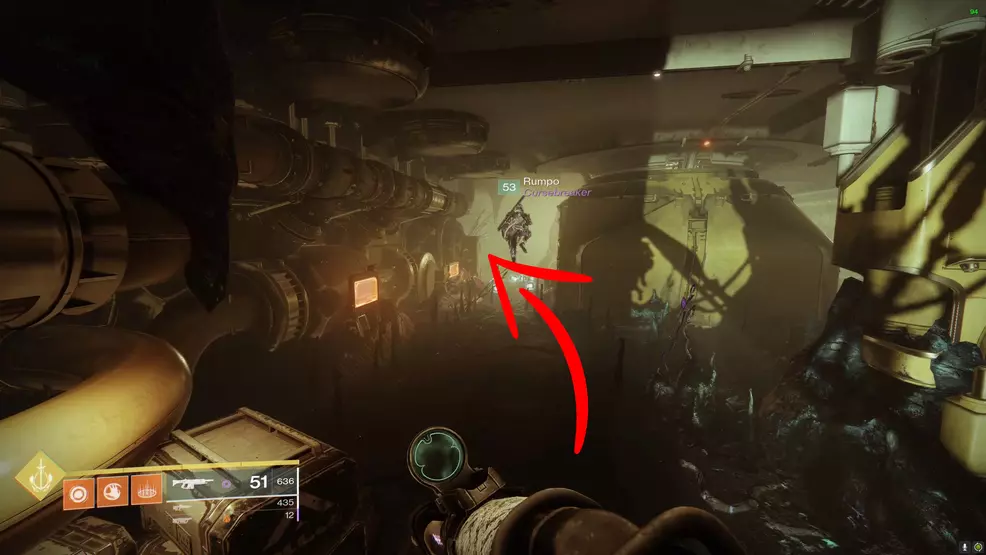
As soon as players pass through the door, take a breath because you are temporarily safe. There will be more glowing spores to the left, but they are necessary right now. With your back to the door you just passed through, the exit to this room is in the top left corner, which the image embedded above has an arrow pointing to.

Continue to follow the path until you find an open hatch above you. There are one or two side areas you could wander into, but they are dead ends and there's only one correct way to go, and that's through the hatch above your head. Once you pass through, jump all the way to the top and find another open ventilation shaft to your right.
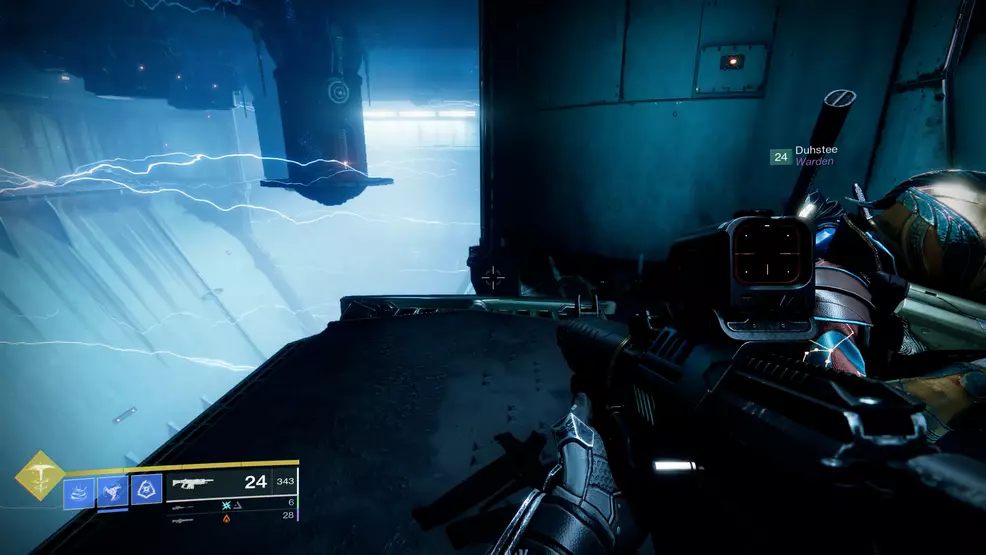
Follow this ventilation shaft until you find a hole in the floor. There's no way to get lost here as the game will funnel you into the correct spot eventually. Once you drop down you'll be looking at an electrified barrier. Your end goal for this section is to get to the other side of the room, beyond the electrified walls, but there's work to be done to accomplish this.
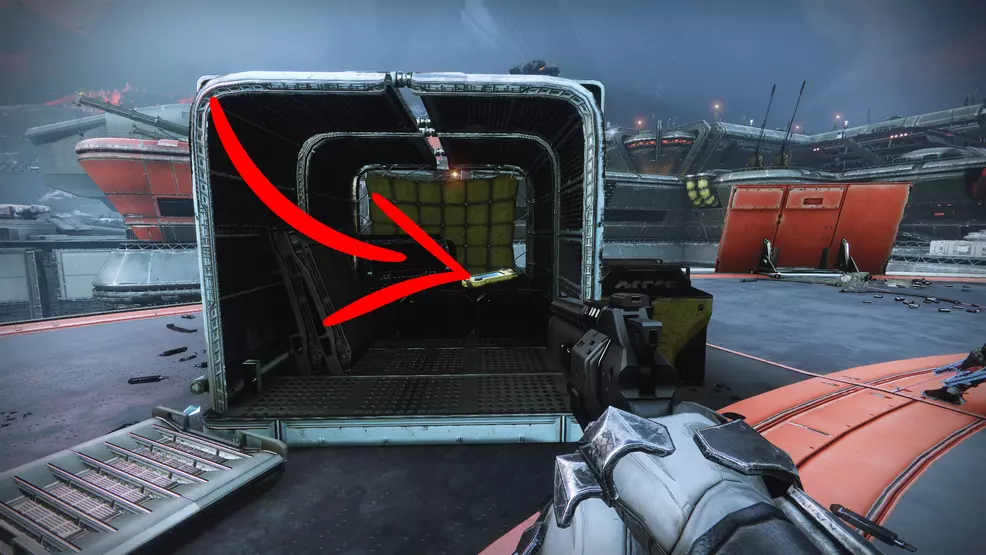
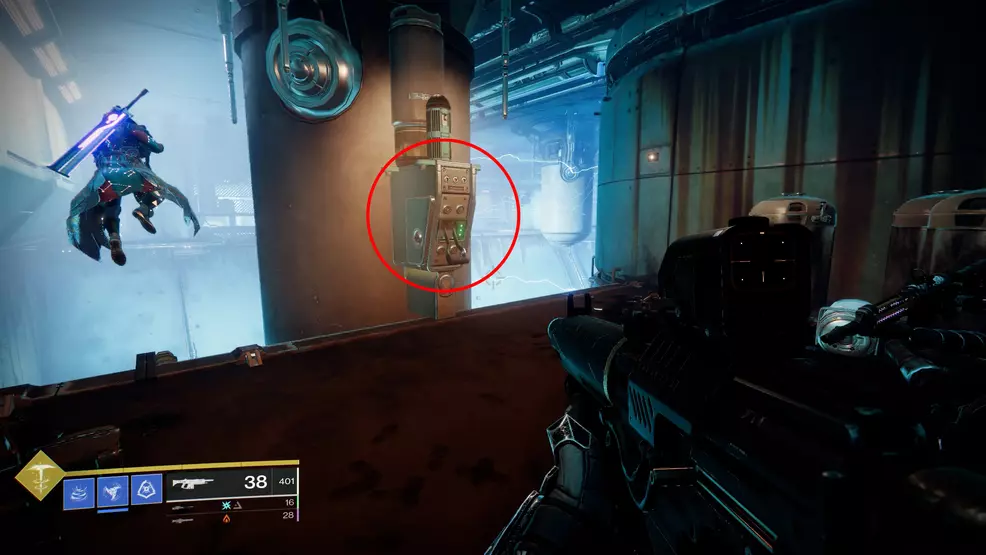
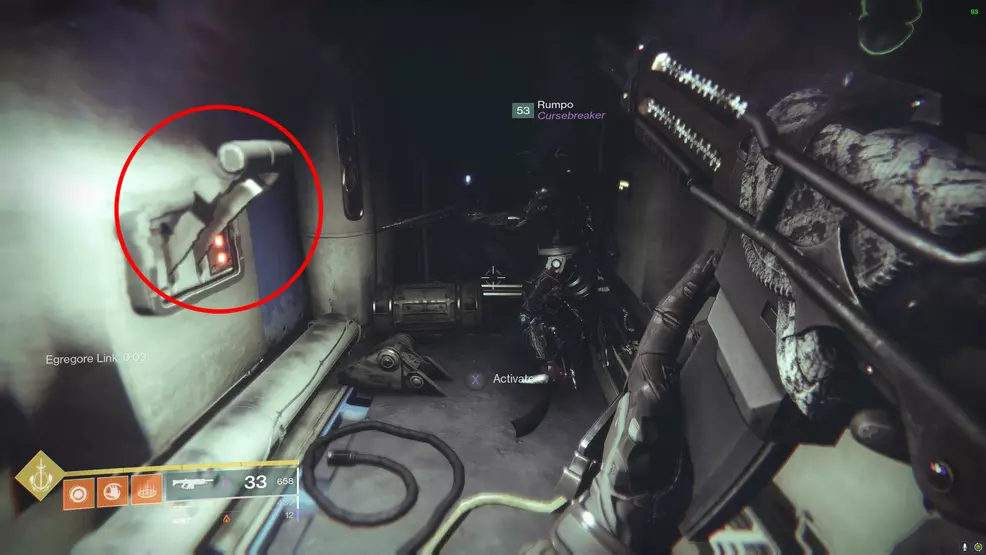
There's an open door where you dropped down. Head into the room and deal with the enemies before you worry about anything else. With them out of the way, head to the opposite end of the room from where you entered. Behind a box is a lever. Pull the lever to open a door right where you dropped down a moment ago.
There will be glowing spores where you just dropped down. Shoot the spores to get the Egregore Link buff, then turn right and jump across the large gap – parallel to the electric barrier – and head beyond the door that would be blocked off without the buff.
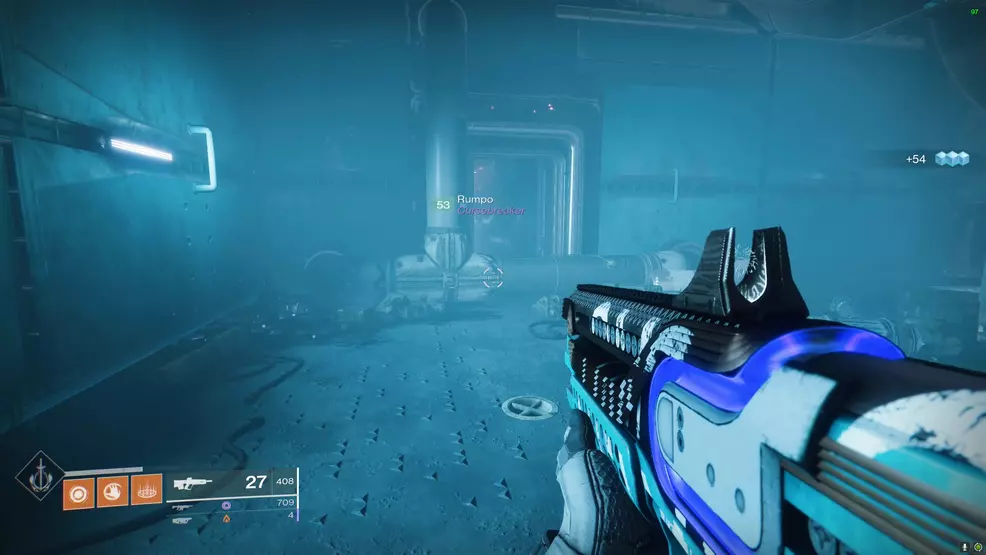
Once you pass through the door with the buff, hop down into a dark room to find several Corrupted Screebs. These are the Scorn enemies that like to sprint at you, jump in your face, and explode. Shoot them before they can do that, then hop up to the platform – top right from where you dropped into this room originally – and kill two more Corrupted Screebs.
Once you hop up on the platform you'll notice an open door that leads you back outside to the electrified barrier, but this time you'll emerge beyond the first one. Simply jump across the gap and back to the side of this area you were on to begin with.
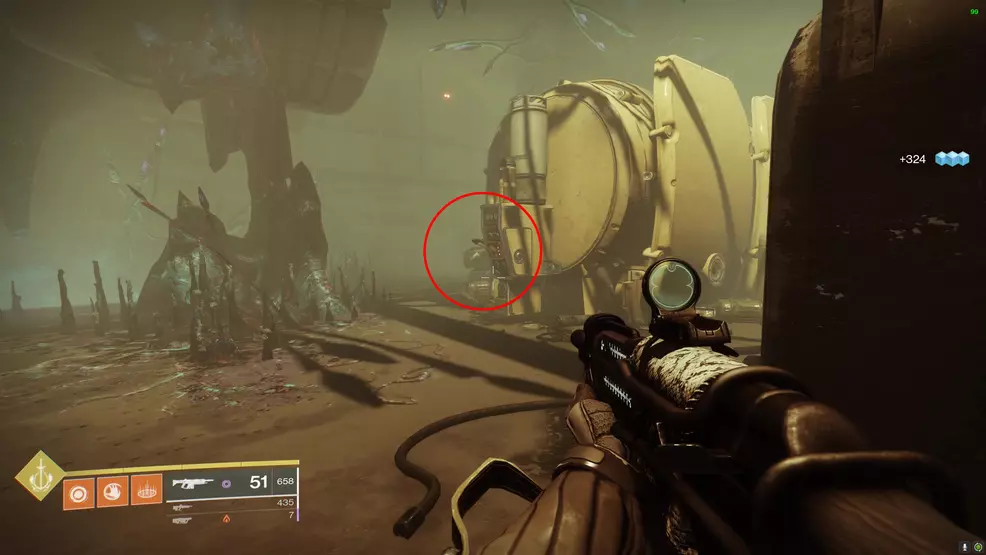
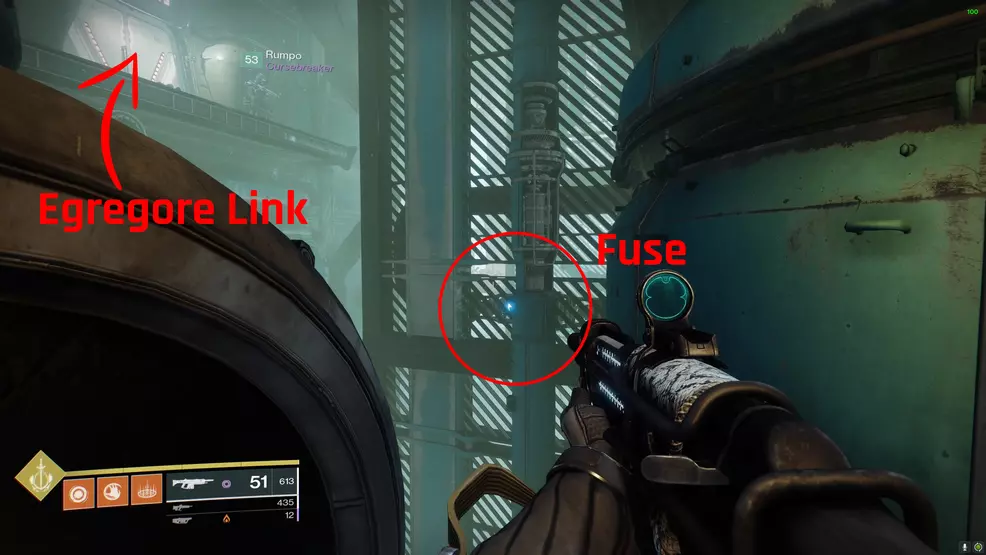
When you land on the other side, notice that there is a glowing fuse. Shoot this fuse to open the hatch just below it. You can then drop down into the hatch to progress further.
After dropping through the hatch you'll be faced with a few Corrupted Screebs. Deal with them, then hop up to the second level of the room to the right of where you originally dropped down just a moment ago. Pull the lever in the corner to open the door on the top level of the room. The newly opened door is on the complete opposite side of the room from the lever.
Go through the door and jump across the gap, staying parallel to the electrified barrier on your left. When you land on the opposite side, pull the lever and backtrack into the room from where you just came. Drop to the bottom level – just below the top door – and shoot the fuse that's now exposed.
Hop back up and go through the top door again, then drop down down onto the narrow platform near the opening in the wall. Slide down, making sure to jump when you emerge on the other side to prevent yourself from dying.
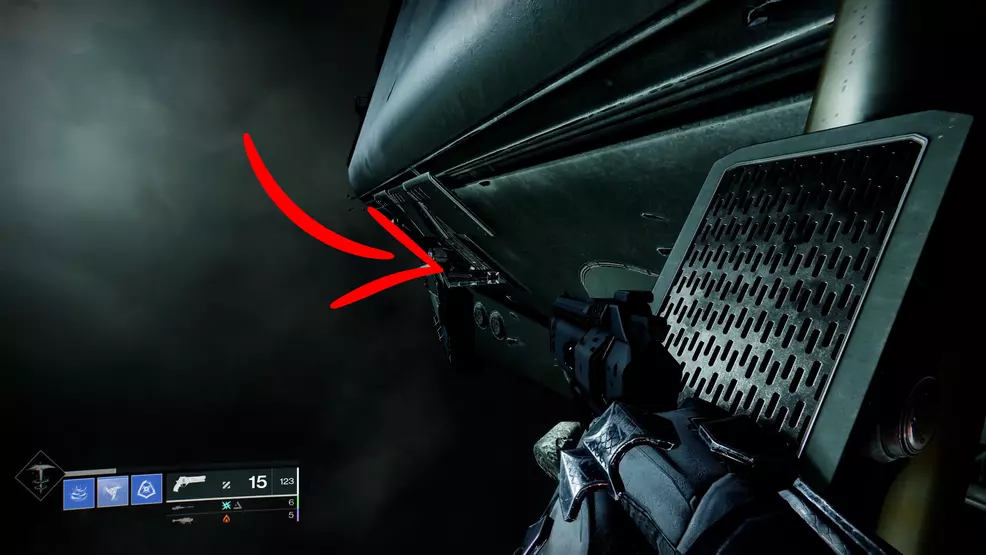
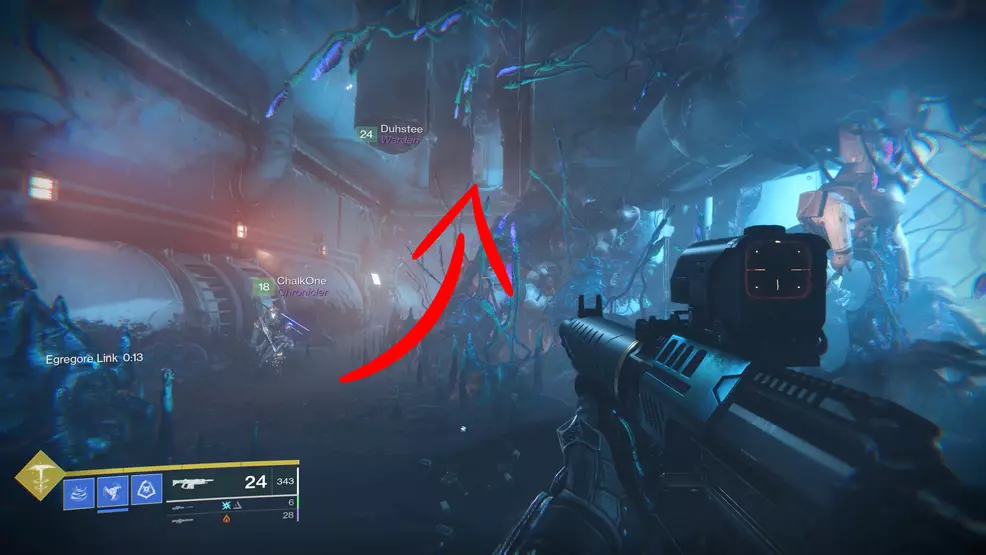
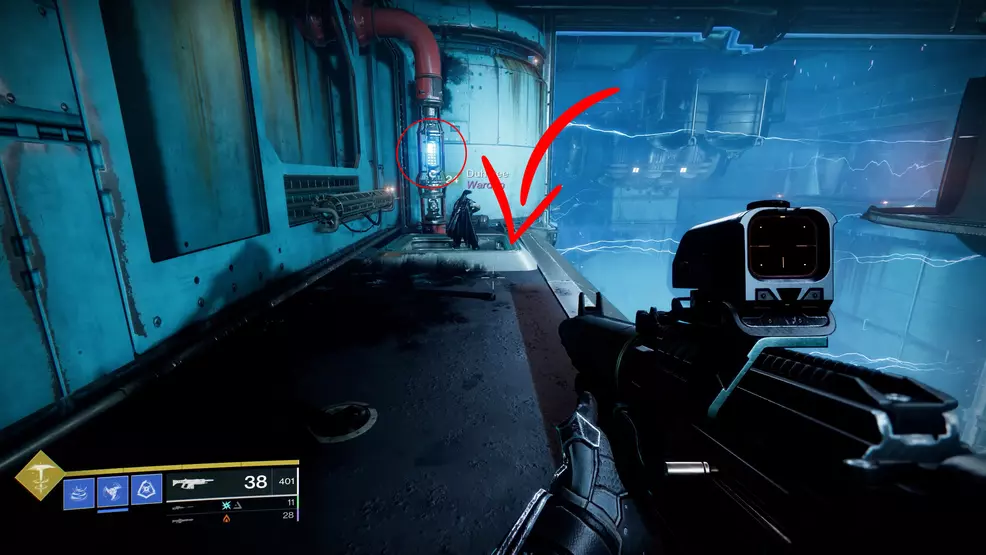
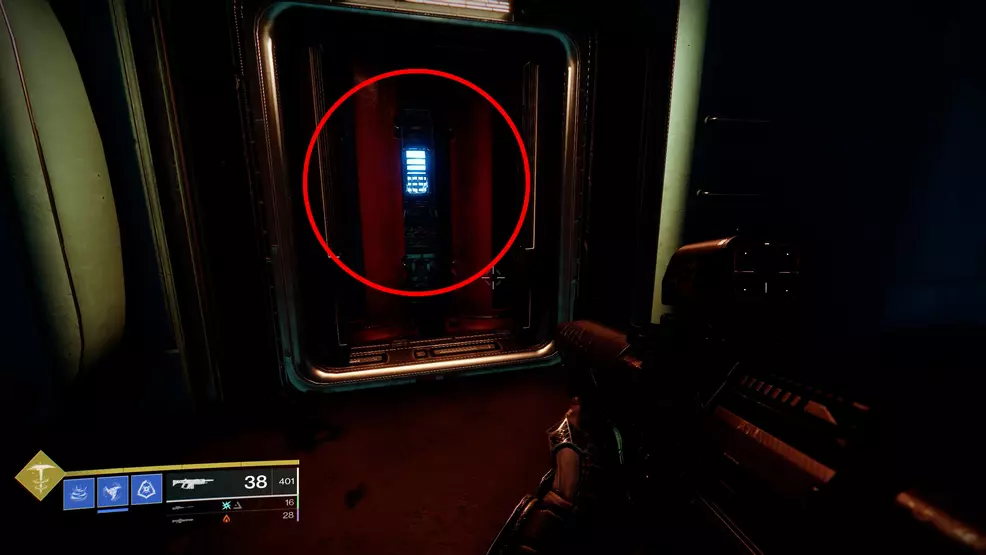
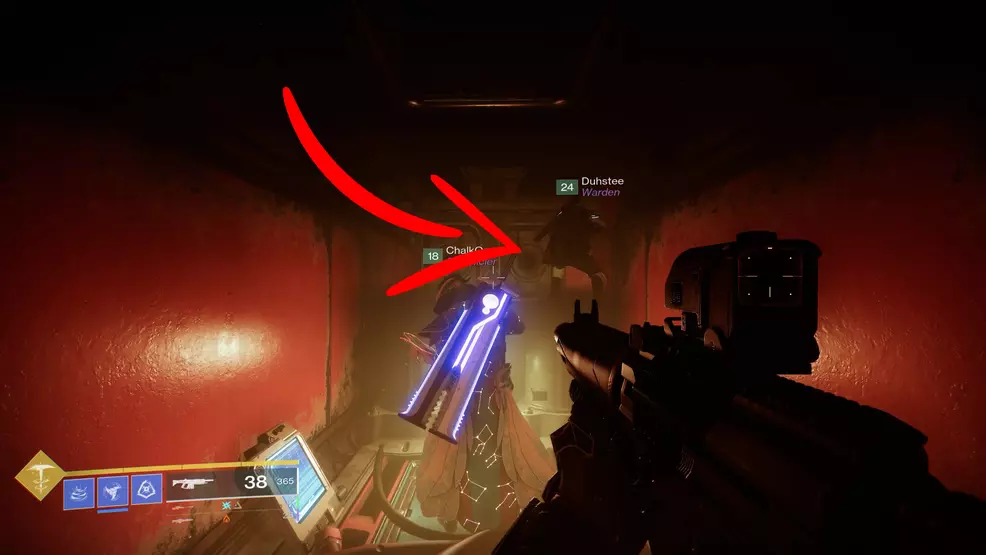
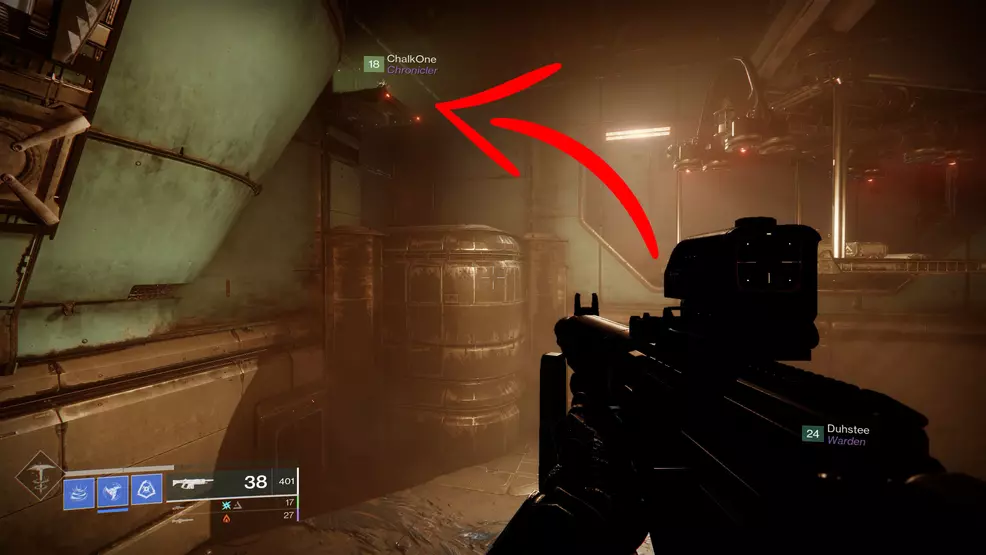
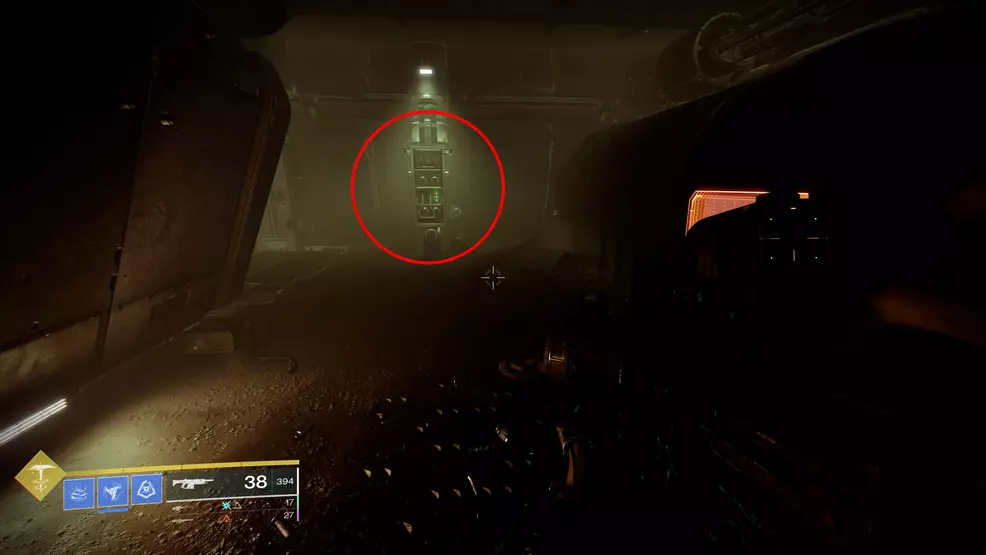
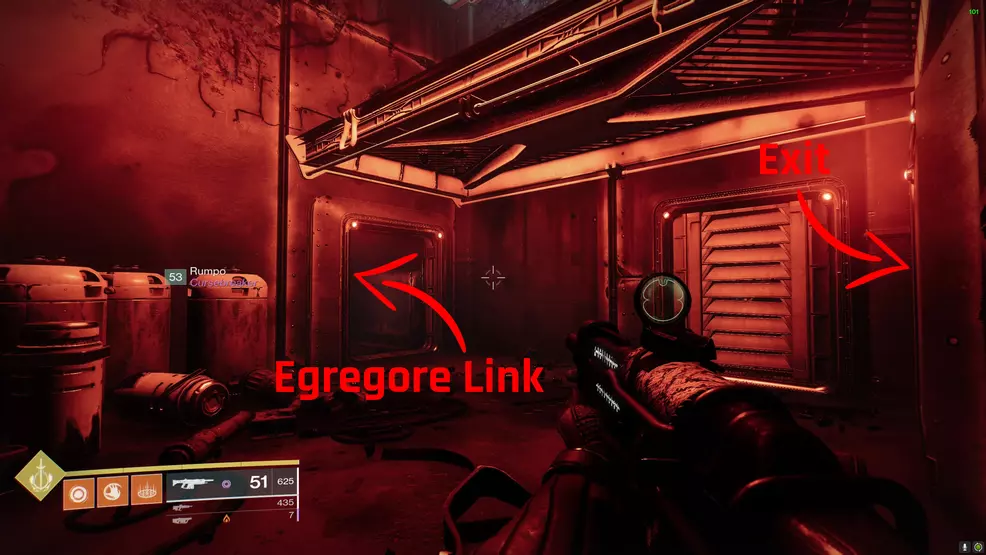
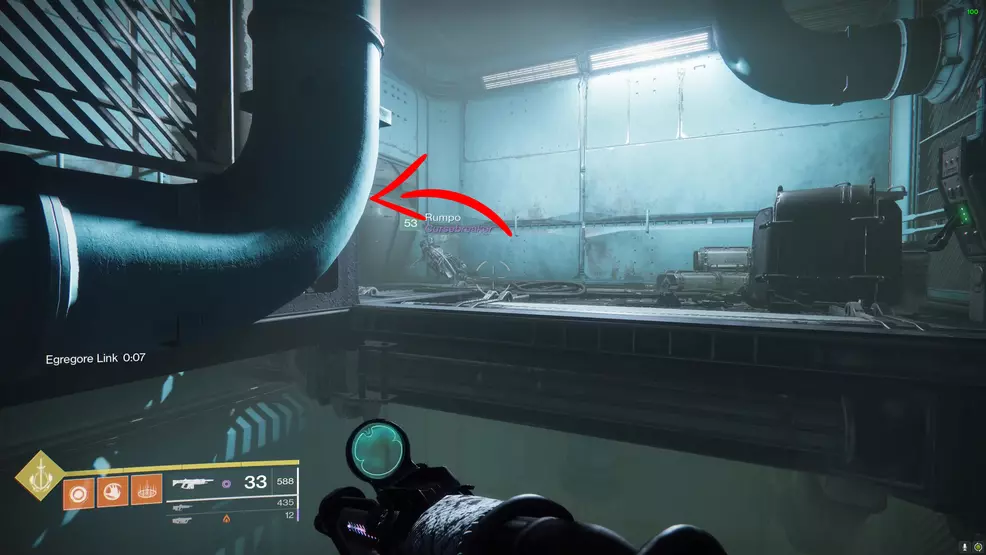
Go pull the lever on the opposite side of the room from where you entered and prepare for terrible things. You're now in a trash compactor that will slowly close until it crushes you. The way to stop this is to shoot the grates on the floor to open them, then shoot the exposed fuses to slow the closing walls, until finally finding an exit from this room under one of the grates. For obvious reasons, this must be done before the walls close in and crush you. Oh, and watch out for more Corrupted Screebs, because this wasn't stressful enough. I would recommend that you have one member of your fireteam on Corrupted Screeb murder duty, and the two others working the grates. Do lots of jumping, too. The exit will have two lights on either end of it, and every time I've done the mission it's been located in the screenshot above, which was taken with my back to the lever in the room.
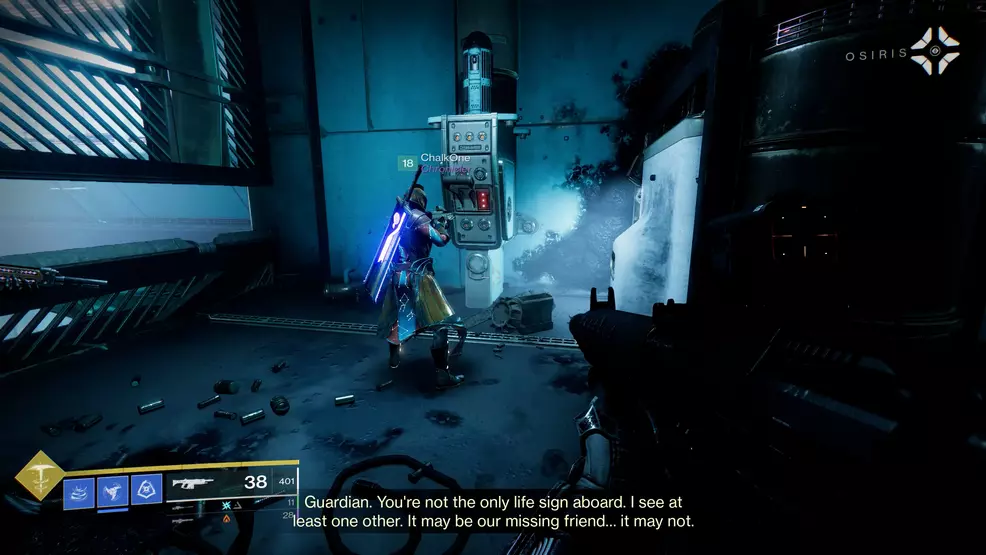
Once you're out of that room and have dropped through the floor, hop up on the pipes and follow the path until you reach another openening in the floor. Drop down and get ready for a small fight against some Scorn. This is easily manageable for a fireteam of three, and very doable solo. Just clear the room. After defeating the Scorn, exit the room through the large door that opened up behind where they spawned. You can now simply follow the path as you progress forward.
Objective: Survive
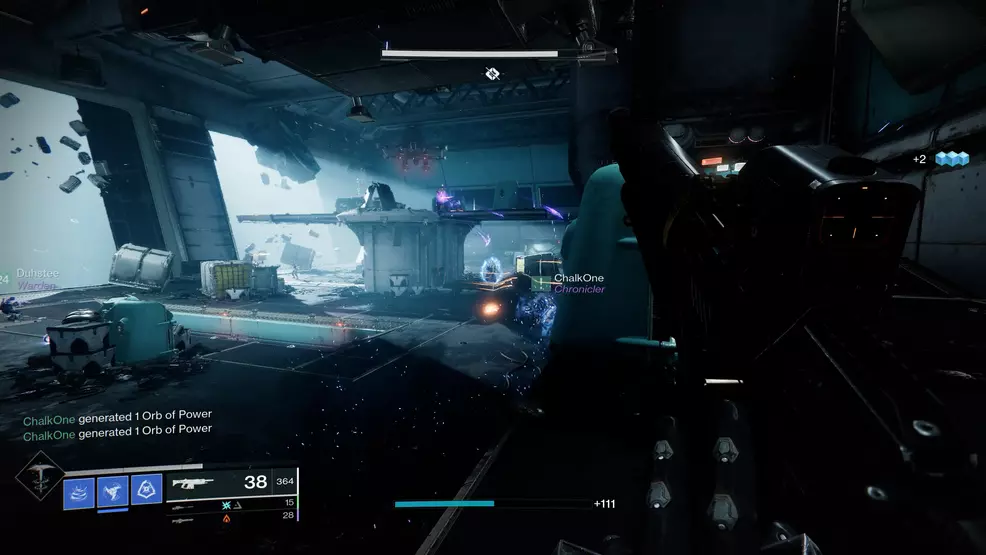
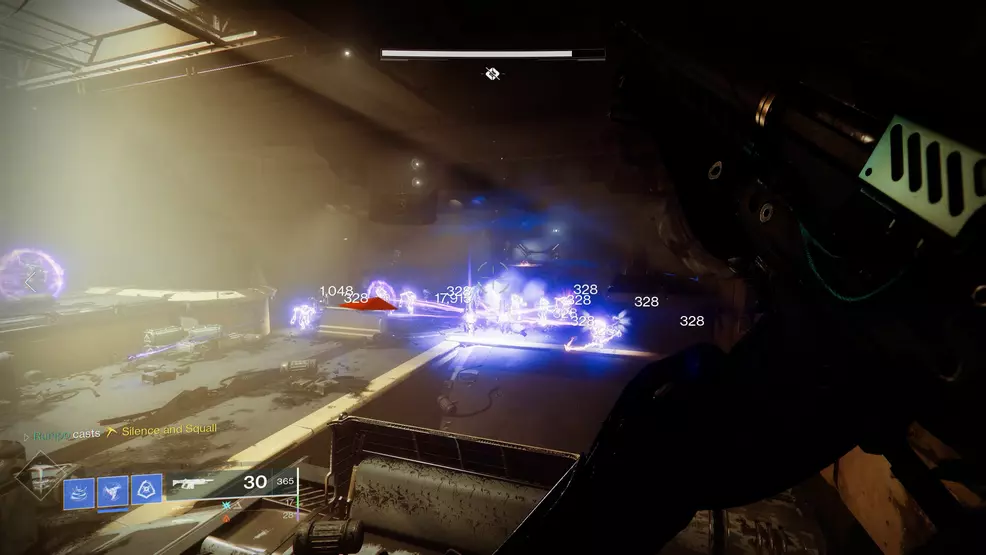
Welcome to the fight, Guardian. You're now in a hangar, but you're in here with a lot of mean looking Scorn, and a bunch of annoying Corrupted Screeb to complicate things. Your objective is simply to surivve, but I suggest you put the Scorn on notice that the scariest thing – probably – on this ship is you. There's really no guidance required here; you just need to win the fight. I found the area where you enter the hangar provided a decent spot to fight since the Scorn were on the opposite side of the room. Just watch out for rushing Corrupted Screebs, as they can end your fun in a big hurry if they get close enough.
Objective: Explore the Glykon
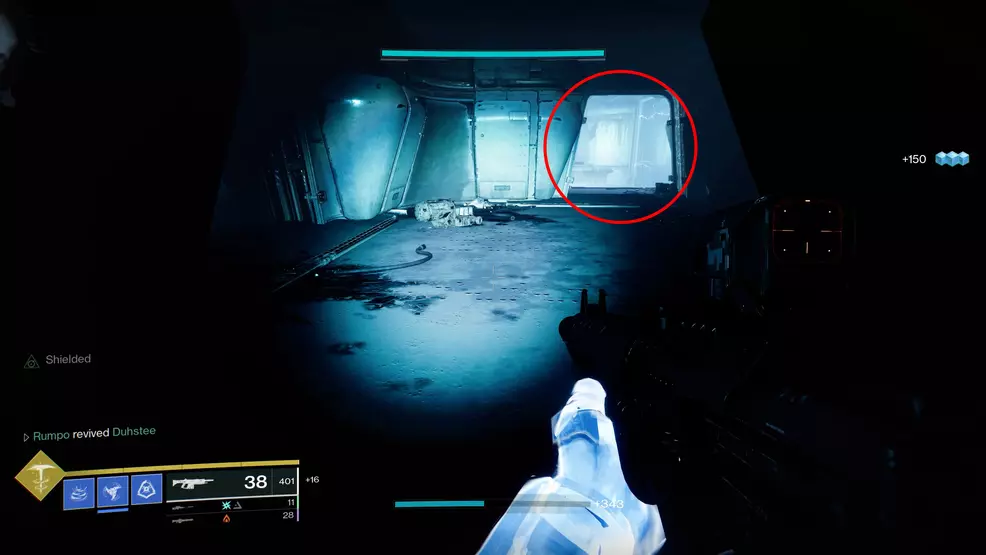
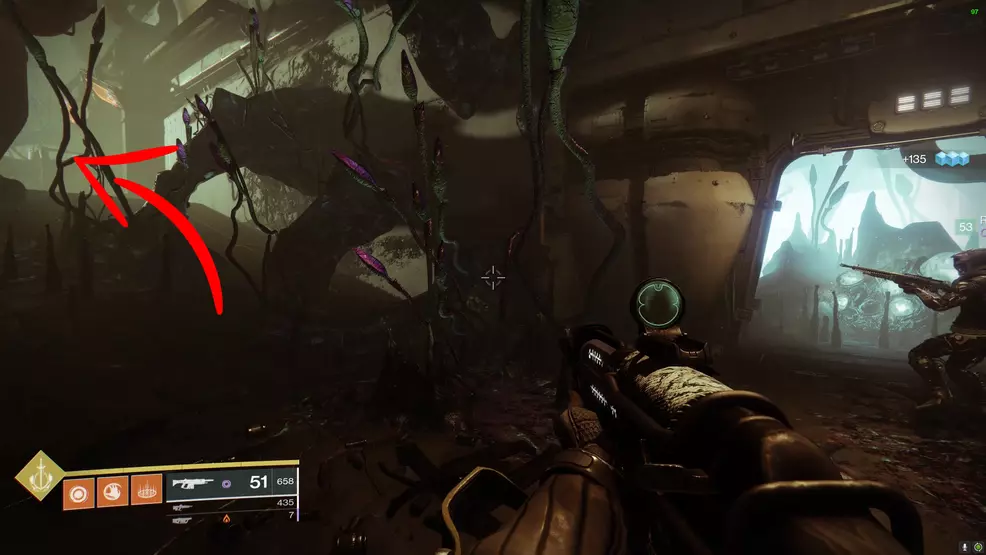
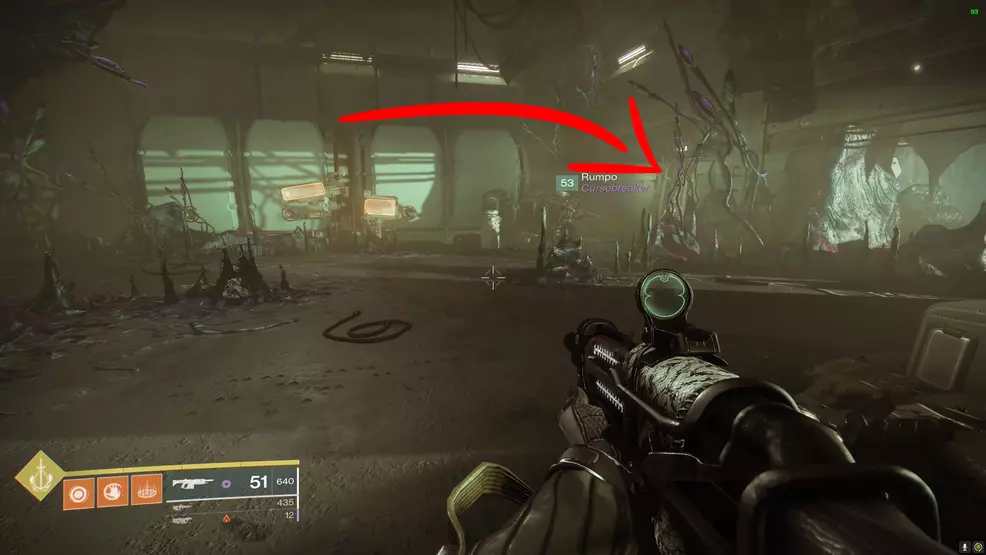
When the fight is over and you've collected all the ammo there is to find, look to the far left corner of the hangar from where you entered, left of the fancy ship parked near the outside. You need to head outside and jump around the ship and make your way back inside.
Hop on top of the Cabal ship and make your way as high as you can in this room. Your exit is in the top left corner from where you entered.
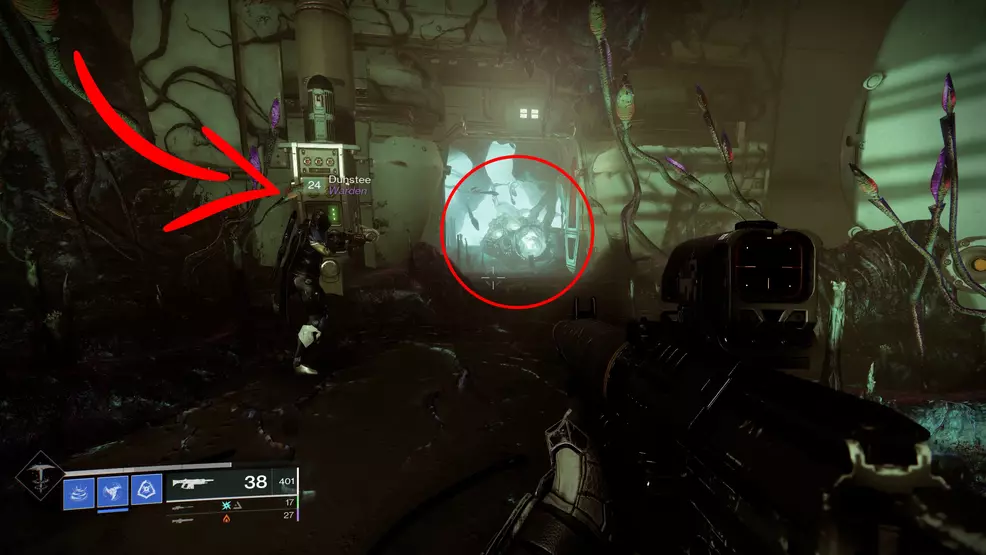

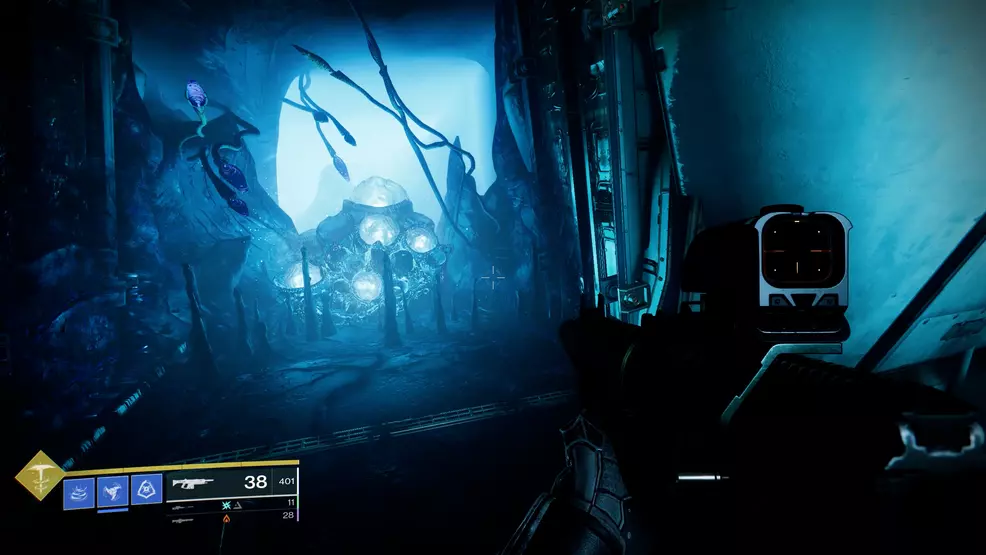
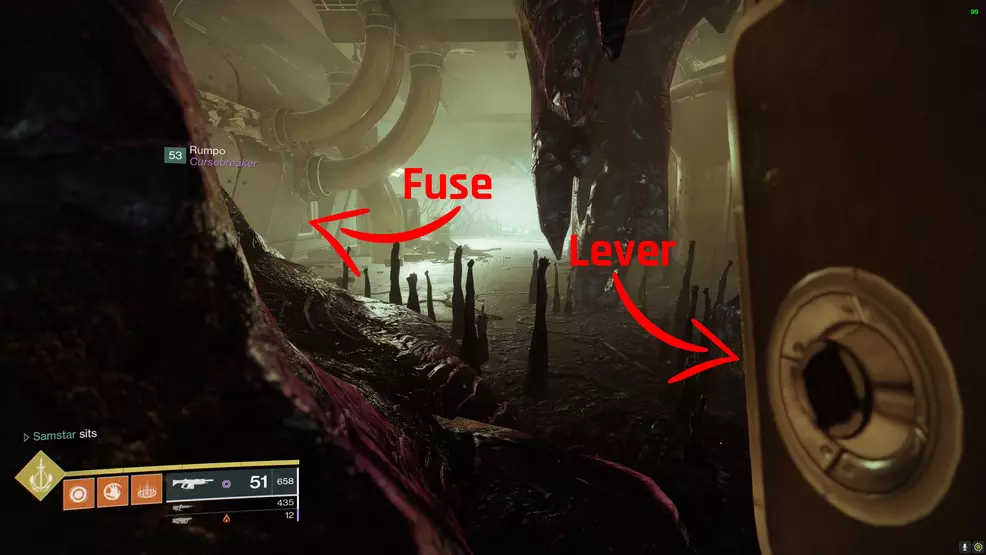
Follow the path until you drop down through another hole in the floor. The room ahead will have a dead Scorn in the center of it. From where you entered, the lever and glowing spores you need are to the left, and the door to exit is to the right. Head left and flip the lever, grab the Egregore Link buff, then run to the opposite side of the room, out the big door, and through the goop.
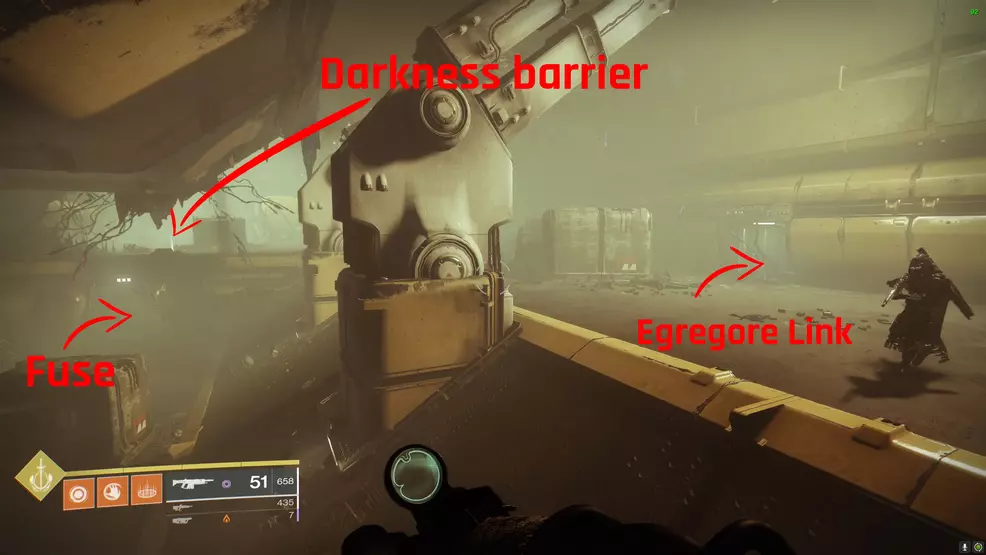
When you get through the goop and enter the next room, turn left and fight the Corrupted Screebs. Notice there is a giant canister – or vat – in the middle of the room. Pull the lever attached to it, then look to the far end of the room – below the electrified barrier – to see that you've opened a door and exposed a fuse. Shoot the fuse from near where you pulled the lever, disabling the electrified barrier, then jump up and past the barrier.
On the top level past the electrified barricade will be a lever to the right and a door on the left. Pull the lever, walk through the door, and then pull another lever in that room. One lever will open a door allowing you to drop back into the room you just left, and the other lever opened a door in the room with the large vat that will give you the Egregore Link buff.
With the two switches behind the electrical grid thrown, drop back down into the room with the canister/vat in the middle. A new door will have opened, revealing the spores needed for the Egregore Link. Grab the buff and run up the ramp, past the canister, and to the back left of the room. Jump up the platforms and double-back behind the wall and through the door where the Darkness barrier was. You’ll enter a little airlock area which opens up into a room with Corrupted Lurkers and other Scorn.
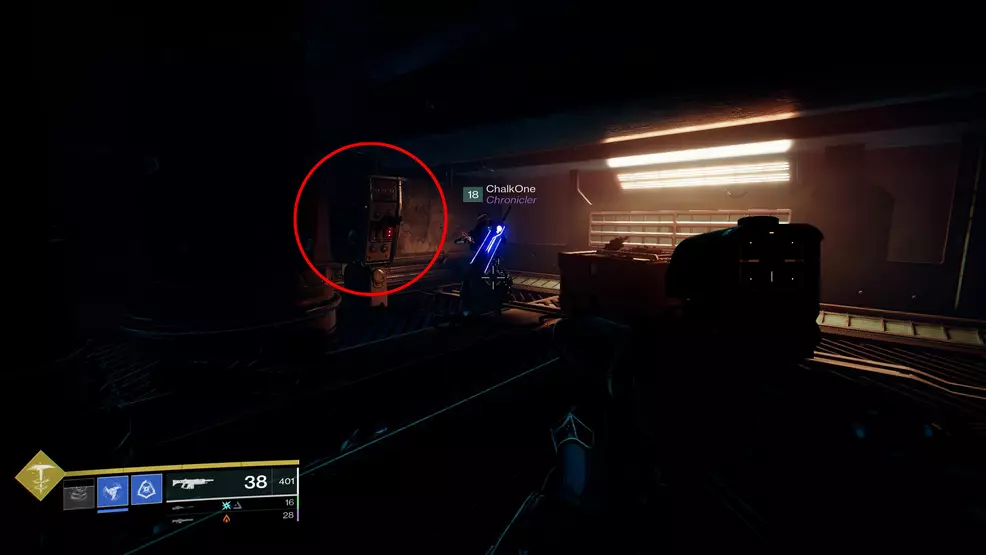
This new room with the Corrupted Lurkers, Screebs, and the Chieftain will have a Darkness barrier in the floor in the back left. The first step is to throw the lever which is on the cylinder canister in the back right of the room. This will open a door toward the start of the room, behind which is a Scorpius turret.
Defeat the Scorpius and shoot the fuse that is behind it. A door to the right of the entrance will open, granting access to the Egregore Link.
Shoot the spores to get the Egregore Link and run to the back left of the room, past the lever on the canister, and drop through the Darkness barrier. You will land on a small platform above a square room with a bunch of grates that can be destroyed.
Drop down into the square room and look up at the platform. This platform “connects” the two grates you must destroy (one on either end) – do not destroy the other ones. The grate on the barrel side of the room has the Egregore Link, the opposite side takes you to the Darkness barrier.
To reach the Darkness barrier, go through the first grate and take every left-hand option. A Screeb will run around a corner. Follow this path as it takes a right-hand turn. You will then find the Darkness barrier on your right and another grate on your left. When you understand the route, grab the Egregore Link and run through. When you reach the lever on the left wall, you’re safe.
Throw the lever to open the door in front of you. Follow the narrow tunnel to enter into one of the earlier rooms with the dead Scorn on a circular terminal. A door on your left will open, but you will need the Egregore Link on your right to pass through. Pass through the antechamber behind the glass and into the next room, which has a bunch of Corrupted Screebs, Corrupted Ravagers, and Deranged Abominations.
Clear out the Corrupted Scorn and go to the far end of the room, opposite where you entered. Here you will find a Darkness barrier on the right and a lever behind some stalactite gunk on the left. Throw the lever to open a door beside you, behind some yellow pipes.
Behind the yellow pipe door will be a fuse, destroy it to open a door at the entrance of the room. Get the Egregore Link from behind this door and go back to the other end of the room and through the Darkness barrier. You will enter a new, jumping-puzzle area with platforms that spin when you get close to them.
This new spinning platform room requires you to use the Egregore Link at the start to reach a second Egregore Link at the mid-point, allowing you to reach the end. Before you can do that, you will need to destroy a fuse. Note that there is a lever at the end of section that opens a door with a Scorpius turret waiting to shoot you in the back.
Go through the area to where the Corrupted Raider Scorn is sniping you. Jump up to its platform and look at the wall dividing the room – the fuse is on it between red pipes. Destroy the fuse to open a door on the platform where the sniper was standing.
Now, go back to the start of the section, get the Egregore Link and quickly run to the new door that opened. Pass through the Darkness barrier, get the new Egregore Link and run through to the end of the section. This will position you in a new room with another lever and a rally point so you can fill up on ammo and your Super before the boss fight. The lever opens up another door behind the Scorpius turret door, allowing you to double-back if you missed something.
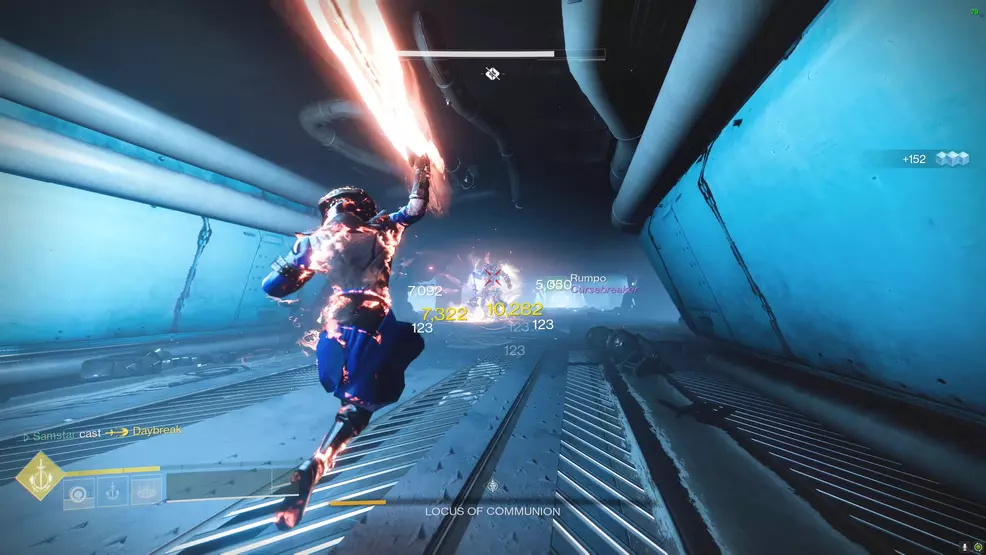
Locus of Communion boss fight
Now that you’ve gotten through all the Egregore Link and fuse-destroying rooms, you will now need to fight the boss, Locus of Communion. Get the Egregore Link buff once more, pass through the Darkness barrier and drop down the hole in the ground to enter the boss room.
This fight is divided into three phases, all of which are the same. The goal is to clear the room of enemies, activate three terminals to turn off the engine room, and drop down into the basement area and deal damage to the boss.

Begin by damaging the Locus of Communion until he goes immune. This will force him down into the basement, which is full of fire – you cannot follow him down there yet. When the boss does teleport out, Scorn will begin spawning in the room. Clear them out.
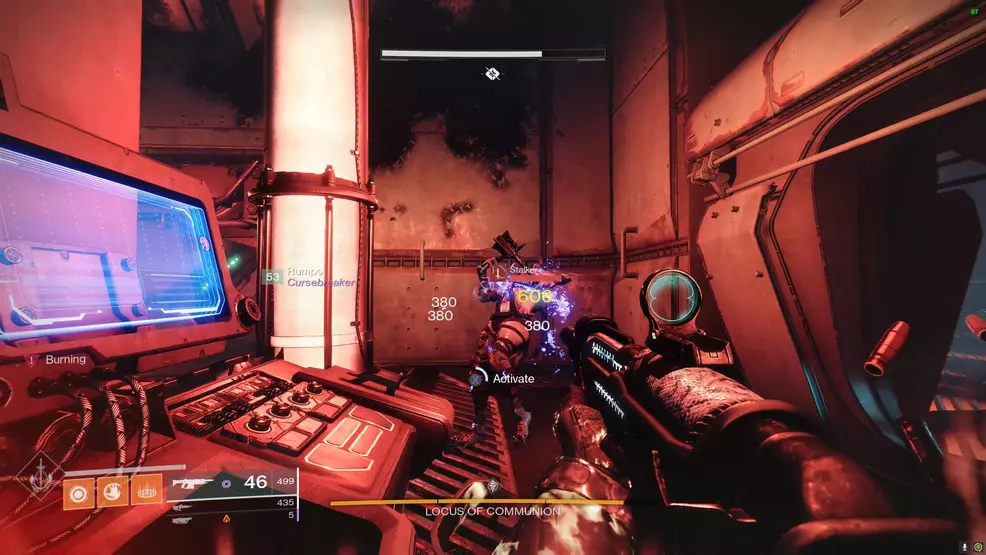
When you defeat the last of the Scorn, you can activate two terminals on the left and right side of the room. This will initiate two of the three Coolant Flushes. The third terminal is in the middle of the room and is defended by a Scorn Stalker. Defeat the Scorn from outside and then run in and activate the terminal. There is just enough time for the last Coolant Flush to activate, which will turn off the fire in the room.
With all three Coolant Flushes activated, you can now drop down into the basement using the holes in the floor around the room. This basement area is where you will deal damage to the Locus of Communion. Some other Scorn will spawn below and above, and the boss will run at you with his flail.
Use your Super or Heavy weapon to deal quick damage to him or your Primary and Secondary to chip at him. If he gets to close, jump up and out and use another hole to give yourself more space. Two of the holes have pipes you can stand on to get an angle on the boss without him hitting you.
When a bar of health is gone, the fire will turn back on and you will need to repeat the process of clearing Scorn, activating the terminals, and dropping down to attack the boss again. After a few cycles of this, the Locus of Communion will be defeated and you can continue on to the reward room to claim your Dead Man’s Tale.
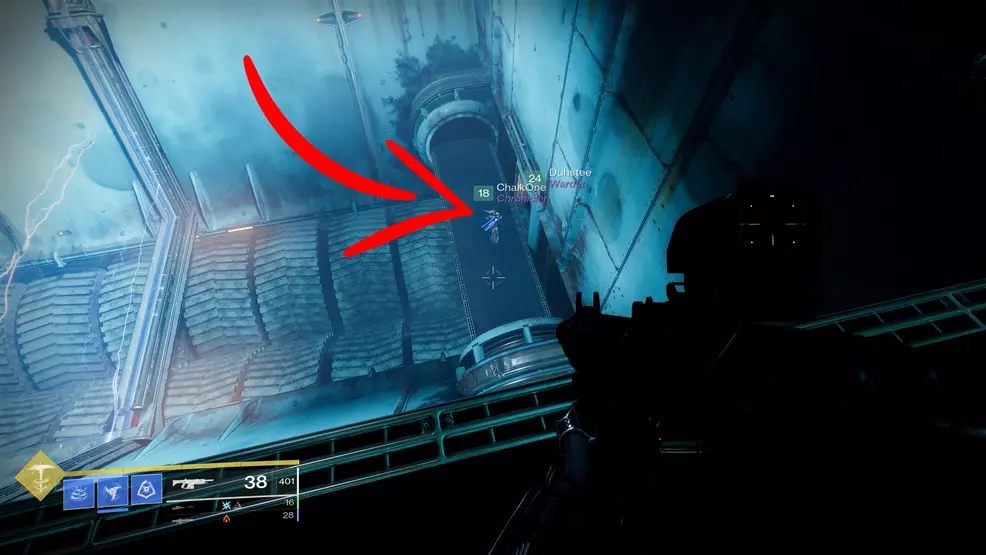
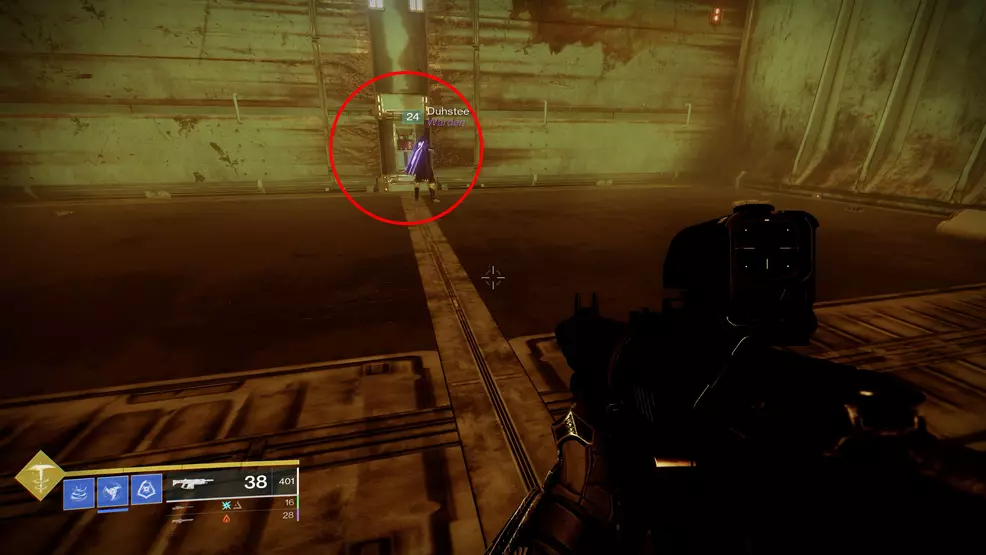
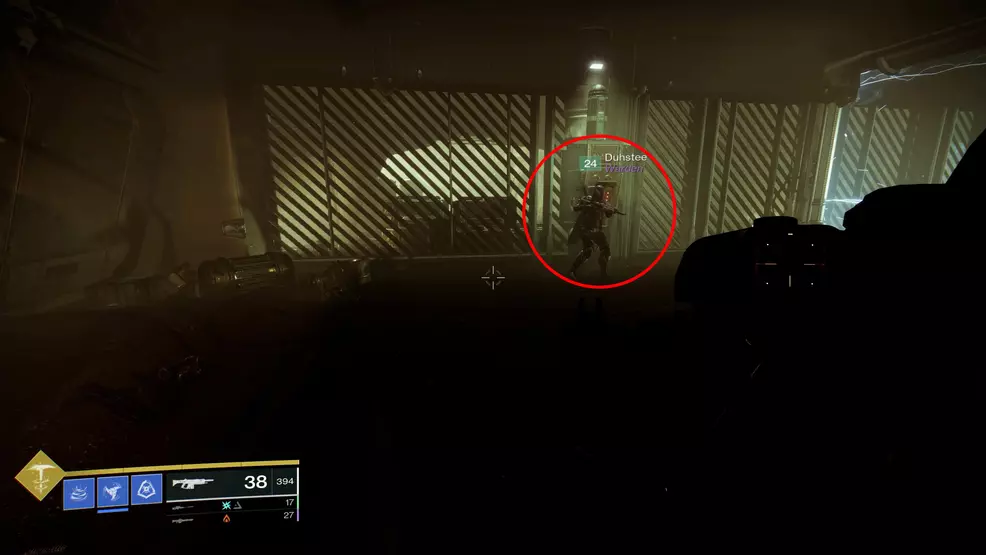
To leave this boss area, jump back up and go towards the central terminal. On one side will be an open door behind some pipes. Go through the door, then the narrow tunnel and drop down the hole in the ground. Continue until you reach the bridge with the Guardian. Claim your Dead Man’s Tale and wait for the mission to end.
The Presage quest has a whole lot of variety in it, from exploration to intense moments of combat. There are all scannables in Presage that players must find for various Triumphs. By following this guide, hopefully your first attempt at the Presage is a smooth one and you'll be ready to tackle the Master version or even solo it in the future. Make sure to visit out Destiny 2 strategy guide for more extensive guide content suited for Guardians of all skill levels.

-
Shacknews

 reply
replyBill Lavoy posted a new article, How to get Dead Man's Tale - Destiny 2
