
Void, Arc, and Solar configuration puzzle - Destiny 2
A complete list of the inputs and outputs for the Void, Arc, and Solar configurations as part of the Outbreak Perfected Exotic Catalyst quest in Destiny 2.
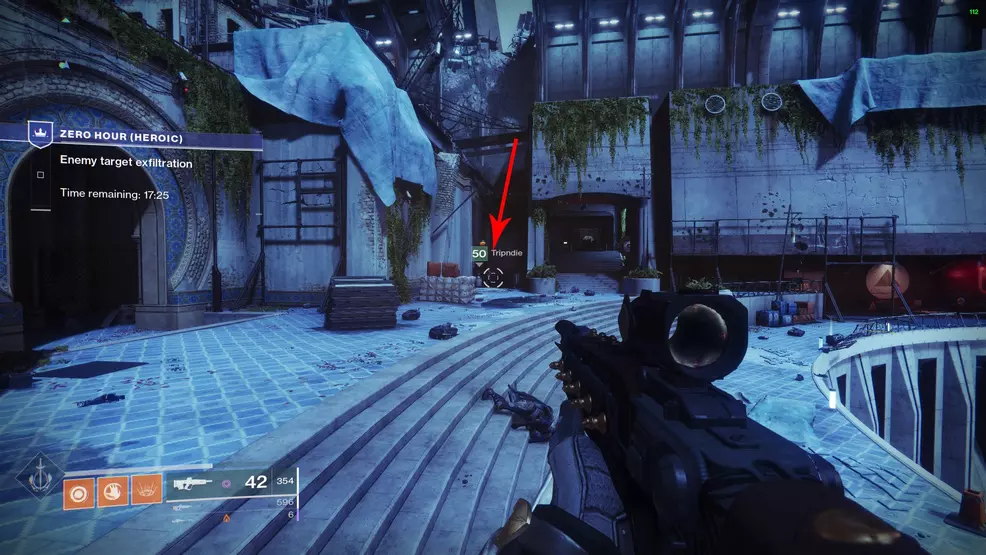
The Void, Arc, and Solar configuration puzzle in Destiny 2 is a requirement in unlocking the Outbreak Perfected Exotic Catalyst. This head-scratcher of a puzzle requires you to use terminals in the Heroic version of the Zero Hour mission to lock nodes to acquire 49 SIVA Particulates.
If you’ve found your way here, then you know exactly what you’re looking for. So let’s get to the tables. The information in these tables is thanks to the hard work of Raid Secrets and its affiliates.
Configuration and Keycards
Before you can begin sorting out the configuration puzzle, you must first acquire the configuration keypad as well as three colored keycards. The location of the keypad and keycards are the same whether you're doing the Void configuration, Arc configuration, or the Solar configuration. If someone does not pick up the keypad, they will not get the keycards and they cannot interact with the nodes in the vault.
The keypad and keycards are only on the Heroic Zero Hour mission.
Configuration keypad location
The keypad is located in the first outdoor fight area, to the left of the barrier down an alleyway and on some shelves.
Blue keycard location
The blue keycard is found after going through the vent near the aircraft. Drop down and walk down the stairs, instead of busting open the grate, look under the stairs to find a secret tunnel. Walk to the end of the tunnel, jump over the gap, and pick up the card.
Green keycard location
The green keycard is found just before the jumping puzzle that takes place on the wall. As you enter the room with the small pipe on the left and right, go right and look under the platform to find another hidden tunnel. At the back of this tunnel is the green keycard leaning against a box.
Red keycard location
The red keycard is found immediately after the jumping puzzle that takes place on the outside of the wall. Jump up and into the open door, and instead of turning right and going down the slide, turn left. Go to the end of the room to spot a well-hidden side passage. Go to the end and crouch down to spot the red keycard in a little vent.
With all three keycards found, you will be able to go to the Cryptarch's vault and access the nodes.
Fire Room Paths
Before you can start unlocking the Vault, you will need to make it through the fire room. This room will instantly kill you if you step on the wrong part of the floor. The correct route through the room changes each week, and so far there are only three paths. Find the path that matches the element you're charging this week and stick to the route.
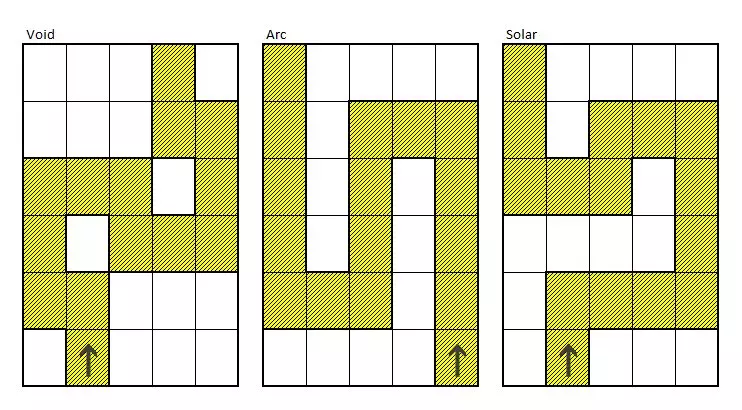
Credit to KPA_ for the above image.
Vault Room Terminal and Lock Layout
The Cryptarch Vault room contains the three main terminals and the 49 nodes that must be activated to claim the SIVA Particulates. Below is a diagram of the vault and the layout of the colored rooms. Use this in conjunction with the tables below to work out what terminal must be activated. Once you understand the general layout of the vault, you may no longer require this tool.
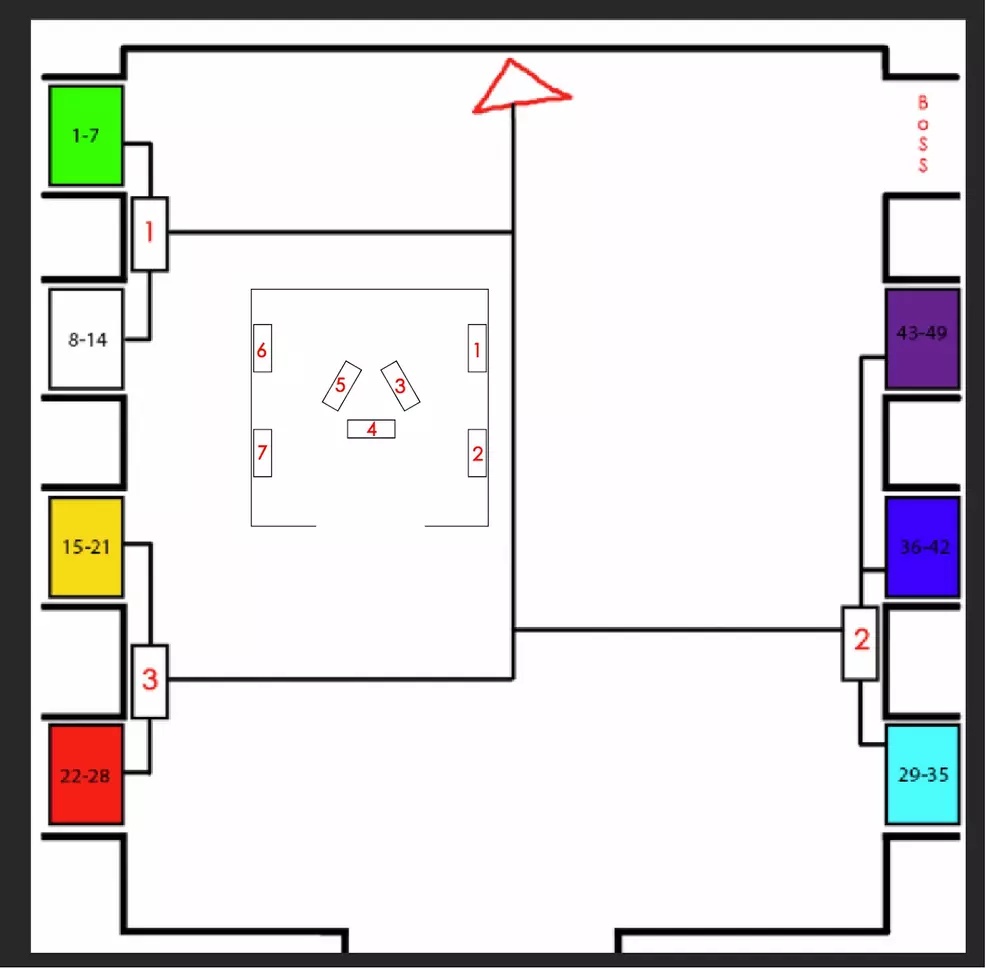
Credit to the Destiny clan Math Class for this image.
How to use the configuration tables
For those that are new to this puzzle or those returning and looking for a refresher, here is how to use the tables to find the solution and a brief overview of what this puzzle looks like. Guardian 1 will always be reading Terminal 1 (near green and white room), Guardian 2 will read Terminal 2 if there is a duplicate, and Guardian 2 and Guardian 3 will each take one side of the room.
- Have Guardian 1 stand at Terminal 1, read out the code, and check it against the tables
- If the code is a duplicate, Guardian 2 should read a different terminal to work out which room
- Guardian 2 or Guardian 3 runs to the room Guardian 1 calls out (whoever is closest)
- Guardian 2 or Guardian 3 enters the room and interacts with the correct screen
- Repeat
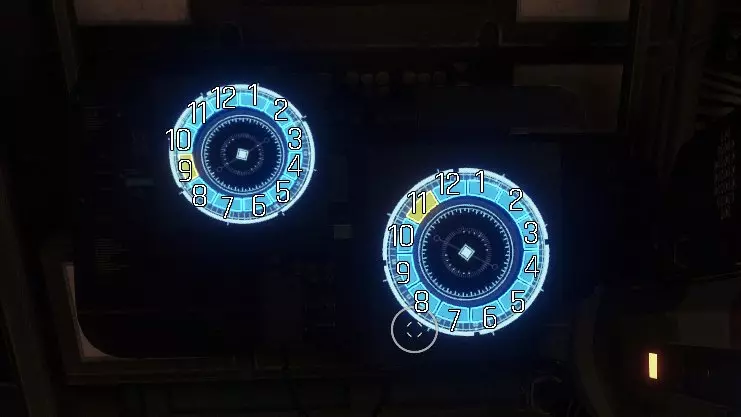
In the Cryptarch Vault room are three terminals. These terminals will have clock-like dials on them. Interacting with a terminal begins the configuration puzzle where segments of the clocks light up.
You must work out the segment number of the left and right clocks and put them together. For example, the above image would be 9-11. You then check the table to see what room this points to. If there are two entries with 9-11, use another terminal to narrow down the solution.
Depending on what week it is will change what configuration you will be using. Ensure you are reading from the correct table or you fail a node.
For every node you successfully lock, a small chunk of time will be added to the mission timer. This should allow your team to comfortably work through all 49 locks before the time runs out.
Configuration puzzle tables
Below are each of the three tables containing the input and outputs needed to solve the configuration. The tables are organized so that the first column is Terminal 1, followed by the next two, with the required room on the right.
If you do not want to scroll through the tables, there are some handy tools out there such as Configurations – Outbreak Perfected, which requires you to manually type in the segment numbers and spits out a solution.
Void Configuration puzzle – Inputs and Outputs
| Terminal 1 | Terminal 2 | Terminal 3 | Color and Number |
| 1-1 | 2-12 | 8-10 | White 1 |
| 1-1 | 4-5 | 6-5 | Red 2 |
| 1-2 | 1-4 | 11-4 | Red 1 |
| 1-7 | 12-3 | 8-4 | Yellow 3 |
| 1-10 | 7-11 | 3-12 | Red 6 |
| 1-12 | 1-1 | 5-4 | Cyan 3 |
| 2-4 | 1-6 | 3-10 | Green 2 |
| 2-5 | 11-2 | 3-5 | Yellow 2 |
| 2-6 | 5-4 | 10-3 | Cyan 1 |
| 2-7 | 2-11 | 9-10 | Yellow 6 |
| 2-9 | 12-3 | 10-2 | Purple 5 |
| 3-3 | 1-3 | 6-8 | Green 7 |
| 4-3 | 2-4 | 2-9 | Green 1 |
| 4-3 | 2-11 | 4-7 | Purple 6 |
| 4-6 | 5-6 | 5-12 | Blue 4 |
| 4-8 | 12-8 | 9-3 | White 5 |
| 4-9 | 9-4 | 5-5 | Yellow 1 |
| 5-6 | 7-3 | 7-10 | Red 5 |
| 5-9 | 11-7 | 12-10 | Purple 7 |
| 6-5 | 6-10 | 1-1 | Purple 1 |
| 6-9 | 12-10 | 8-5 | White 7 |
| 6-11 | 11-4 | 12-4 | Cyan 4 |
| 7-2 | 8-3 | 3-12 | White 6 |
| 7-4 | 2-7 | 7-9 | Green 5 |
| 7-9 | 6-5 | 5-12 | Yellow 4 |
| 7-12 | 1-2 | 5-4 | Blue 5 |
| 8-4 | 5-8 | 9-4 | Cyan 2 |
| 8-5 | 11-8 | 11-11 | Cyan 7 |
| 8-6 | 2-9 | 2-10 | White 3 |
| 8-6 | 9-2 | 12-12 | Yellow 5 |
| 8-10 | 5-6 | 11-11 | Red 3 |
| 8-12 | 5-9 | 9-4 | Cyan 6 |
| 9-3 | 12-7 | 12-12 | Green 3 |
| 9-7 | 7-8 | 12-7 | Purple 4 |
| 9-9 | 8-10 | 8-6 | Purple 2 |
| 10-2 | 3-8 | 9-3 | White 2 |
| 10-3 | 2-3 | 7-11 | Green 4 |
| 10-5 | 11-2 | 3-1 | Blue 2 |
| 10-12 | 11-5 | 8-12 | Green 6 |
| 11-1 | 5-7 | 10-2 | Blue 6 |
| 11-4 | 2-8 | 4-8 | Blue 7 |
| 11-4 | 4-11 | 12-3 | Yellow 7 |
| 11-4 | 5-4 | 7-6 | Red 4 |
| 11-6 | 12-8 | 11-11 | Red 7 |
| 11-7 | 6-3 | 12-5 | Purple 3 |
| 11-11 | 7-3 | 8-11 | Blue 3 |
| 12-2 | 11-4 | 10-2 | Cyan 5 |
| 12-5 | 7-1 | 5-7 | White 4 |
| 12-5 | 12-11 | 4-4 | Blue 1 |
Arc Configuration puzzle – Inputs and Outputs
| Terminal 1 | Terminal 2 | Terminal 3 | Color and Number |
| 1-4 | 5-7 | 6-7 | Red 6 |
| 1-6 | 11-3 | 5-1 | Yellow 7 |
| 2-4 | 12-10 | 8-6 | Green 3 |
| 2-9 | 4-3 | 2-11 | Green 2 |
| 2-9 | 5-9 | 1-8 | Purple 6 |
| 3-5 | 7-6 | 4-12 | Cyan 2 |
| 3-8 | 1-8 | 3-7 | Yellow 4 |
| 4-4 | 10-3 | 4-1 | Cyan 1 |
| 4-5 | 9-7 | 1-6 | White 4 |
| 4-6 | 6-12 | 9-8 | Purple 2 |
| 4-7 | 3-5 | 5-1 | Blue 5 |
| 4-8 | 8-7 | 4-8 | White 5 |
| 4-9 | 1-1 | 11-5 | Cyan 5 |
| 4-12 | 2-7 | 2-10 | Green 6 |
| 4-12 | 5-6 | 4-4 | Yellow 1 |
| 5-4 | 5-2 | 8-5 | Red 5 |
| 5-4 | 11-8 | 9-8 | Cyan 7 |
| 5-8 | 3-2 | 2-11 | Red 7 |
| 5-9 | 1-1 | 5-11 | Red 1 |
| 5-9 | 6-8 | 2-2 | Red 4 |
| 6-2 | 12-5 | 9-3 | Blue 3 |
| 6-2 | 1-7 | 7-5 | Purple 5 |
| 6-3 | 10-3 | 7-3 | White 1 |
| 6-5 | 2-12 | 7-3 | Blue 1 |
| 7-3 | 2-9 | 9-5 | Cyan 3 |
| 7-9 | 5-12 | 10-4 | Yellow 5 |
| 8-1 | 11-2 | 7-4 | Red 2 |
| 8-3 | 4-9 | 5-9 | Purple 7 |
| 8-9 | 9-12 | 11-1 | Green 7 |
| 8-11 | 7-9 | 9-5 | Cyan 4 |
| 8-12 | 6-4 | 12-6 | White 7 |
| 9-1 | 12-4 | 11-4 | Yellow 3 |
| 9-6 | 5-3 | 8-7 | Purple 4 |
| 9-10 | 11-4 | 7-11 | Yellow 2 |
| 9-11 | 12-6 | 3-7 | Blue 4 |
| 9-11 | 1-3 | 7-11 | Blue 7 |
| 9-12 | 7-6 | 4-9 | Purple 1 |
| 10-8 | 11-6 | 4-2 | Red 3 |
| 10-9 | 3-7 | 7-12 | Blue 6 |
| 10-11 | 3-2 | 8-7 | Green 1 |
| 10-11 | 9-3 | 4-9 | Yellow 6 |
| 10-12 | 8-4 | 12-4 | Green 5 |
| 10-12 | 9-6 | 5-7 | White 3 |
| 11-1 | 2-10 | 7-1 | White 2 |
| 11-11 | 9-11 | 3-6 | White 6 |
| 12-5 | 11-4 | 5-1 | Cyan 6 |
| 12-7 | 1-8 | 5-7 | Purple 3 |
| 12-8 | 1-8 | 8-3 | Blue 2 |
| 12-12 | 1-6 | 4-1 | Green 4 |
Solar Configuration puzzle – Inputs and Outputs
| Terminal 1 | Terminal 2 | Terminal 3 | Color and Number |
| 1-2 | 6-10 | 12-11 | Green 4 |
| 1-3 | 7-7 | 4-12 | Cyan 4 |
| 1-7 | 2-8 | 5-6 | White 6 |
| 1-7 | 9-5 | 10-6 | Green 6 |
| 1-10 | 5-2 | 2-4 | Yellow 2 |
| 1-11 | 6-4 | 6-10 | Yellow 6 |
| 2-6 | 8-9 | 6-8 | Purple 2 |
| 2-10 | 7-1 | 1-7 | Purple 5 |
| 2-11 | 1-6 | 6-10 | Blue 4 |
| 2-11 | 12-8 | 9-1 | Blue 6 |
| 3-5 | 2-4 | 9-12 | White 7 |
| 4-6 | 9-2 | 10-8 | White 5 |
| 4-8 | 2-6 | 5-5 | Red 2 |
| 5-6 | 1-7 | 8-9 | Purple 6 |
| 5-10 | 10-1 | 4-8 | Purple 4 |
| 5-11 | 3-12 | 1-8 | Cyan 6 |
| 5-11 | 7-2 | 7-6 | Yellow 5 |
| 6-7 | 4-1 | 1-11 | Green 7 |
| 6-8 | 10-7 | 11-9 | Purple 7 |
| 6-11 | 12-8 | 5-11 | Purple 1 |
| 7-4 | 3-7 | 3-8 | Red 7 |
| 7-8 | 1-9 | 6-5 | White 3 |
| 7-8 | 3-4 | 9-12 | Green 3 |
| 7-11 | 1-9 | 7-9 | Red 1 |
| 7-12 | 6-5 | 2-2 | Red 4 |
| 8-5 | 4-10 | 4-5 | Green 1 |
| 8-7 | 4-8 | 8-10 | Blue 3 |
| 8-10 | 7-9 | 4-8 | White 1 |
| 8-11 | 4-12 | 10-10 | Red 5 |
| 8-12 | 11-7 | 3-1 | Blue 5 |
| 9-4 | 10-9 | 7-2 | Cyan 7 |
| 9-6 | 1-6 | 9-8 | Cyan 3 |
| 9-7 | 3-5 | 2-8 | Yellow 1 |
| 9-10 | 3-3 | 11-6 | Purple 3 |
| 9-10 | 10-3 | 8-3 | Green 2 |
| 9-10 | 11-11 | 8-7 | Blue 1 |
| 9-11 | 7-2 | 8-9 | White 2 |
| 9-11 | 3-10 | 9-5 | Blue 2 |
| 10-3 | 8-4 | 9-12 | Yellow 3 |
| 10-5 | 6-12 | 3-12 | Cyan 1 |
| 10-6 | 5-2 | 5-7 | Cyan 2 |
| 10-10 | 2-6 | 12-8 | Cyan 5 |
| 11-2 | 8-2 | 9-2 | White 4 |
| 11-4 | 4-6 | 12-5 | Blue 7 |
| 11-9 | 11-4 | 9-3 | Yellow 7 |
| 11-11 | 8-7 | 1-12 | Red 3 |
| 12-1 | 3-10 | 12-10 | Red 6 |
| 12-7 | 11-7 | 1-12 | Yellow 4 |
| 12-10 | 6-5 | 1-1 | Green 5 |
After inputting all 49 nodes in the correct order, you should complete the configuration puzzle you were attempting. Be sure to check back each week as the Heroic Zero Hour rotates through the Void, Arc, and Solar configurations. Check out the Shacknews Destiny 2 guide for more walkthroughs and complete coverage of the latest content drops.

-
Shacknews

 reply
replySam Chandler posted a new article, Void, Arc, and Solar configuration puzzle - Destiny 2
