
All Ascendant Chests in the Dreaming City in Destiny 2
Where to find all the Ascendant Chests hidden around the Dreaming City.
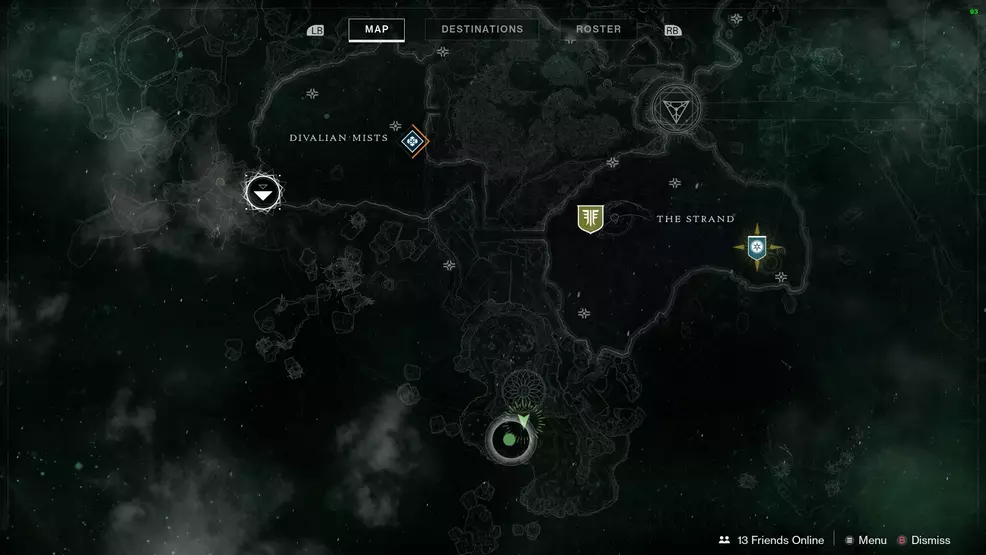
The Dreaming City houses more than just the raid and a bunch of cats, it contains Ascendant Chests hidden in obscure and difficult to reach places. Every week, the location of the ten Ascendant Chests changes, and every week, a new Triumph is unlocked for players who manage to find them all.
All Ascendant Chests
The Ascendant Chests can only be accessed by using a Tincture of Queensfoil, as without the Ascendance buff, the platforms leading to the chest will not appear and players will be unable to interact with the chest. Make sure you know how to get more Tincture of Queensfoil, as collecting all these may take longer than the 30 minutes that the buff lasts.
Every weekly reset, the ten Ascendant Chests that are available are a part of a different Triumph, with the first week being Hidden Riches and the second being Bolder Fortunes. Players who missed the first week’s Ascendant Chests will need to wait until the cycle repeats in order to unlock the Triumph.
- Ascendant Chests - Hidden Riches - Curse Weak
- Ascendant Chests - Bolder Fortunes - Curse Medium
- Ascendant Chests - War Chests - Curse Strong
There will be one chest in each of the main areas in the Dreaming City, for a total of 10 chests:
- Spine of Keres
- The Confluence (accessed via Spine of Keres)
- Divalian Mists
- Bay of Drowned Wishes Lost Sector
- Rheasilvia
- Chamber of Starlight
- Harbinger's Seclude
- The Strand
- Aphelion's Rest
- Gardens of Esila
Ascendant Chests – Hidden Riches
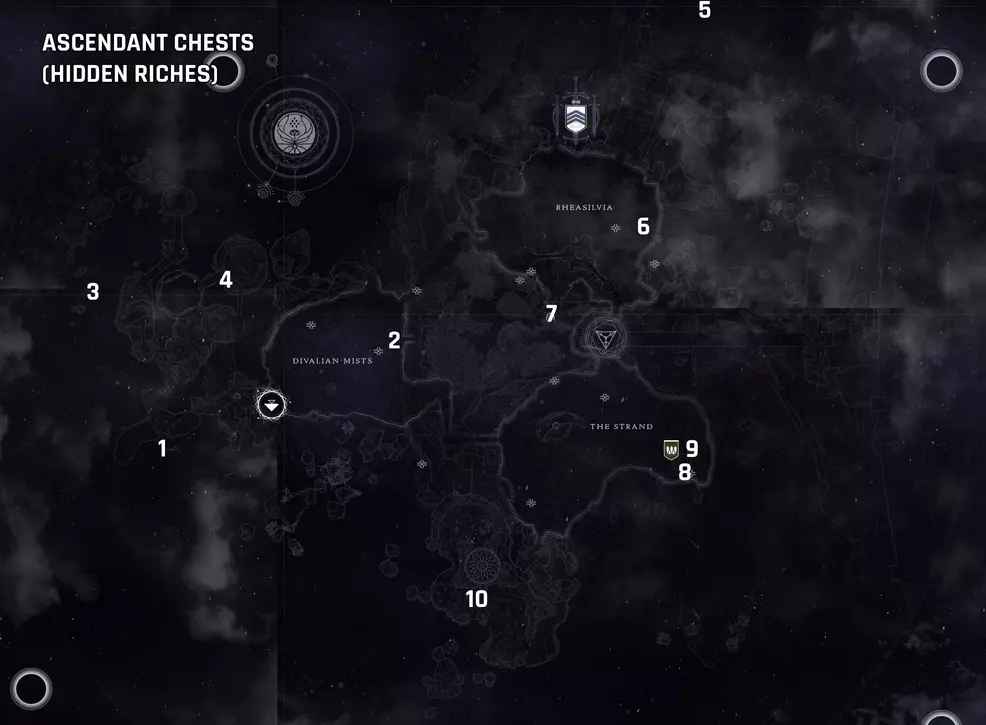
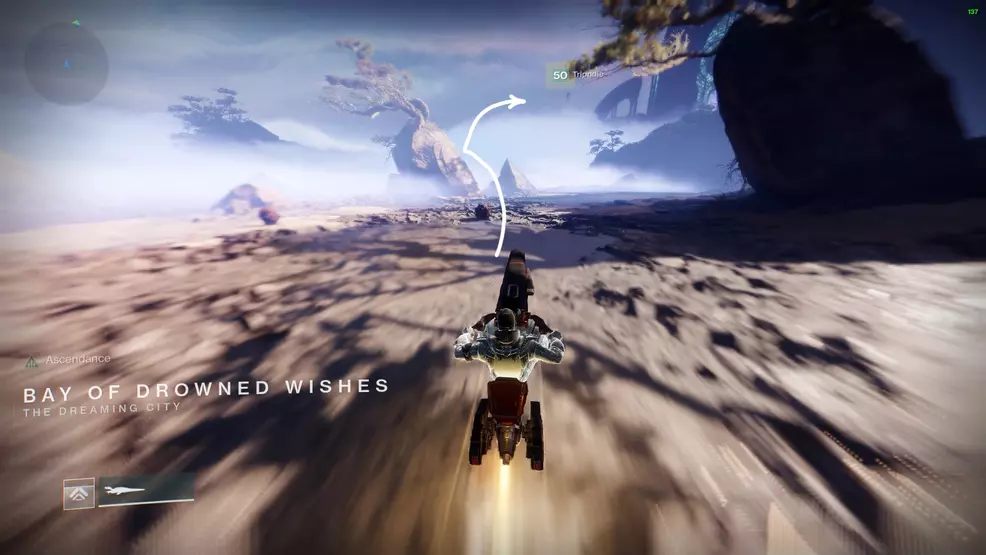
Ascendant Chests – Hidden Riches 1: Bay of Drowned Wishes
Source: Shacknews
Source: Shacknews
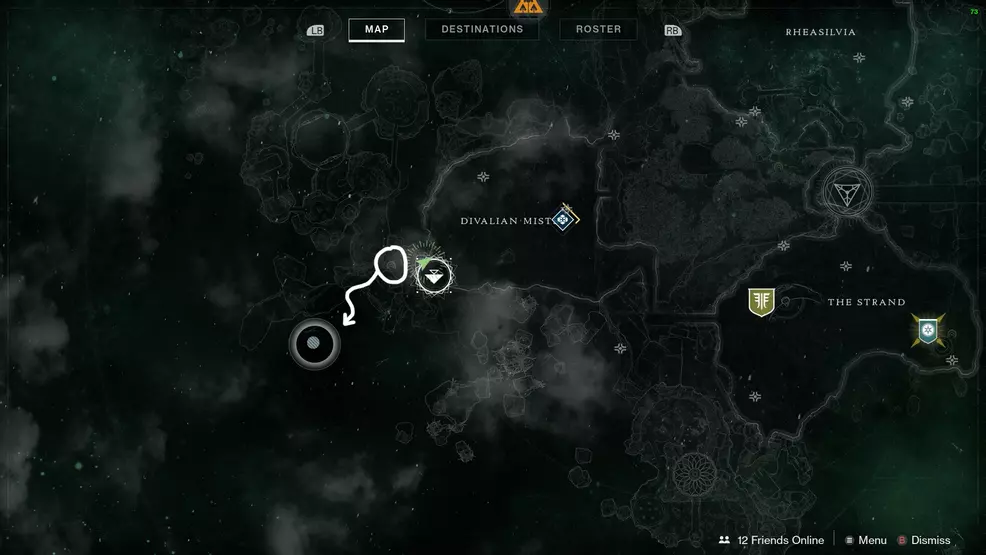
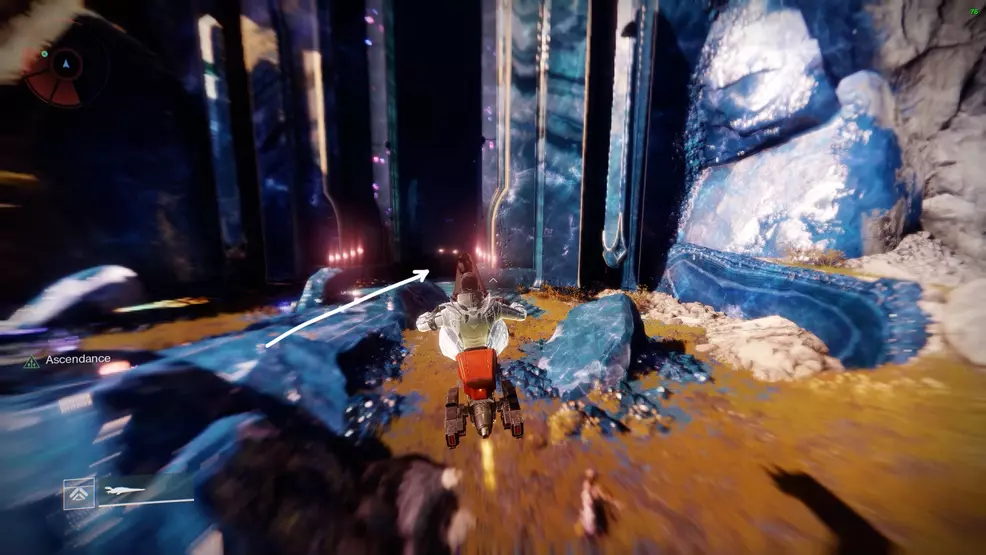
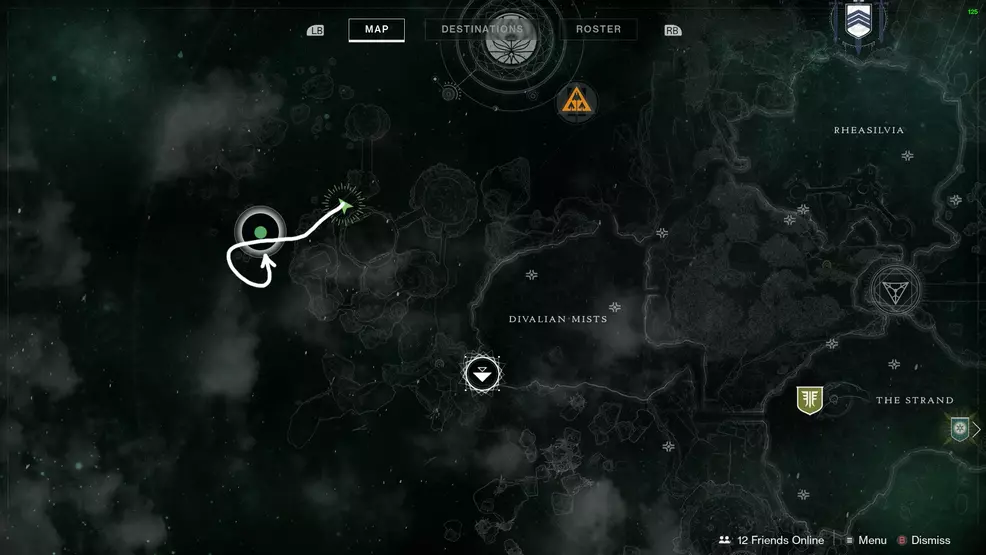
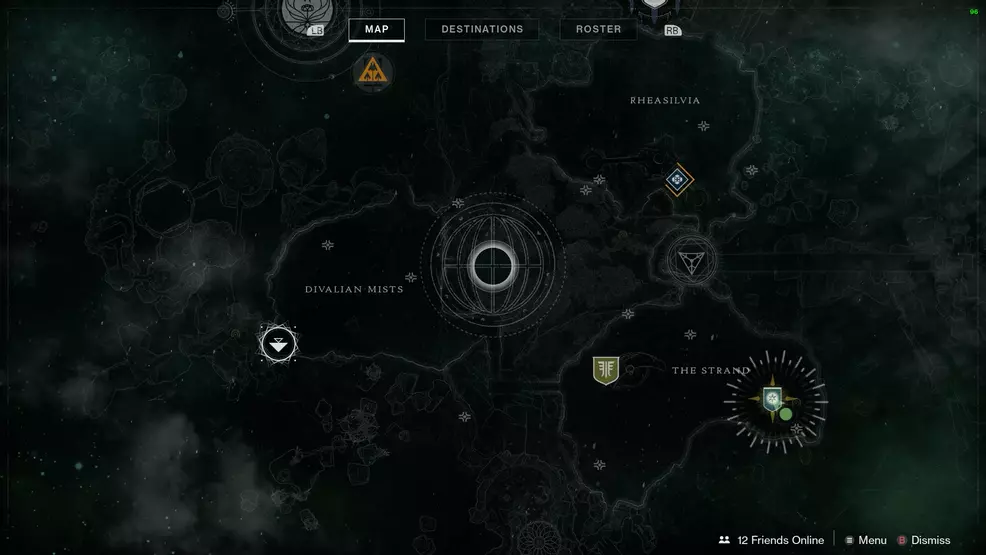
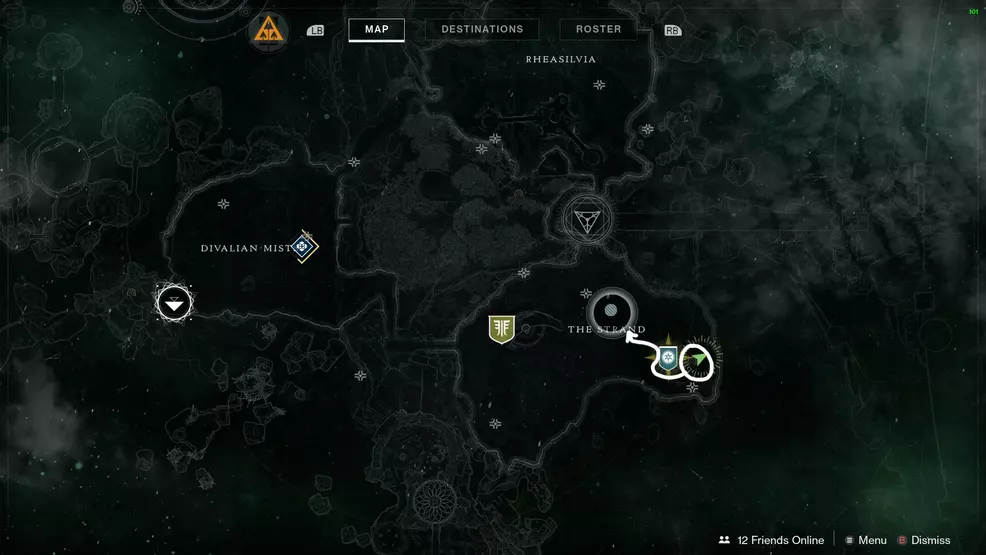
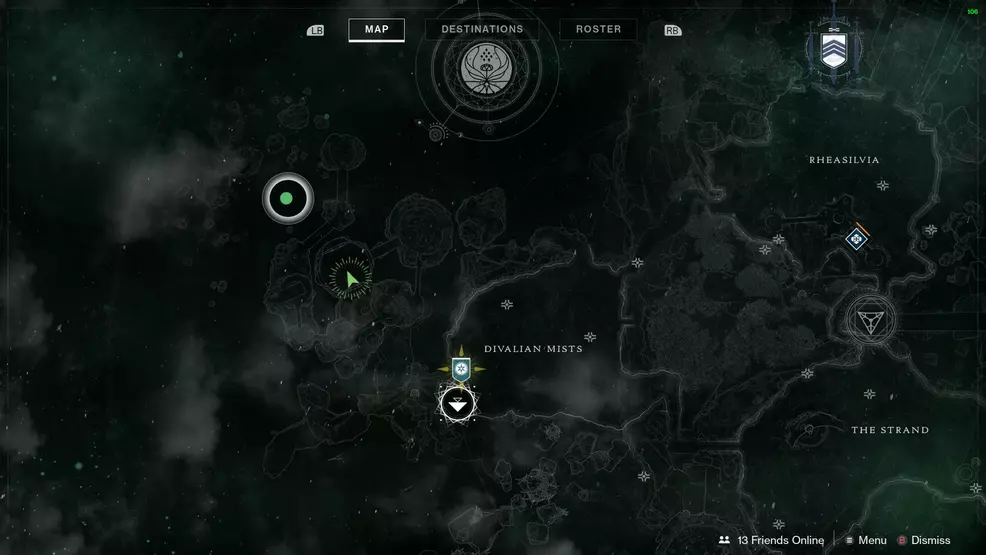
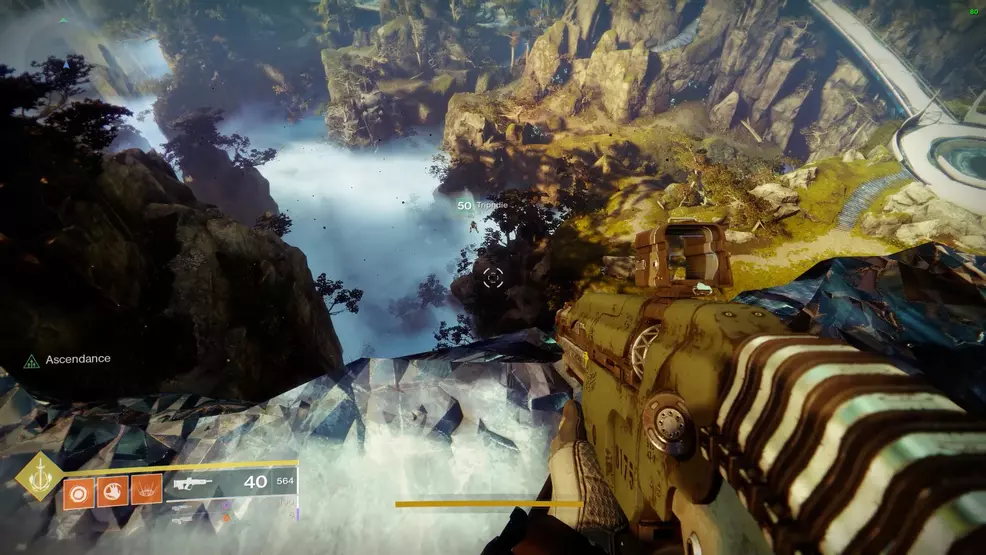
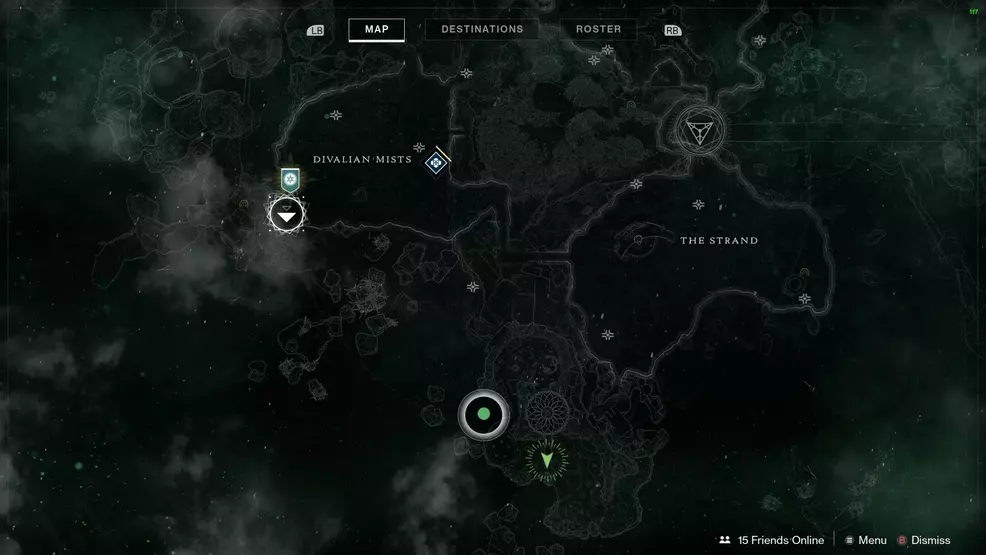
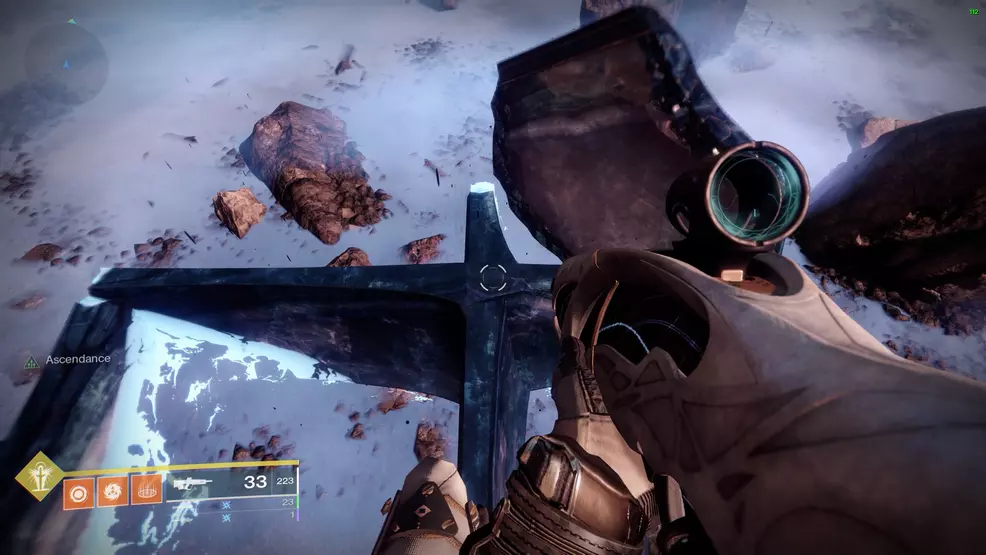
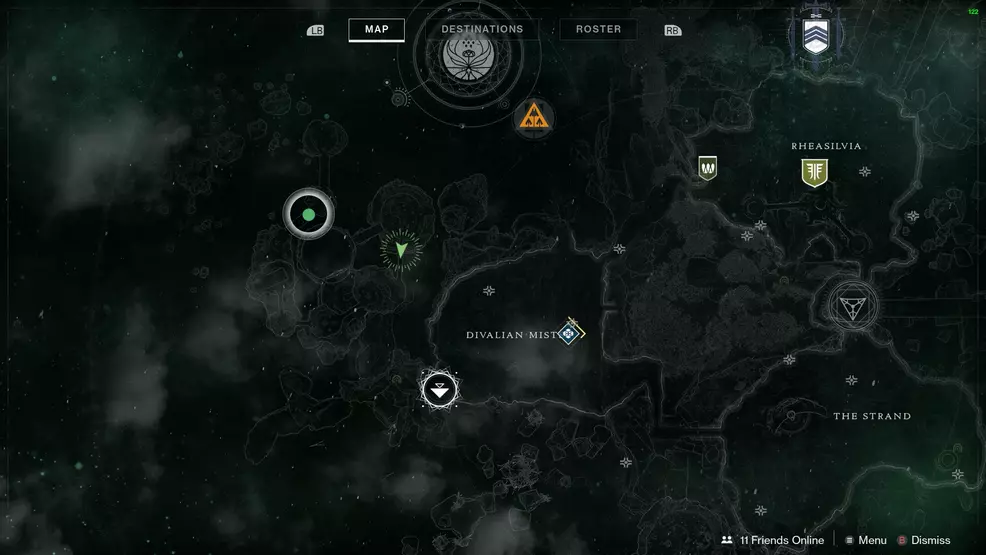
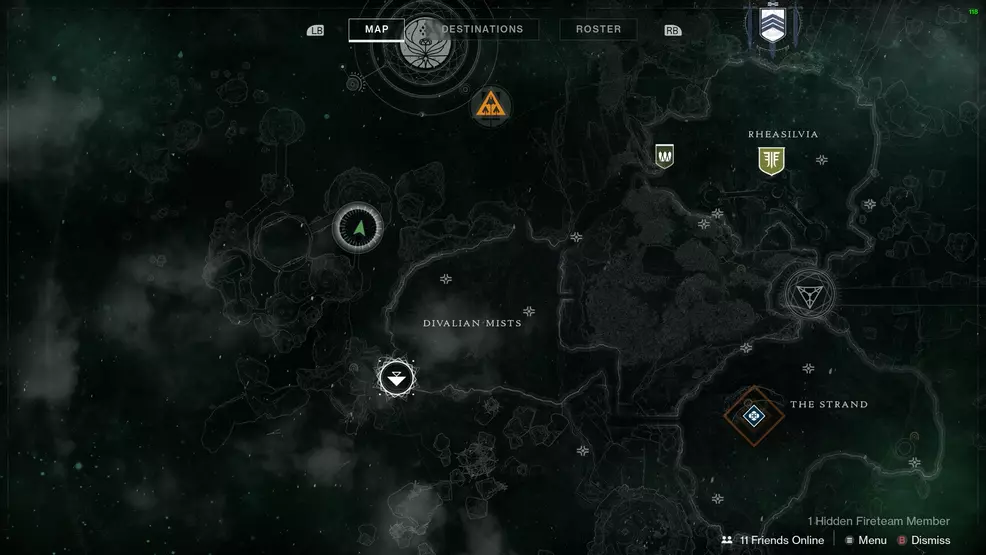
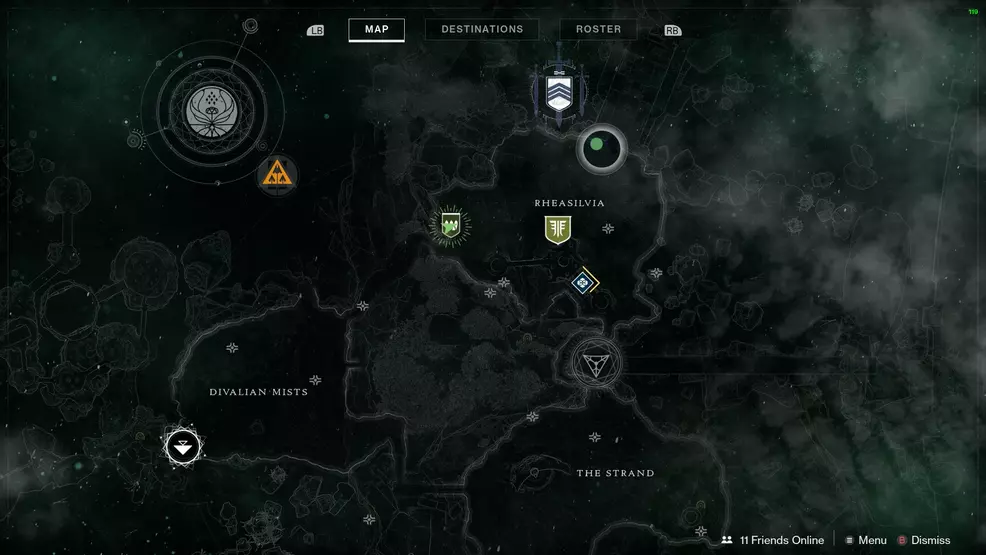
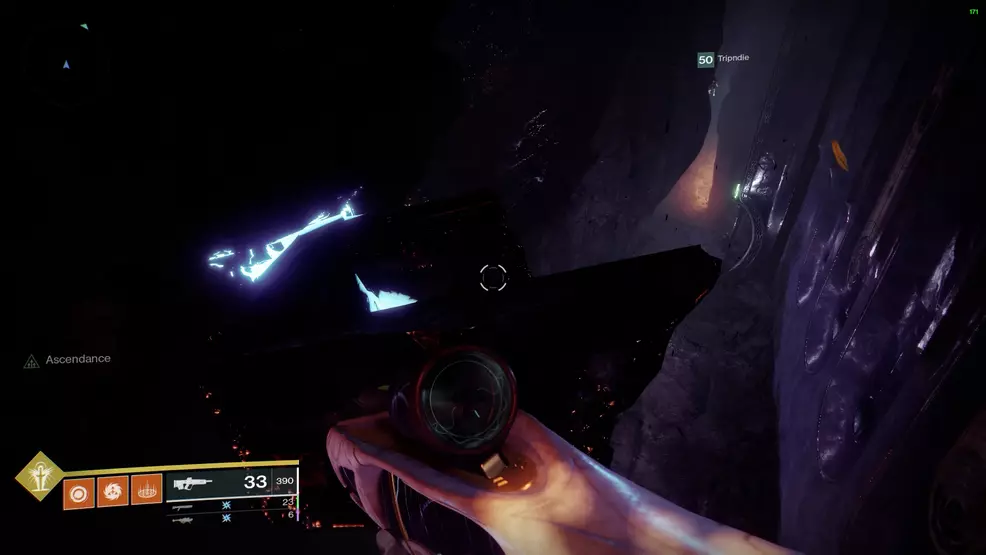
The first Ascendant Chest in the Hidden Riches collection is located in the Bay of Drowned Wishes Lost Sector behind the Divalian Mists fast travel point. Enter the Lost Sector and cut across the open lake to the rocks on the right. Climb the rocks and turn around to see the first of a few platforms leading to the chest.
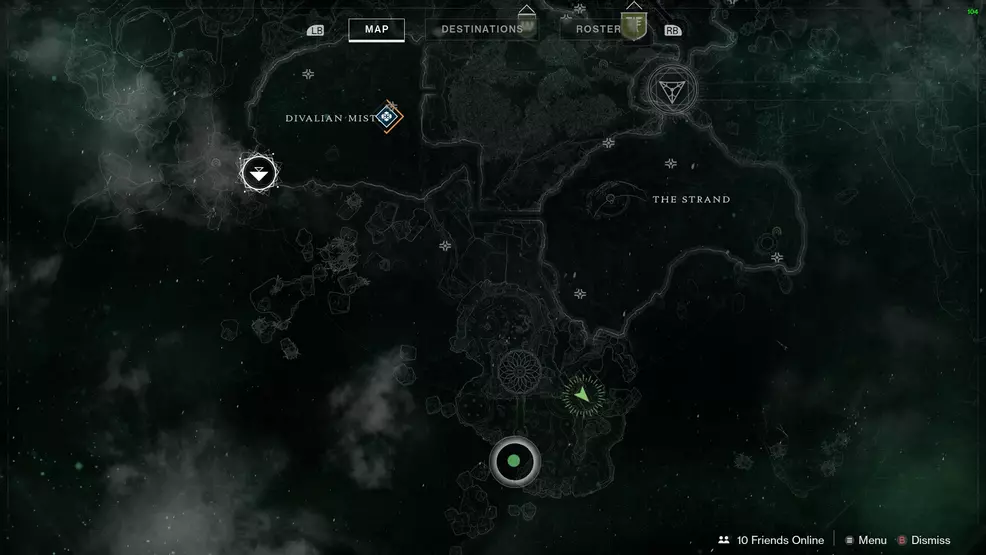
Ascendant Chests – Hidden Riches 2: Divalian Mists
Source: Shacknews
Source: Shacknews
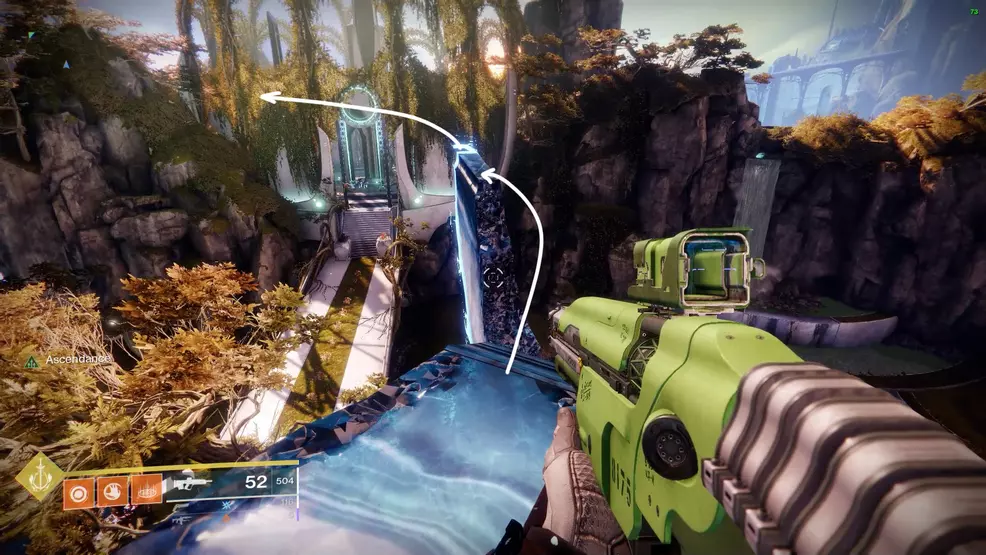
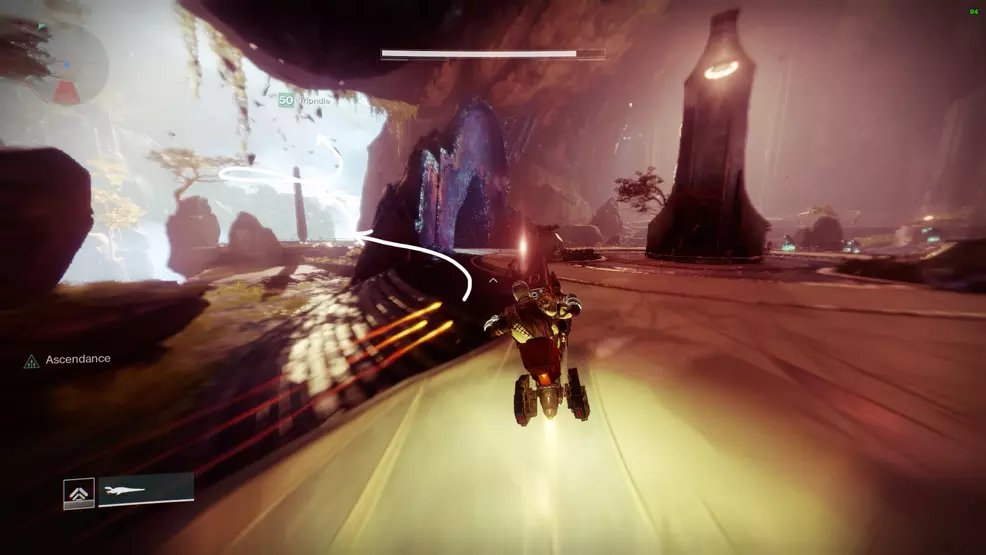
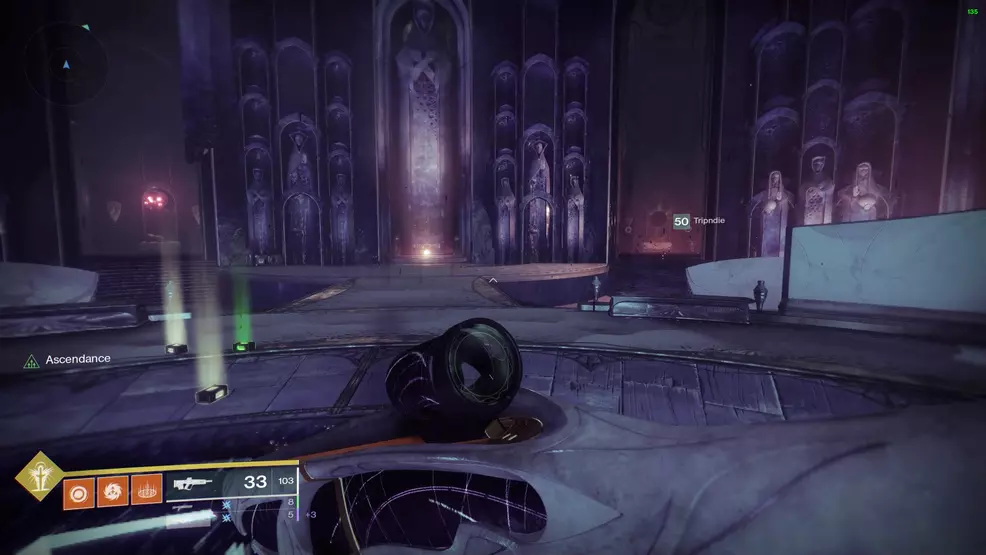
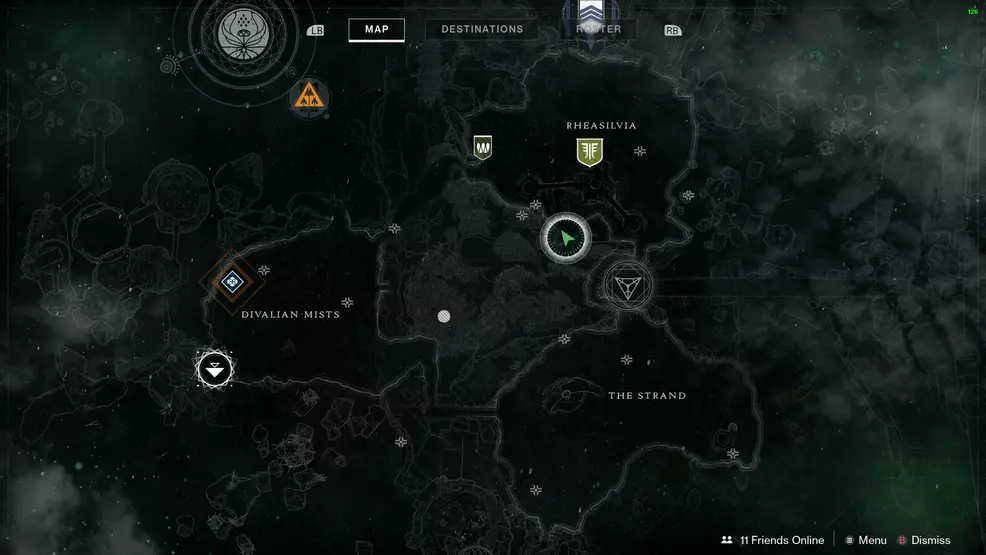
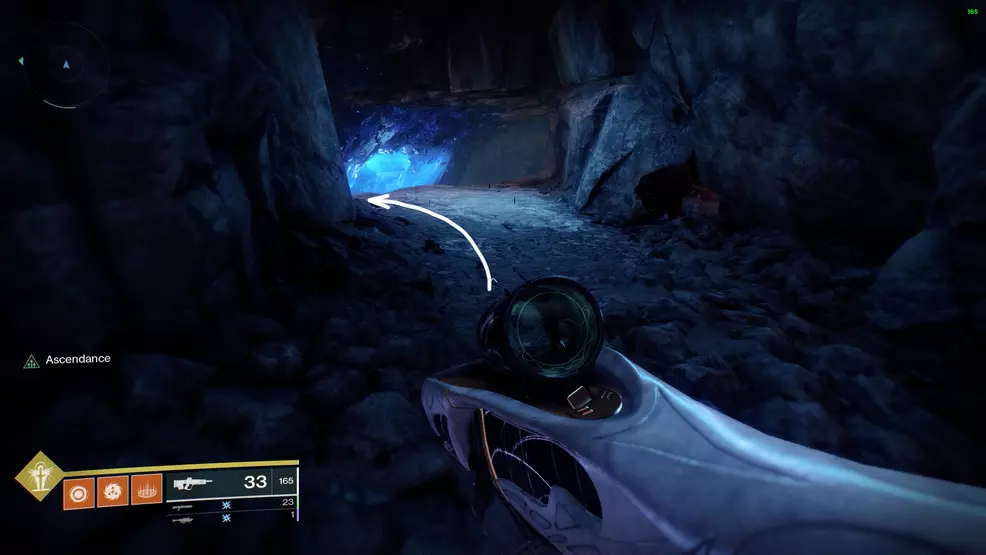
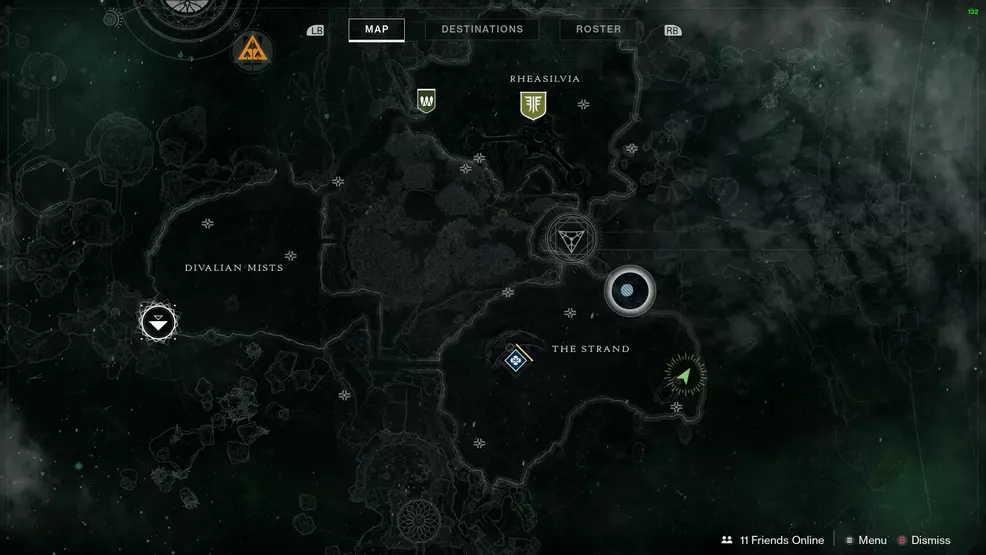
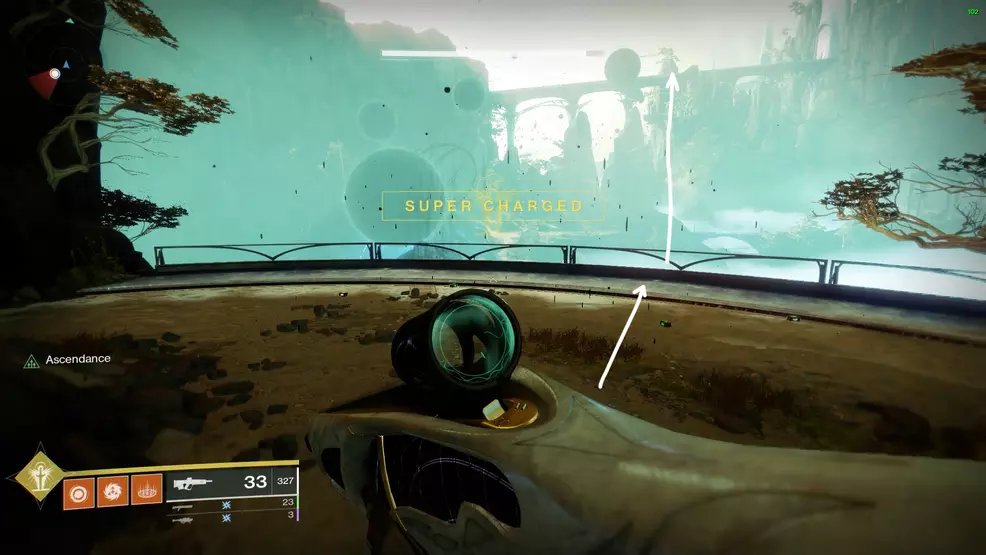
The next Ascendant Chest in the Hidden Riches collection can be found above the entrance to the Blind Well. Pass the enemies fighting outside and head into the foyer to find the first platform near the statue at the start of the next hallway. Jump up and around the room, following the platforms as they lead back outside to the chest.
Source: Shacknews
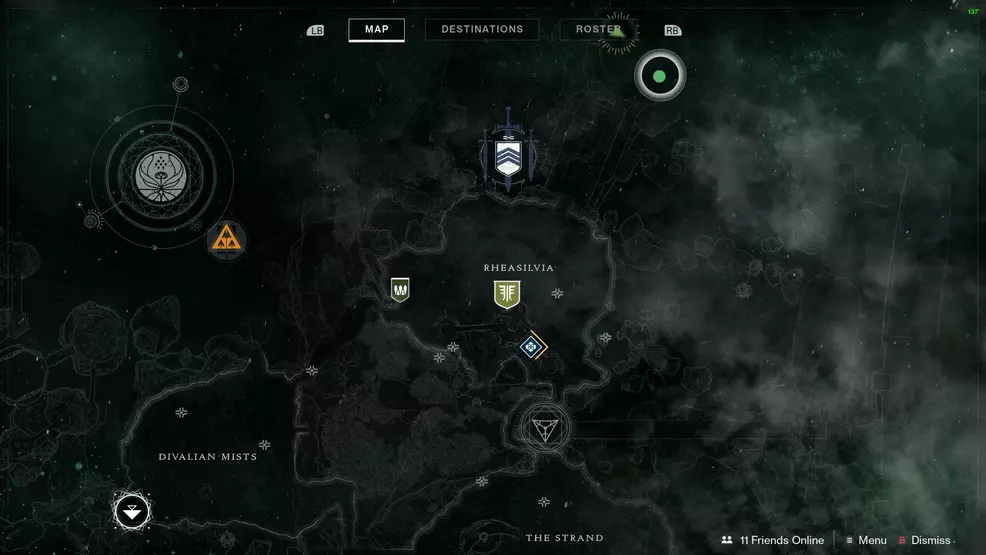
Ascendant Chests – Hidden Riches 3: Spine of Keres
Source: Shacknews
Source: Shacknews
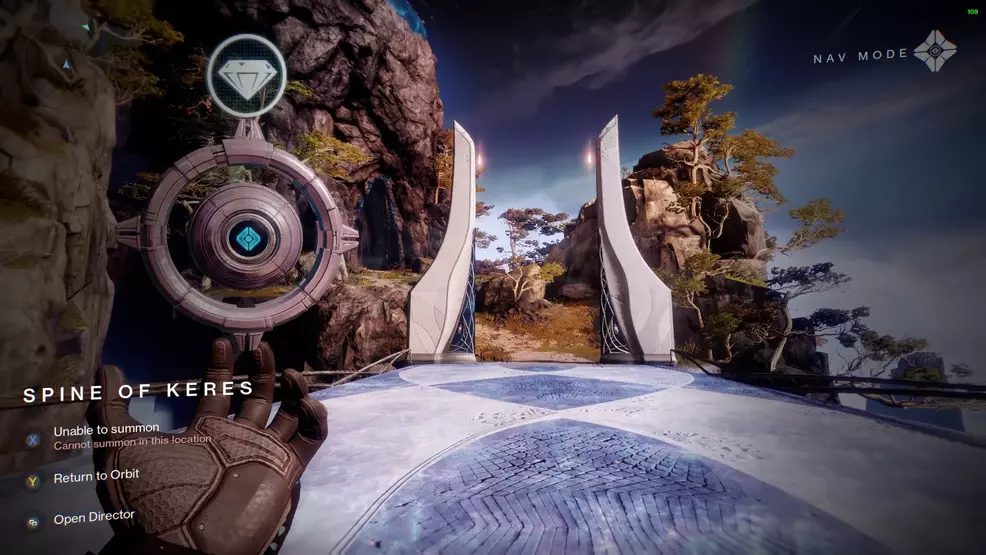
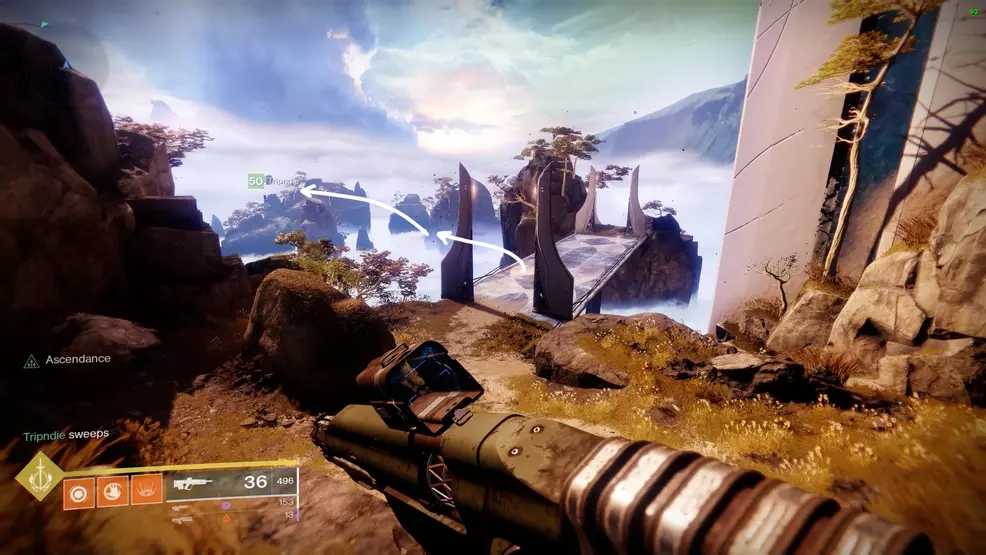
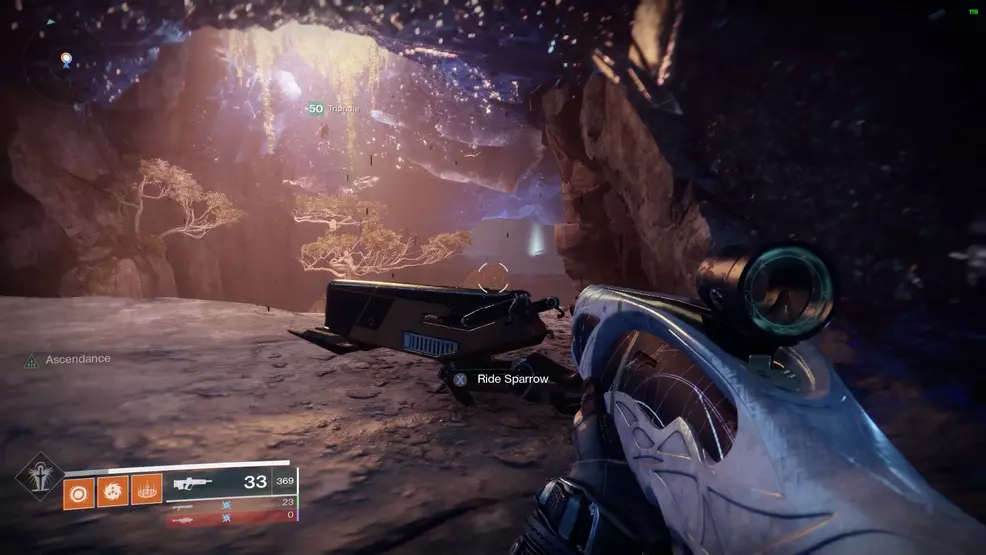
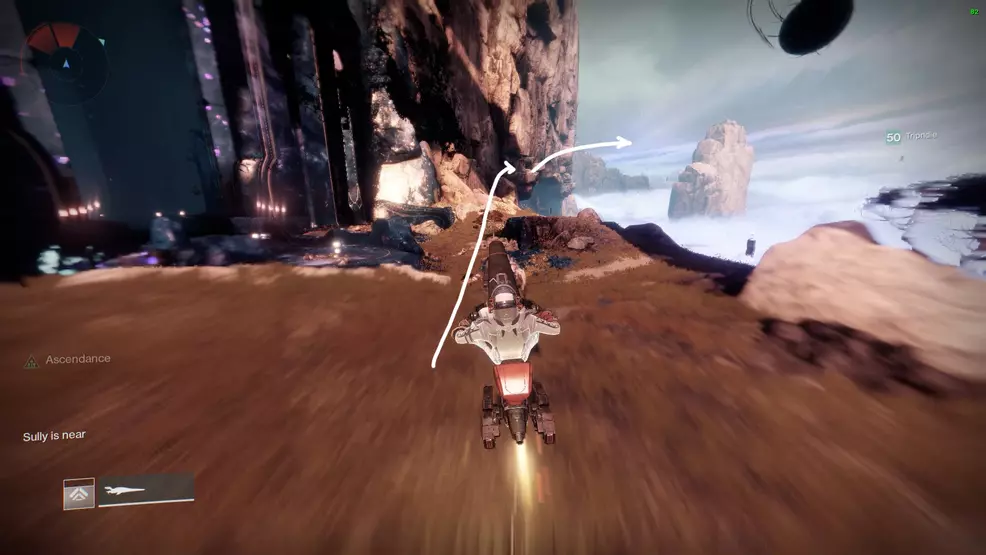
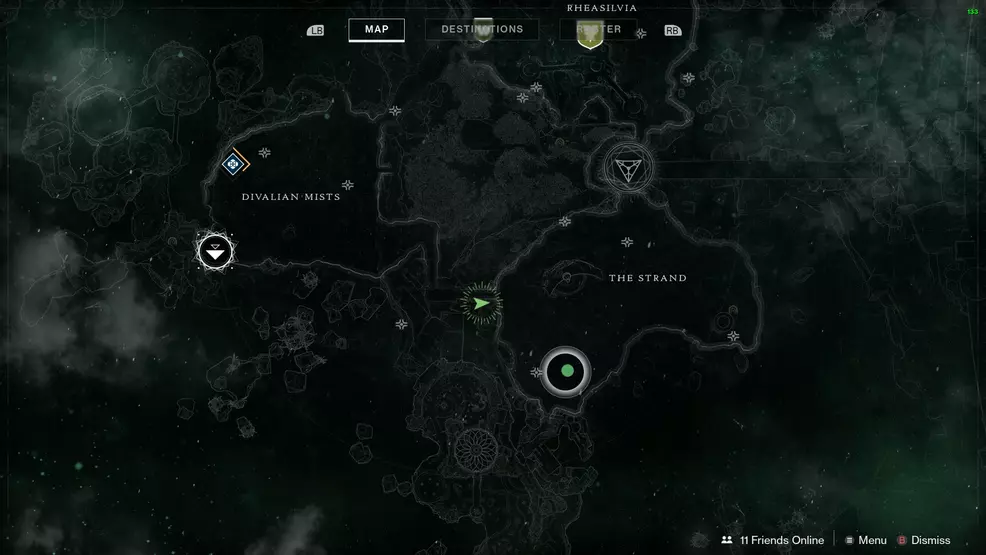
The third Ascendant Chest during the weakest curse week is located in the Spine of Keres, beyond the Oracle temple. Start at the Divalian Mists and head straight, then take the blue crystal cave on the left to reach the Spine of Keres. Enter the Oracle room and pass through to the outer courtyard.
Source: Shacknews
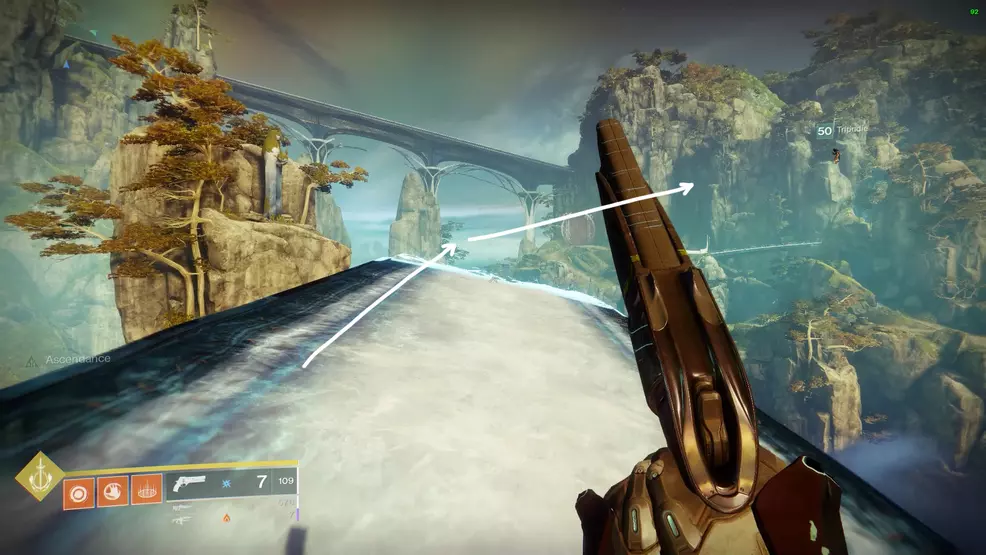
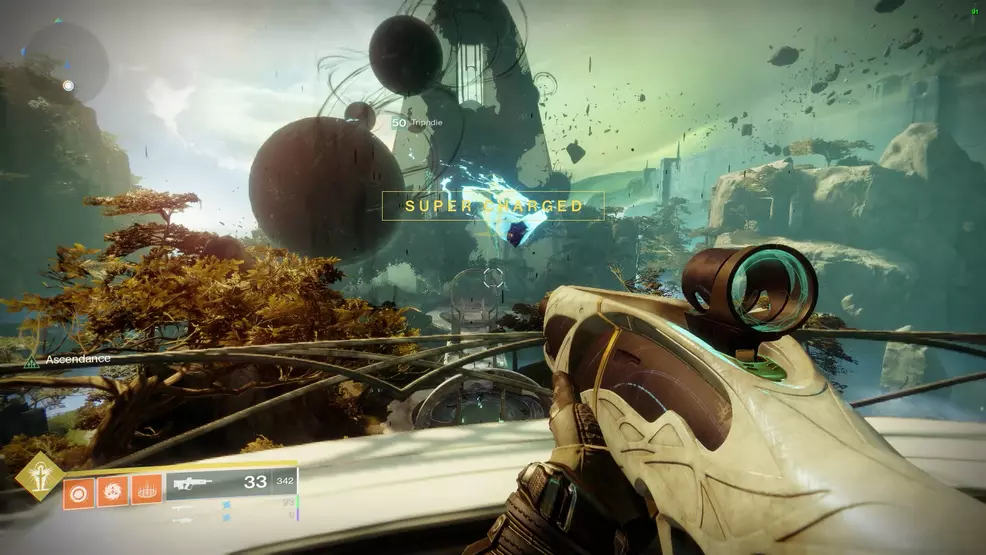
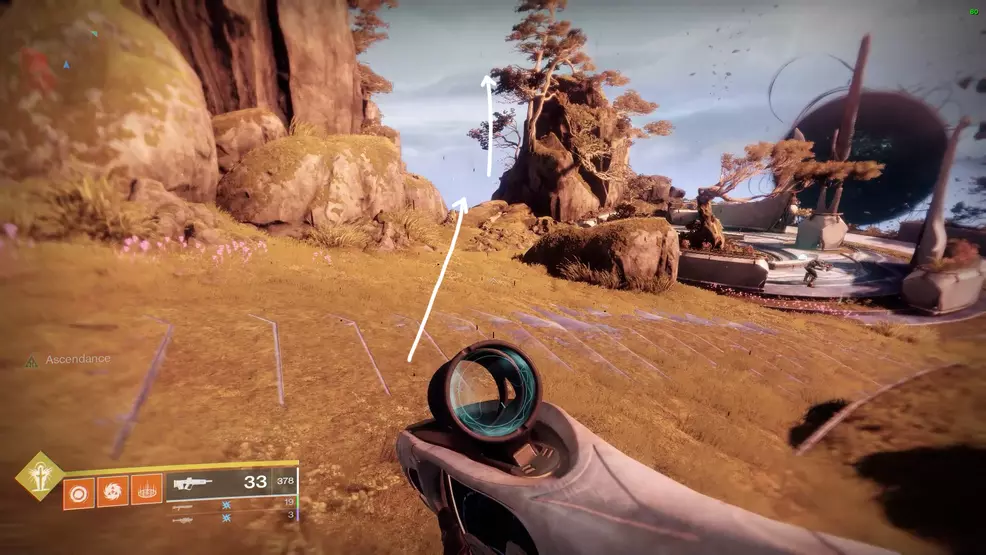
Follow the path along to the second last bridge before the rocks. Stand at the end of the landmass looking out to the left-side of the area to find the first platform. Follow the platforms out as they lead to the two rocks in the distance and then up to the chest.
Ascendant Chests – Hidden Riches 4: The Confluence via Spine of Keres
Source: Shacknews
Source: Shacknews
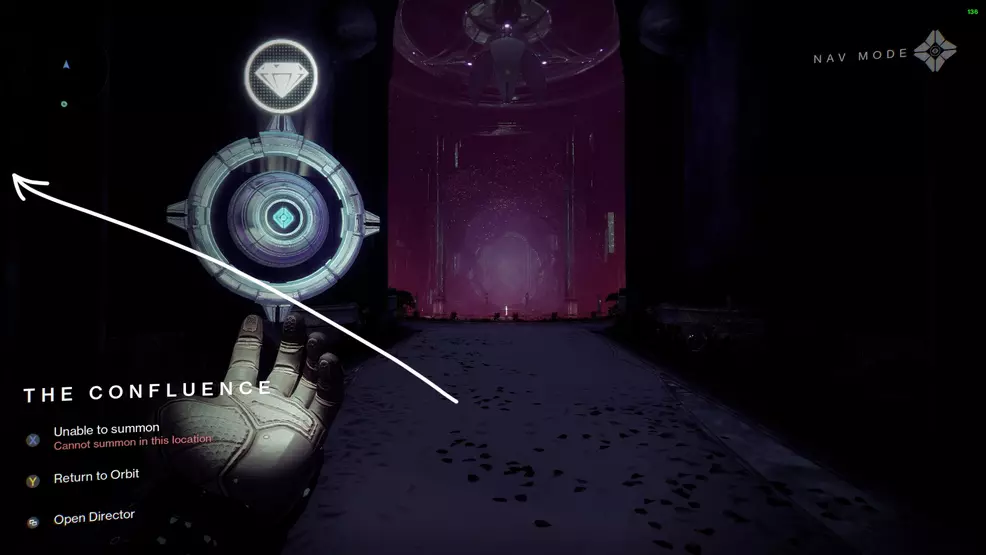
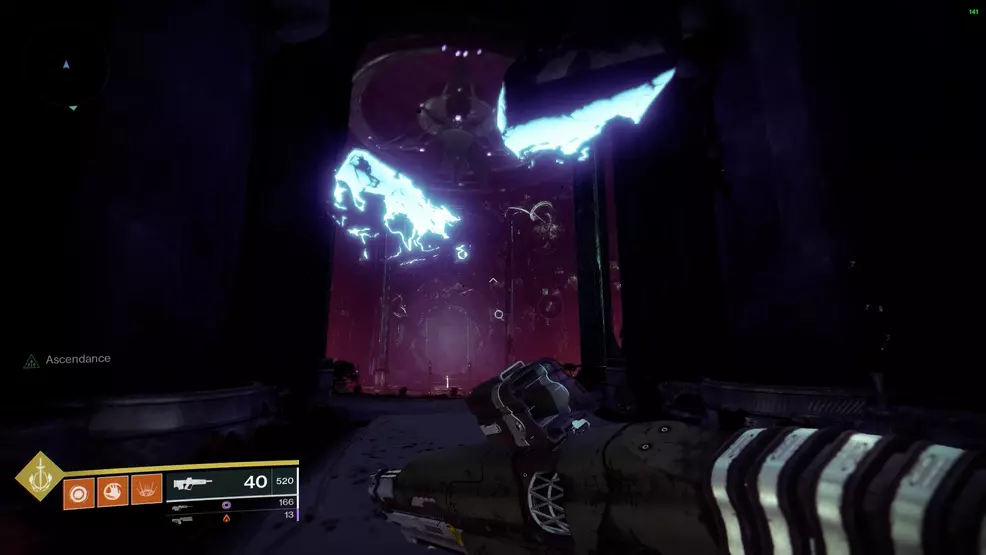
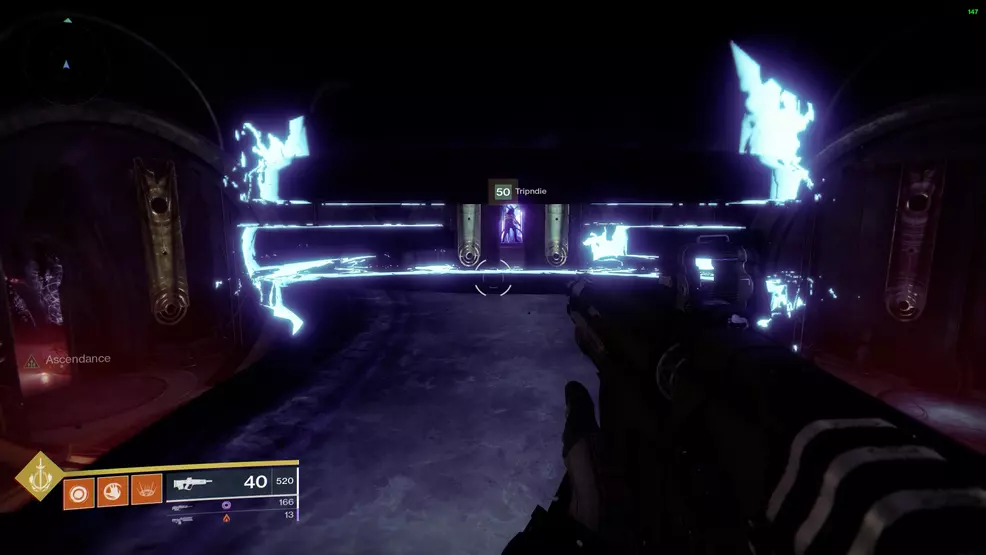
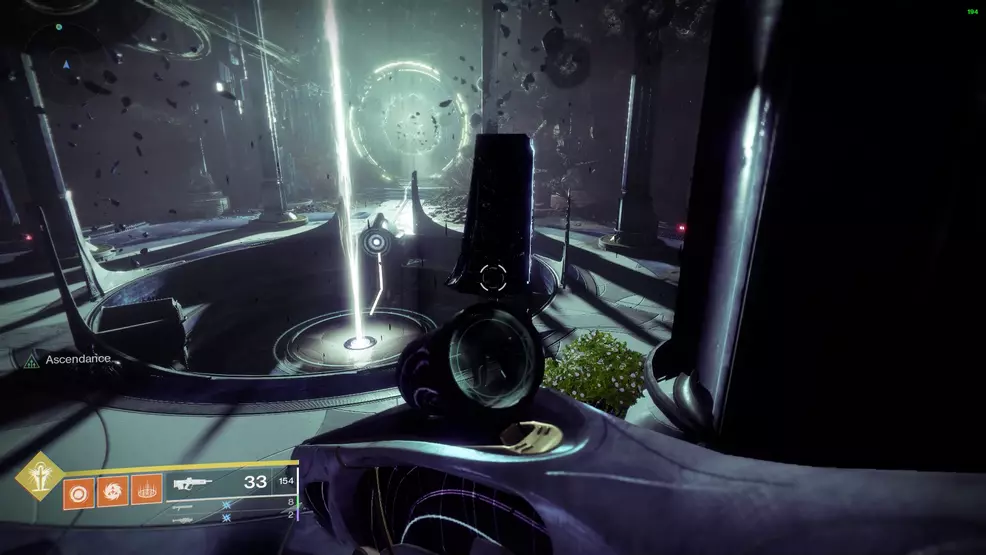
Though not technically in the Spine of Keres, the fourth Ascendant Chest that is part of the Hidden Riches triumph is located in the Confluence, the area beneath the Dreaming City. Access the Confluence via one of the three Taken portals (there is one in the Spine of Keres).
Source: Shacknews
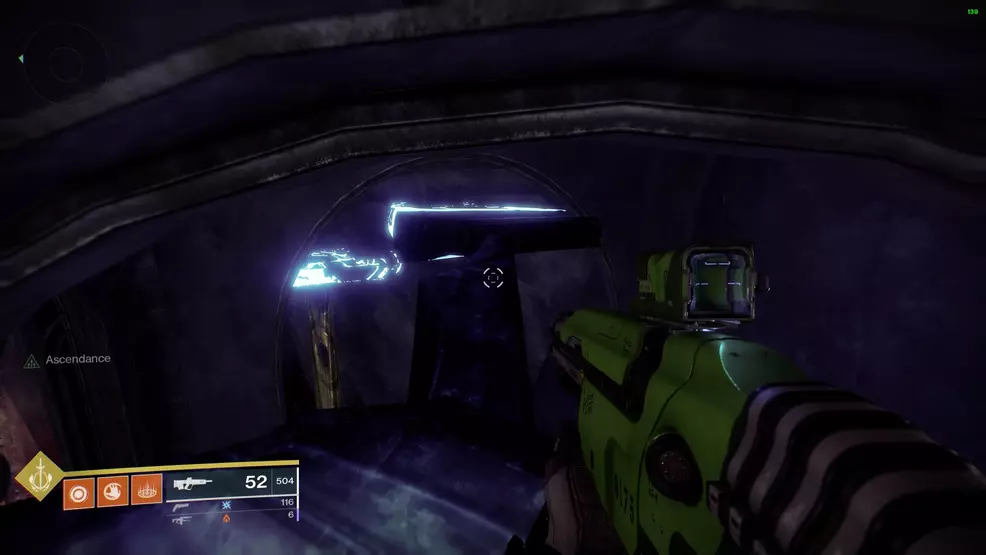
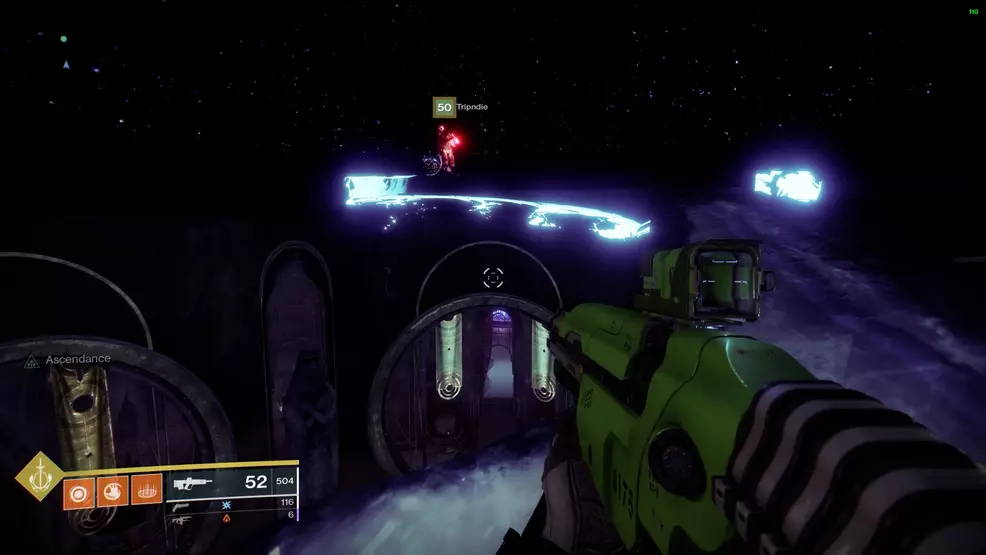
The platforms in the Confluence begin near one of the main doorway looking at the large portal room.
Ascendant Chests – Hidden Riches 5: Harbinger's Seclude via Rheasilvia
Source: Shacknews
Source: Shacknews
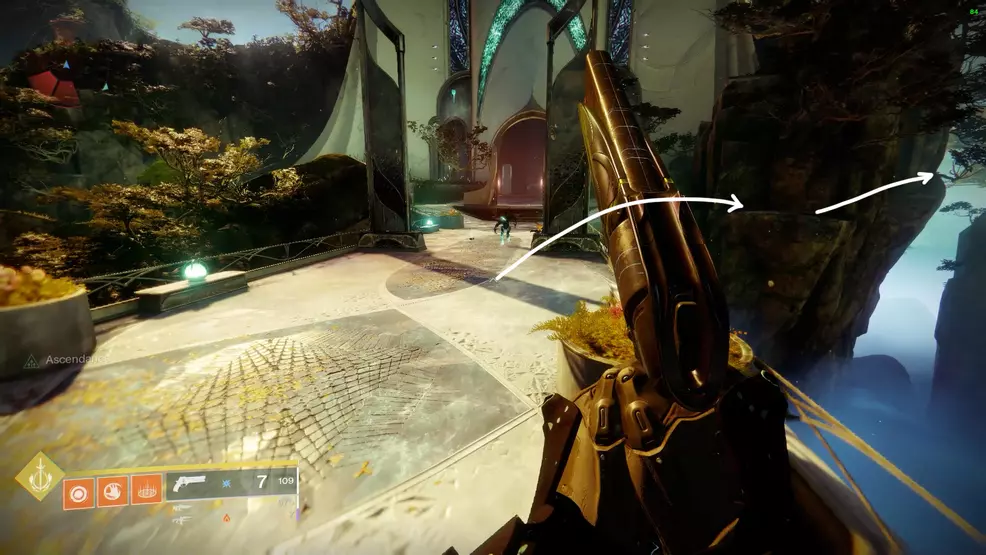
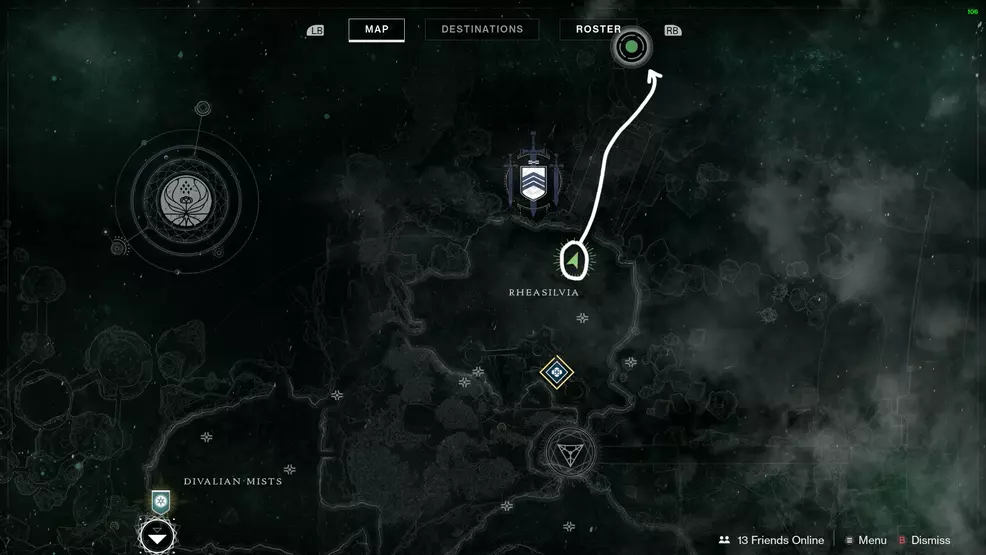
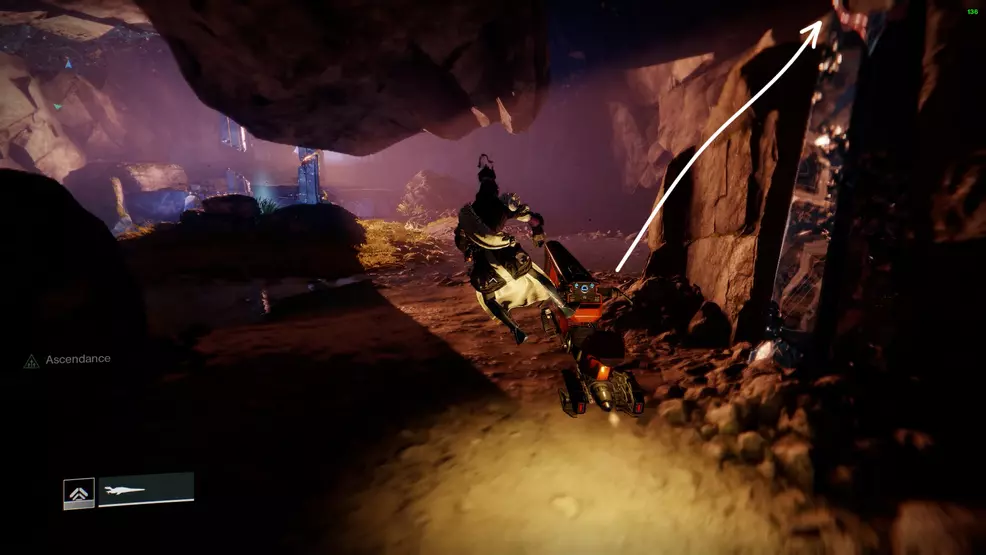
The fifth Ascendant Chest in the Hidden Riches collection is located deep within Rheasilvia, in the Harbinger’s Seclude. Enter the main building in Rheasilvia and continue through the halls into the large cavern with the buildings. Cut across the room and into the next area with the winding staircase. The platforms begin in the little circular area before the statue out on the ledge.
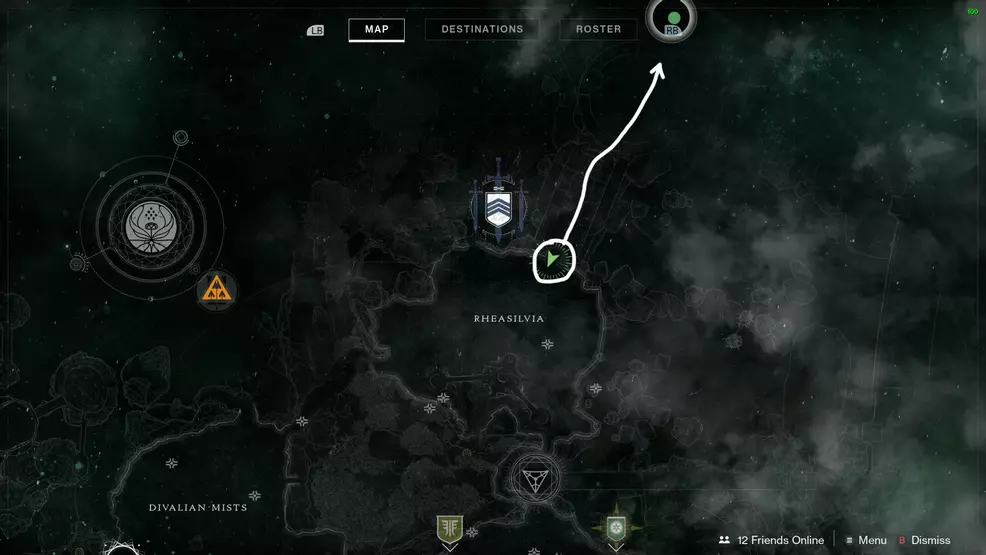
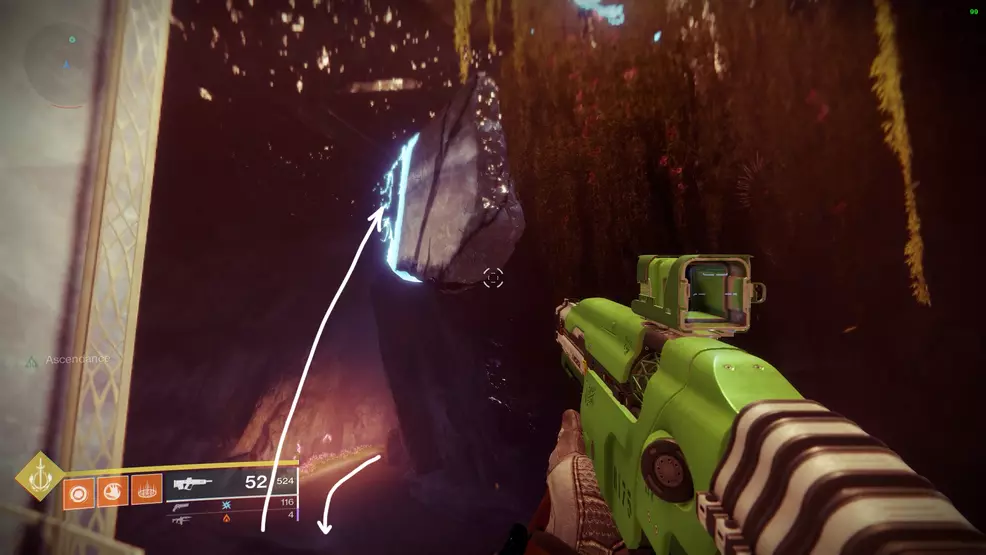
Ascendant Chests – Hidden Riches 6: Rheasilvia
Source: Shacknews
Source: Shacknews
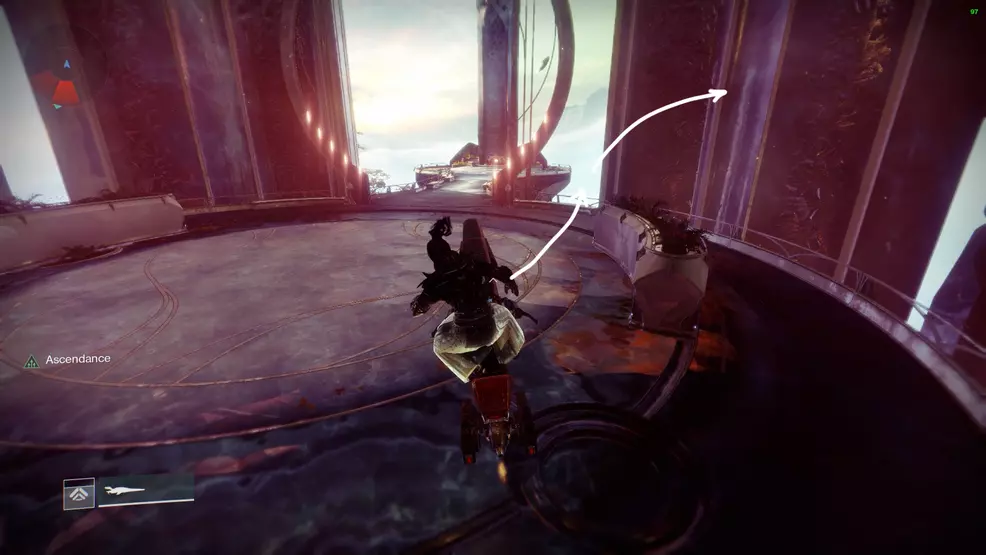
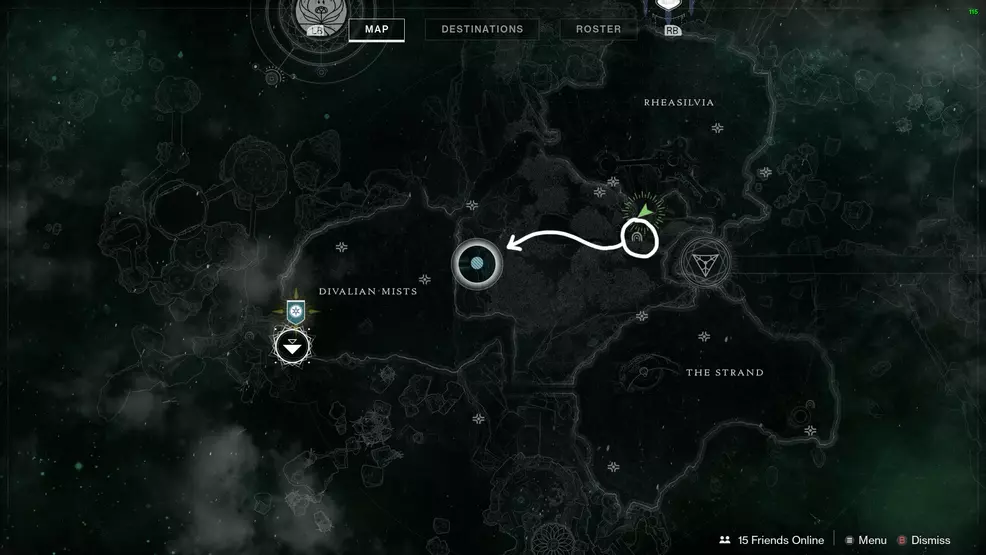
The sixth Ascendant Chest is located in Rheasiliva, outside the main building. Stand facing the building and look to the left, jump to the ledge and then jump around the cliff face. Jump across the gap and use any ledge to reach the top of the rock formation.
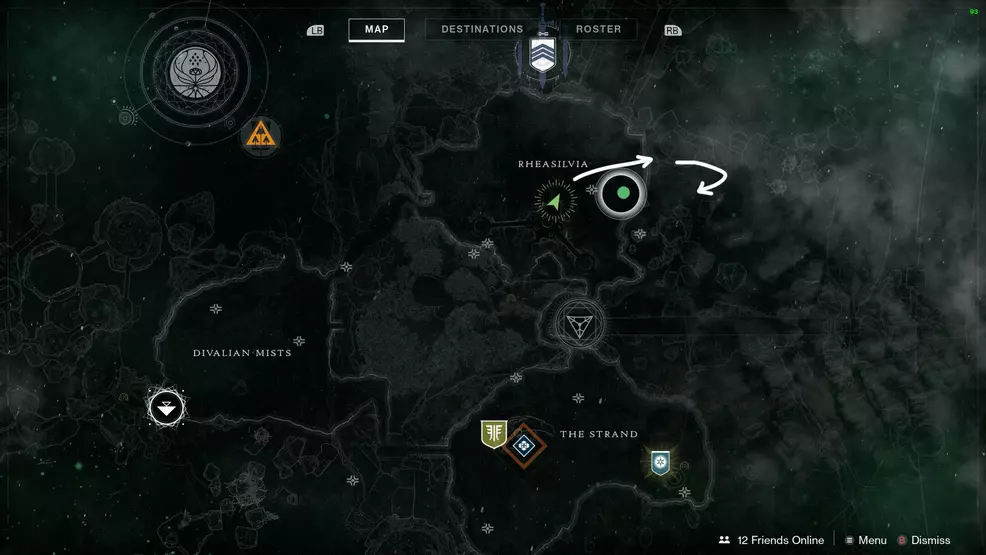
Source: Shacknews
At the top, head to the edge to spot the first of a few platforms that lead to the chest.
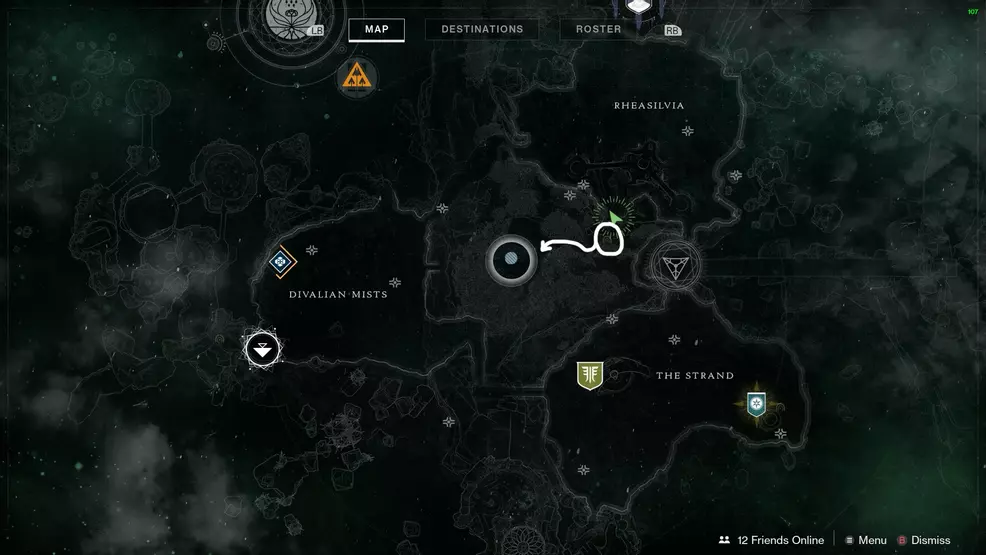
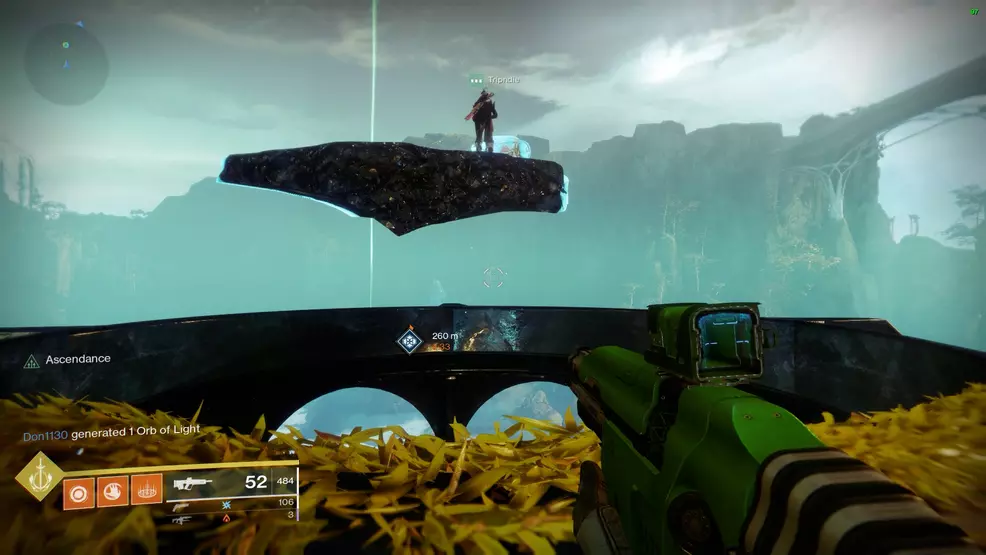
Ascendant Chests – Hidden Riches 7: Chamber of Starlight
Source: Shacknews
Source: Shacknews
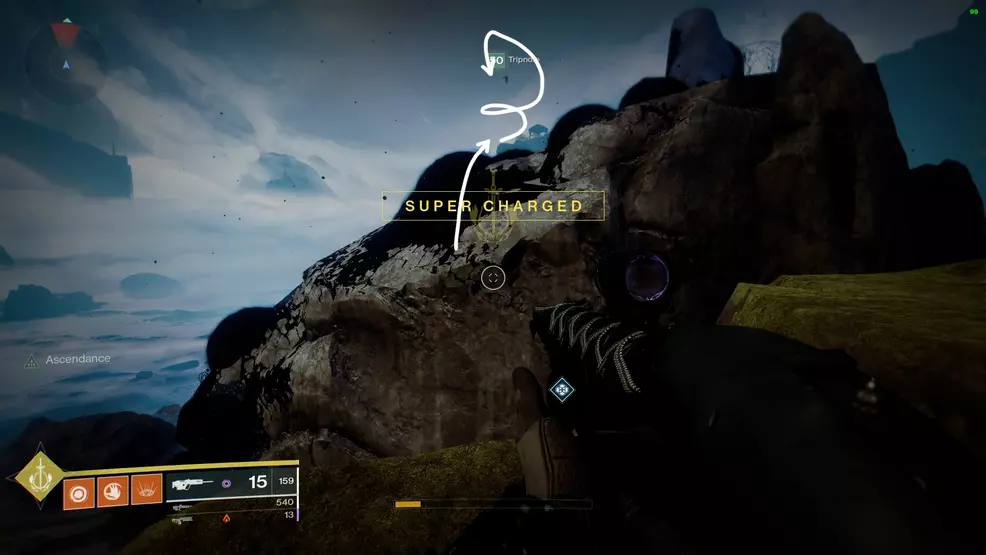
The seventh Ascendant Chest is located within the Chamber of Starlight Lost Sector in Rheasilvia. Clear the Lost Sector and go to the balcony overlooking the path in, the platform will appear close by.
Ascendant Chests – Hidden Riches 8: The Strand
Source: Shacknews
Source: Shacknews
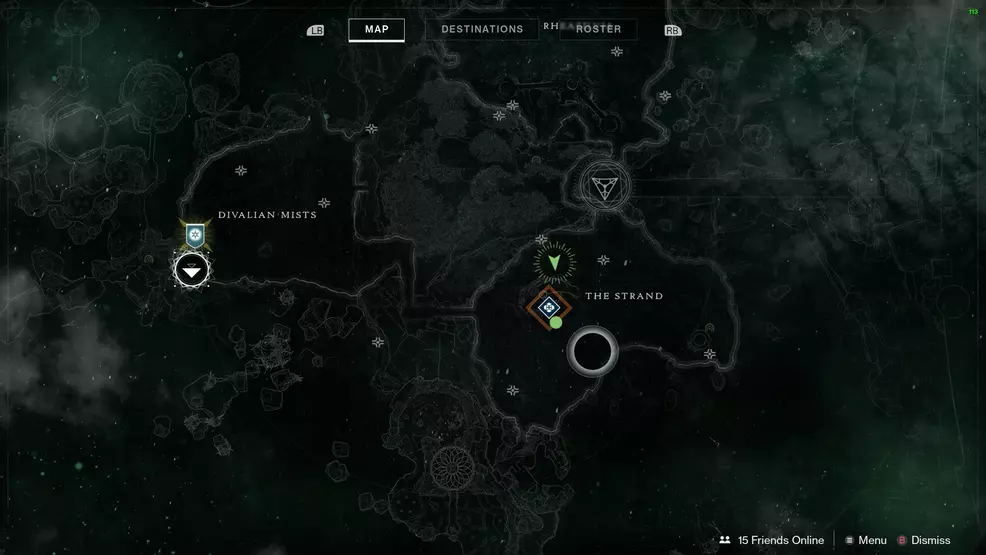
The next Ascendant Chest in the Hidden Riches collection is located in The Strand, on top of the pergola behind where Petra usually stands. Players can either start at Petra and use the platforms to jump around the area to the top, or climb the little hill and jump directly up to the chest with ease.
Ascendant Chests – Hidden Riches 9: Aphelion's Rest

Source: Shacknews
Source: Shacknews
The ninth Ascendant Chest is located in the Aphelion’s Rest Lost Sector in The Strand. Continue through the Lost Sector, past the boss chest, but before dropping down to exit, look to the right to spot the chest sitting on the ground.
Ascendant Chests – Hidden Riches 10: Gardens of Esila
Source: Shacknews
Source: Shacknews
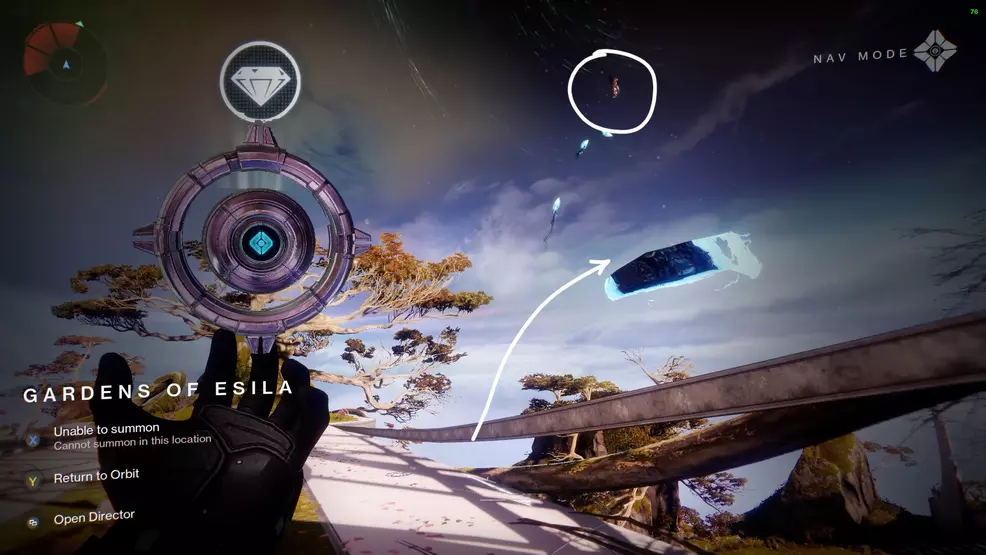
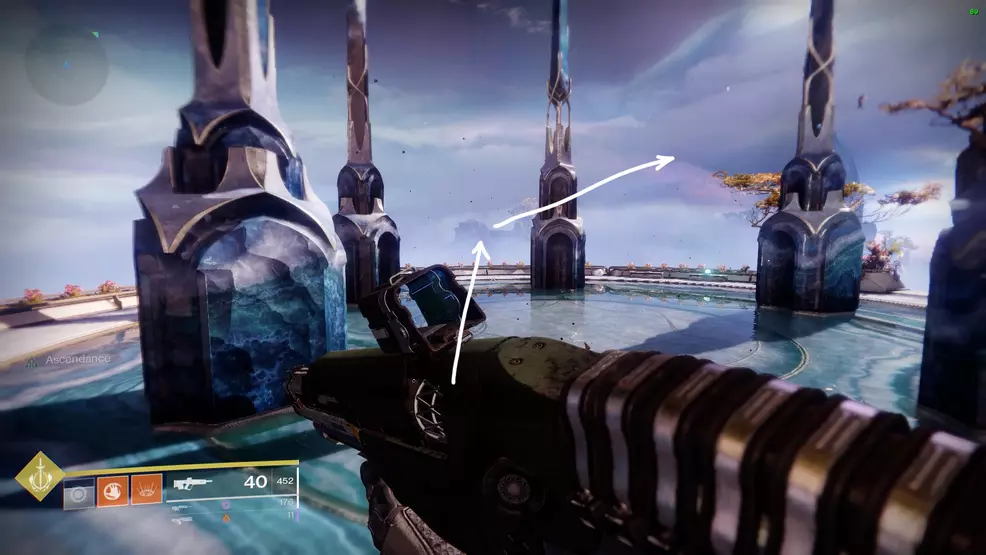
The tenth Ascendant Chest in the Hidden Riches collection is located in the Gardens of Esila. From the main bridge in the garden, look off the side toward the circular area with pillars to spot the first platform that leads to the chest.
Source: Shacknews
Ascendant Chests – Bolder Fortunes
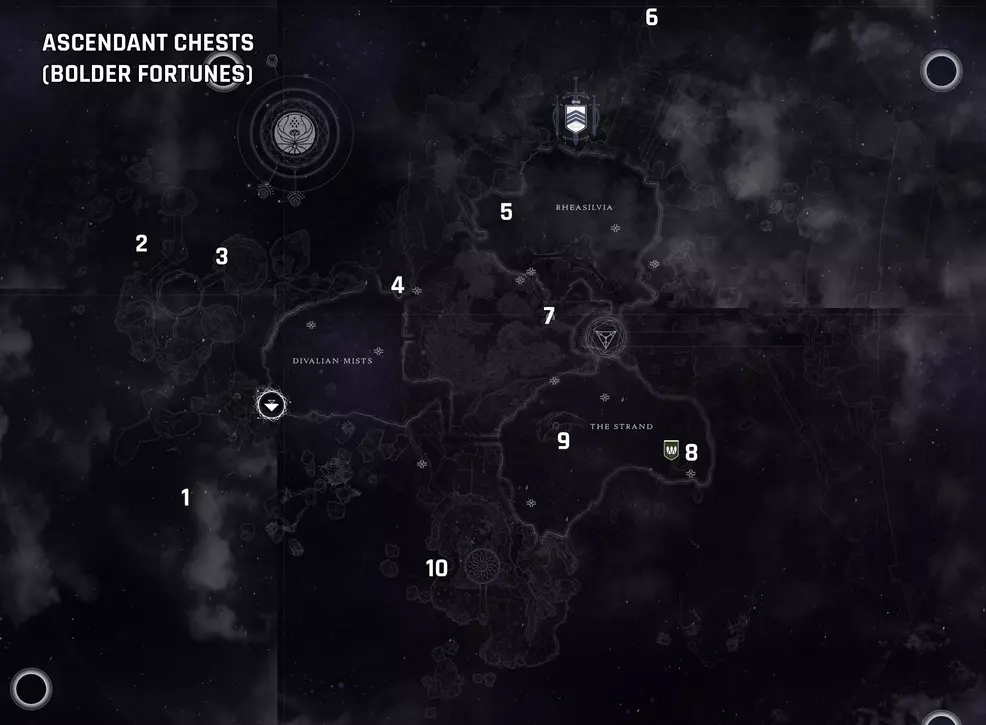
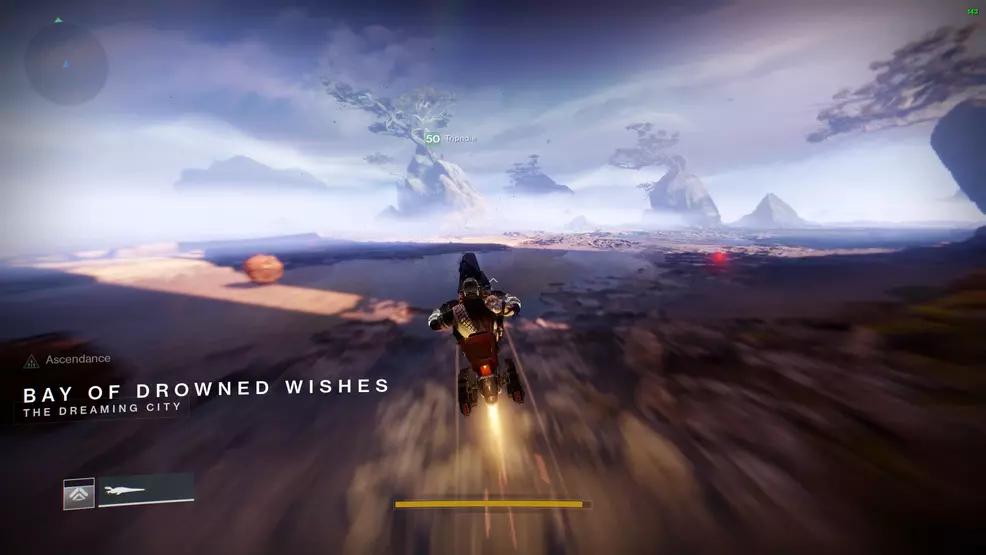
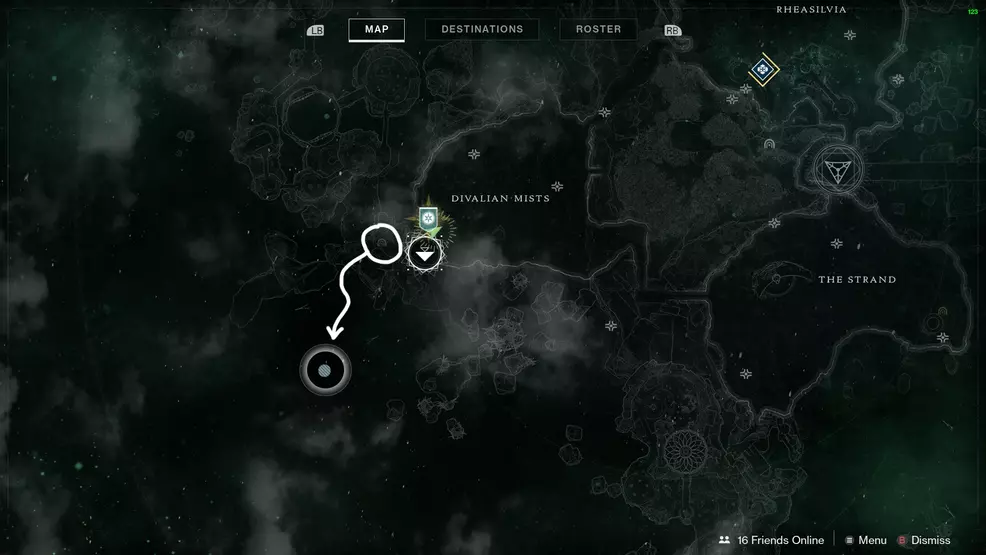
Ascendant Chest – Bolder Fortunes 1: Bay of Drowned Wishes
Source: Shacknews
Source: Shacknews
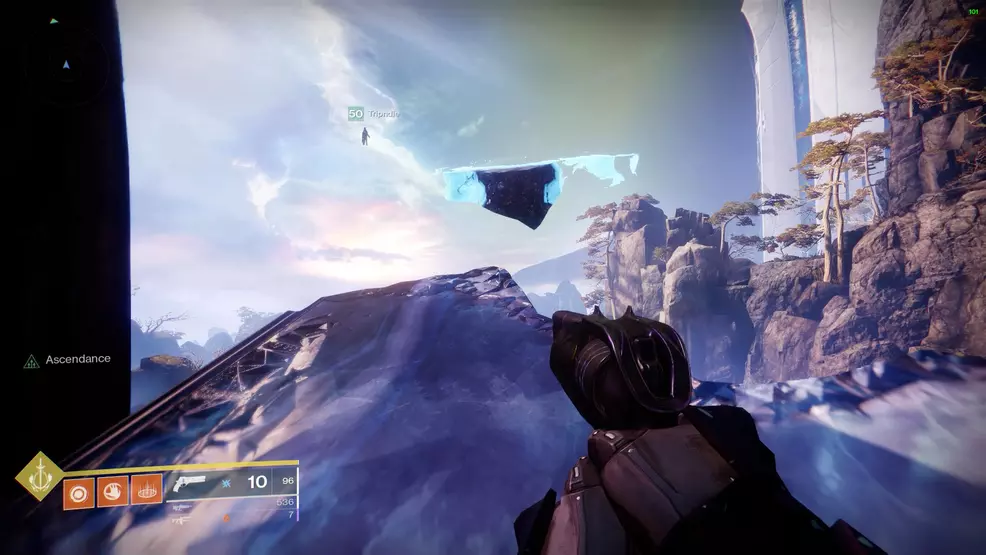
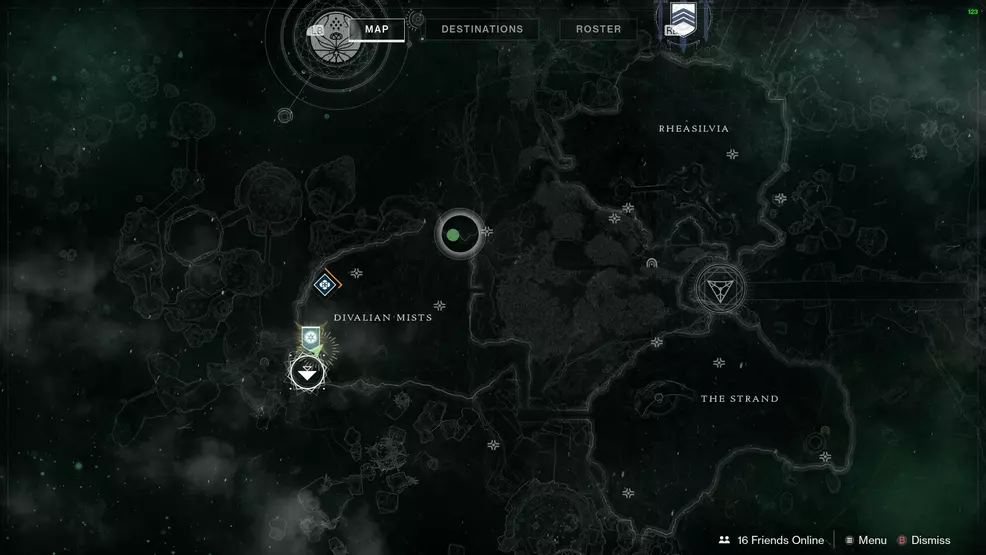
The first Ascendant Chest as part of the Bolder Fortunes collection can be found in the Lost Sector behind the fast travel point in Divalian Mists. Head into the Bay of Drowned Wishes and once out of the cave system, look across the foggy bay to the rock formation on the left. At the top of this hill is the Ascendant Chest.
Ascendant Chest – Bolder Fortunes 2: Spine of Keres
Source: Shacknews
Source: Shacknews
The second Bolder Fortunes Ascendant Chest is located in the Spine of Keres, in the area where players are first brought to the Dreaming City. Start at the Divalian Mists, travel forward and through the blue crystal until on the left. Go through the Oracle temple and out the other side, following the track around. On the second last bridge before the rock formations, stand close to the edge to find the platforms.
Ascendant Chest – Bolder Fortunes 3: The Confluence via Spine of Keres
Source: Shacknews
The third Ascendant Chest included in the Bolder Fortunes collection isn’t technically in the Spine of Keres, it’s actually in the Confluence, which can be accessed via any of the three Taken portals – this portal is just the closest. Start at the Divalian Mists, head through the blue crystal tunnel into the Spine of Keres and then cross the small arena toward the observatory. Instead of crossing the bridge, look over the right side to see a pathway leading down to a cave. Go through the portal and follow the hallways until you reach the Confluence. Find the platforms near the doorway leading to the large, black, cavernous room.
Source: Shacknews
Climb the platforms and instead of going below the central structure, climb over it and drop down onto the ledge on the other side. Follow the route through the structure as it wraps back outside and then in again. The Ascendant Chest is right in the middle.
Ascendant Chest – Bolder Fortunes 4: Divalian Mists
Source: Shacknews
Source: Shacknews
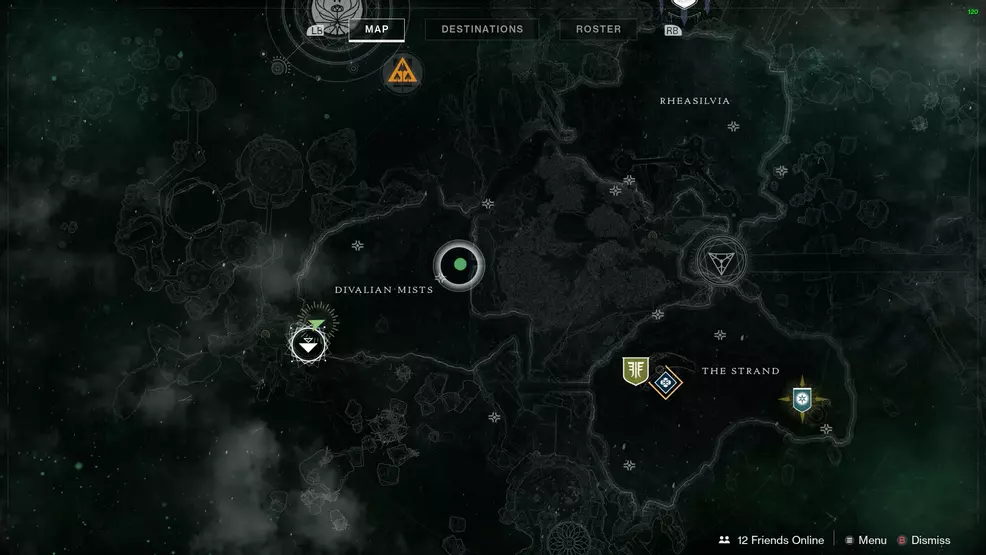
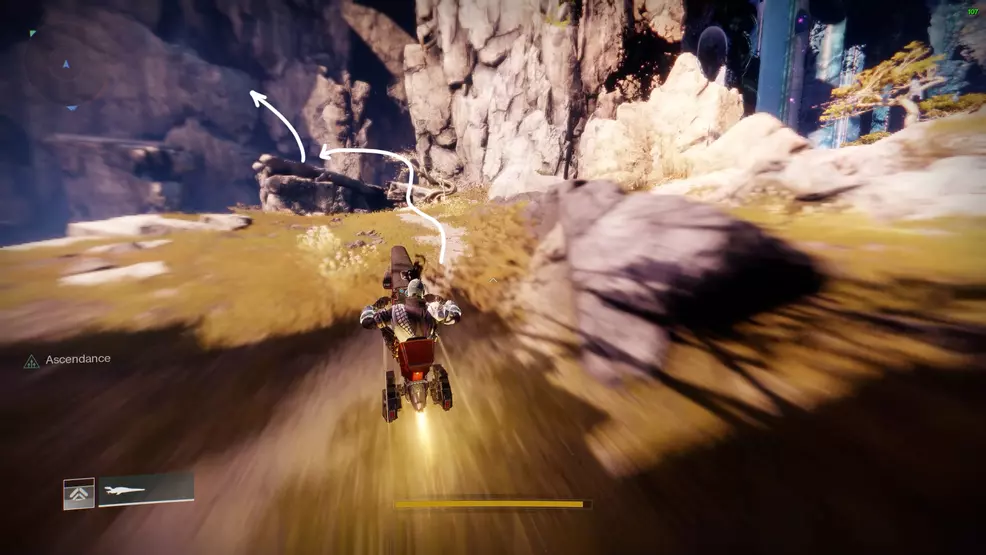
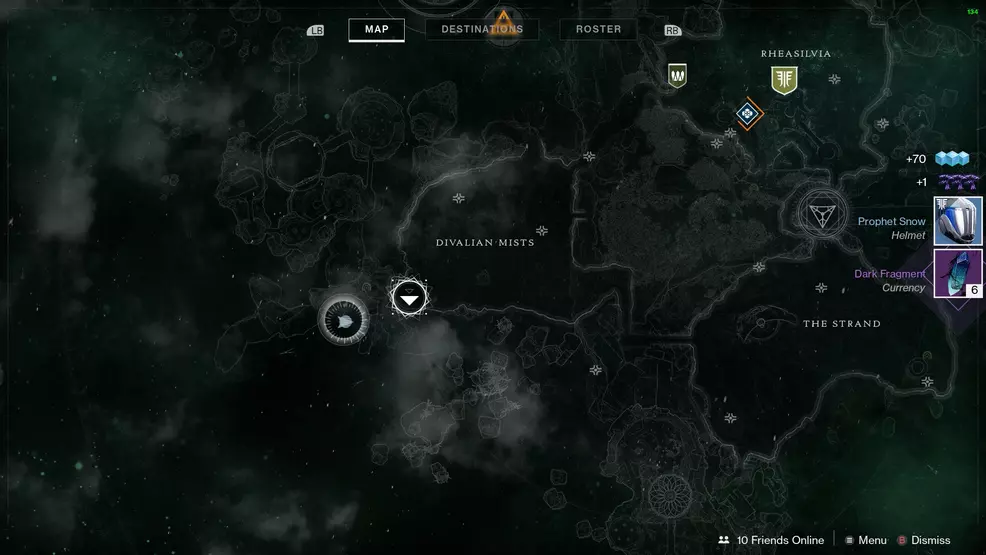
The fourth Ascendant Chest in the Bolder Fortunes collection is found in the Divalian Mists, near the track that leads to Rheasilvia. Instead of entering the tunnel to Rheasiliva, walk to the edge of the cliff overlooking the blue crystal tunnel to spot the platforms.
Ascendant Chest – Bolder Fortunes 5: Rheasilvia
Source: Shacknews
Source: Shacknews
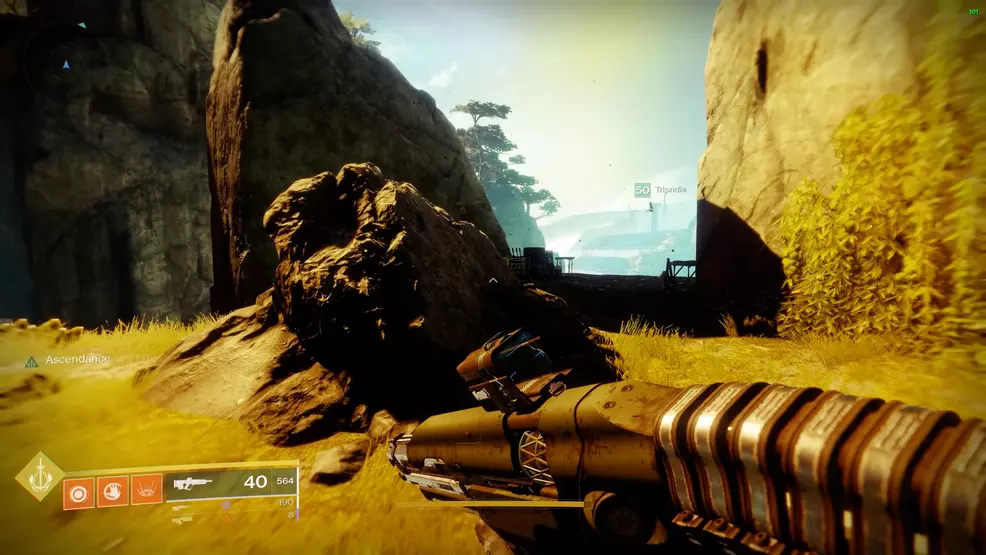
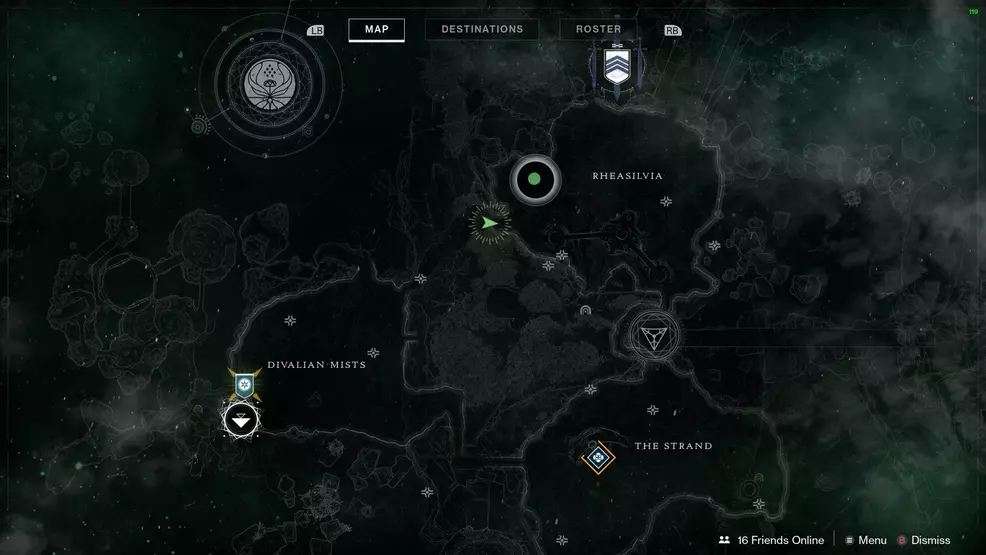
This fifth Bolder Fortunes Ascendant Chest is in Rheasiliva. Start at Divalian Mists and progress straight ahead, using the rocky tunnel to access Rheasiliva. As soon as Rheasiliva appears on-screen, turn left to find a few boxes and canisters. Use the ledge of the cliff on the left to jump over to the rocky formation on the right. Continue along the ledges, wrapping around the cliff, and then jump over to the right. Follow these ledges up to a blue statue (one of the Dreaming City cats is here) and with your back to the statue, head to the right and jump up to the rocky outcropping behind the tree.
Source: Shacknews
Approach the edge of the rocky outcropping to see the platforms. Go straight across the large disc and jump over the edge to reach another platform below.
Ascendant Chest – Bolder Fortunes 6: Harbinger's Seclude
Source: Shacknews
Source: Shacknews
The sixth Ascendant Chest that is part of the Bolder Fortunes Triumph is found deep within Rheasiliva. Head into the building and continue through the halls into the Harbinger’s Seclude. Upon entering the large cavernous space, head left to a little lookout point, here is where the platforms can be found.
Ascendant Chest – Bolder Fortunes 7: Chamber of Starlight

Source: Shacknews
Source: Shacknews
The seventh Ascendant Chest included in the Bolder Fortunes Triumph is found deep within the Chamber of Starlight Lost Sector in Rheasiliva. The Lost Sector is accessed through the canyon system. Once inside, clear out the enemies and approach the central strip to spot the appearing platforms.
Ascendant Chest – Bolder Fortunes 8: Aphelion's Rest
Source: Shacknews

Source: Shacknews
The eighth Ascendant Chest in the Bolder Fortunes Triumph actually looks like it’s in the middle of the map, but it’s actually accessed via the Aphelion’s Rest Lost Sector in The Strand. Clear out the Lost Sector, and once at the boss chest, turn around and look for the blue statue beside a boulder. Climb the boulder to spot the first of three platforms leading to the Ascendant Chest.
Ascendant Chest – Bolder Fortunes 9: The Strand
Source: Shacknews
The ninth Ascendant Chest of the Bolder Fortune collection is arguably the most difficult to reach. Approach the large statue in the center of the Strand, and use the hill behind it to jump on top. From here, go toward the lip to spot the first of many vertical slices of platforms. Navigate along these thin platforms to reach a central pillar. Climb the outside of the pillar and drop down to find the Ascendant Chest.
Ascendant Chest – Bolder Fortunes 10: Gardens of Esila
Source: Shacknews
Source: Shacknews
The final Ascendant Chest included in the Bolder Fortunes Triumph is found in the Garden of Eslia just south of The Strand. Enter the garden and continue past the bridge in the center of the area. On the lookout dais, approach the edge to find the first rounded platform. Find the next platform to the right and continue onwards. The Ascendant Chest is on a large circular platform a few jumps up.
Ascendant Chests – War Chests
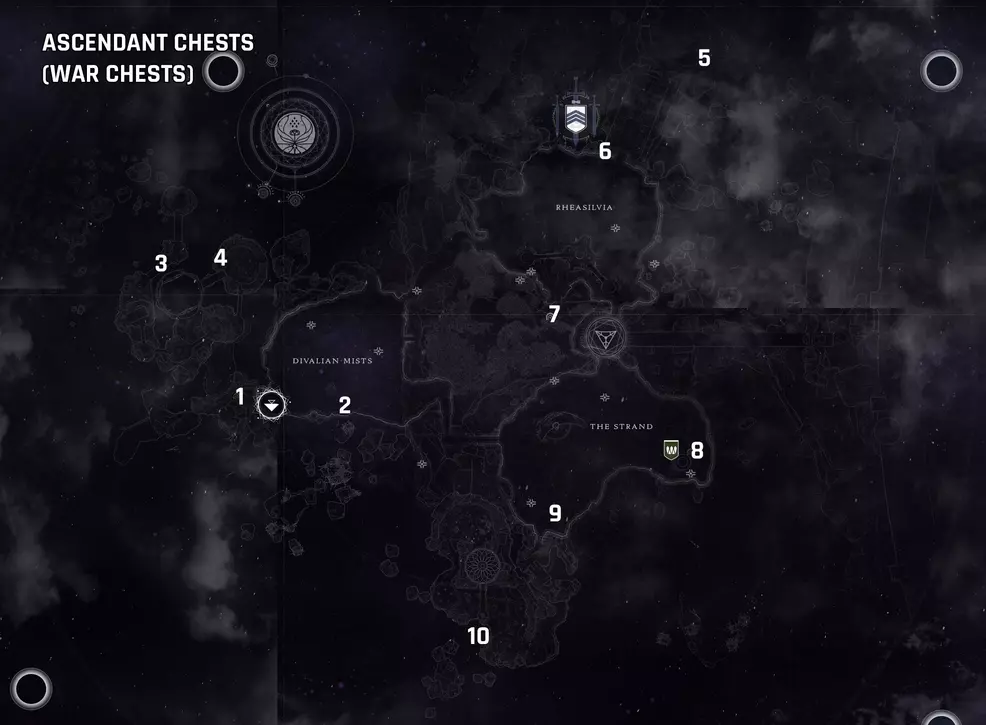
Ascendant Chest – War Chests 1: Bay of Drowned Wishes
Source: Shacknews
Source: Shacknews
The first Ascendant Chest that is part of the War Chest collection can be found in the Bay of Drowned Wishes Lost Sector behind the Divalian Mists fast travel point. Continue through the Lost Sector into the boss room and use the nearby rocks to spot the first of a few platforms.
Ascendant Chest – War Chests 2: Divalian Mists
Source: Shacknews
Source: Shacknews
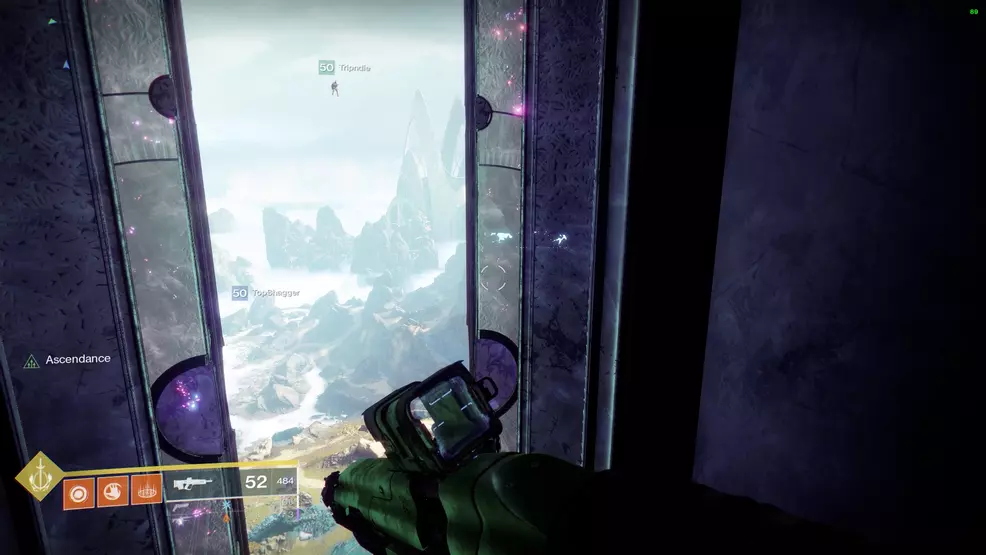
The second Ascendant Chest of the War Chest collection is in the Divalian Mists, floating right above the dry lake. Use the cliff near the doorway to the Blind Well to reach the floating platforms. This one is exceptionally tricky, as it consists mainly of thin vertical platforms set out in a maze. The gist of it is to use the first main platform, jump across to the thin platform, turn right and walk ahead, jump over to the next thin platform and turn right. Continue around the "outside" of the platforms to progress up the "edge" of the area.
Ascendant Chest – War Chests 3: Spine of Keres

Source: Shacknews
Source: Shacknews
The third Ascendant Chest included in the War Chest collection is found in the Spine of Keres, up the main tower that houses the Oracle. Approach the Spine of Keres from the Divalian Mists and when the first arena with enemies is reached, take the left path to gain access to the back observatory. From the balcony above the Orale, jump around the outside of the building, going from ledge to ledge until you wrap almost entirely around the tower. The path will continue around the tower, but look for a little outcropping off to the side to find the chest.
Ascendant Chest – War Chests 4: The Confluence via Spine of Keres
Source: Shacknews
Source: Shacknews
While the map above states that this Ascendant Chest is in the Spine of Keres, it is actually technically in the Confluence, the tunnels below the ground that connect the three main areas. The easiest way to access this War Chest is to use the Taken portal found in the Spine of Keres and then continue through the underground passages until the Confluence is reached. The first platform can be found just to the right of the central stairs leading down into the massive portal. The following platforms wrap around the perimeter of the room to reach the chest.
Ascendant Chest – War Chests 5: Harbinger's Seclude
Source: Shacknews
Source: Shacknews
This next Ascendant Chest is found right beside the Huginn skull (the same location where more Tincture of Queensfoil can be bought) in the Harbinger's Seclude, the area deep below Rheasiliva. Approach the skull and look to the right to spot this War Chest.
Ascendant Chest – War Chests 6: Rheasilvia
Source: Shacknews
Source: Shacknews
This next Ascendant Chest is located outside the front of the main building in Rheasiliva. Use the balcony that overlooks the building and surrounding area to spot the first platform. These platforms are quite far from one another, making it difficult to see them unless you start jumping. Jump to the first platform and then follow its trajectory to find the first disc. Turn left and jump out straight to find the next platform and then turn right and run off the edge to find the next. All that remains are a few thin vertical platforms and the War Chest can be collected.
Ascendant Chest – War Chests 7: Chamber of Starlight
Source: Shacknews
Source: Shacknews
Another Ascendant Chest from the War Chest collection can be found in the Rheasiliva Lost Sector, Chamber of Starlight, at the boss chest and up a few platforms. Head into the Lost Sector and look for the balcony overlooking the path. Instead of fighting through the entire Lost Sector, use the lights to jump up to the ledge, then simply jump across the platforms to find the chest.
Ascendant Chest – War Chests 8: Aphelion's Rest
Source: Shacknews
Source: Shacknews
To find this next Ascendant Chest, head into the Lost Sector in The Strand, Aphelion's Rest. Complete the Lost Sector, and before jumping down, look to the left to spot the first of a few small platforms that lead to the chest.
Ascendant Chest – War Chests 9: The Strand
Source: Shacknews
Source: Shacknews
Ascendant Chest number nine of the War Chest collection can be found in The Strand near the path leading to the garden area. Head up to the little viewing platform and look for the appearing platforms that wrap around a pillar. Jump up the pillar and continue on to the next pillar. The chest is at the top of the third pillar.
Ascendant Chest – War Chests 10: Gardens of Esila
Source: Shacknews
Source: Shacknews
The final Ascendant Chest included in the War Chest collection is found in the Garden of Esila. Enter the garden and stick to the left-hand side. Out in the distance is a rocky platform, jump to it to see the platforms begin to appear. Following them along toward the Taken Blight to find the criss-crossing platforms. Continue up the platforms to find the chest.
With all the Ascendant Chests found, the appropriate Triumphs can be claimed in the Triumph tab. Taking the time to find the Ascendant Chests each week is a great way to acquire a large sum of Dark Fragments, a valuable currency in the Dreaming City. Swing by the Shacknews Destiny 2 Complete Strategy Guide for more thorough walkthroughs and collectible guides.

