
Destiny 2 - Leviathan Raid Guide
Learn how to complete the Leviathan Raid in Destiny 2.
Unquestionably, my most memorable moments in the original Destiny were in raids. Especially the King’s Fall raid with Oryx since I didn’t get into raiding heavily until I had a proper fireteam with the Taken King. In Destiny 2, raids are back, and the first one is called Leviathan. You and your fireteam are tasked with taking out Emperor Calus, all the while collecting loot from some of the raid’s secret and not so secret chests.
Part 1 - Embarkment
When you spawn into the Leviathan raid you’ll be at the Embarkment. There will be Royalist Legionary Cabal standing to your left, right and in front of you, but they should be ignored. You can fight them, but there’s no point. Run past all the Cabal, going up the stairs in front of you and turning right or left. Head up three ramps and you’ll find yourself on a level with two transport devices. Enter one of the transport devices and you’ll be propelled forward. Continue moving forward until you reach the Castellum.
Part 2 - Castellum
Think of the Castellum as your main hub for the raid. There are several doors you need to open from this area, each one leading to a different encounter that needs to be bested. When you finish one encounter, you’ll return to the Castellum to open another door and begin the next, unless of course you know your way around the Leviathan underbelly and have the codes.
As you explore the Castellum, you’ll notice that there are several large doors. Each one will have a symbol above it. You will see these very same sybmols repeatedly throughout the raid. Each door will also have a plate in front of it, and one will have a ghostly outline of one of the symbols floating above its plate. That's the door that you're going to need to open first.
The doors in the Castellum are as follows:
- Sun - Royal Pools
- Dog - Pleasure Gardens
- Axes - Gauntlet
- Chalice - Calus Boss Fight
To begin the fight, split your team into two groups. One team will consist of two members who are good at killing things. These will be what we call your Standard seekers. The sescond group will consist of the remaining four fireteam members and they will be your Standard defenders.
Find the door that has a plate with a ghostly symbol above it. Idienfy the symbol on the plate, then send your Standard seekers out to that door in the Castellum. When they arrive, a Standard Bearer will spawn. Your team of two needs to kill this enemy and pick up the Standard that they dropped. It will match the ghostly symbol that was on the plate in front of the door you need to open. Return the Standard to that plate and place it there.
Placing the Standard on the plate will cause an enemy type called the Standard Liberator to spawn in. They will keep spawning in every few seconds until this portion of the raid is complete. Your Standard defenders team must defeat this enemy type, and all others, until your Standard seekers have idenfied all three Standards you need, secured them, and placed them on the plate in front of the door. Each time your Standard seekers return a Standard to the plate, a new ghostly symbol will appear and they'll need to head out to find the correct Standard Bearer, kill him, and bring the Standard back.
The fight is quite simple, really. The only curveball for the Standard defenders is that Loyalty Councilor enemies can spawn from time to time. If they do, run up and melee them. As long as a Loyalty Councilor is active, you cannot harm the Standard Liberator enemy type, meaning they can approach and take the Standard you're attempting to defend.
When the fight ends, head inside the door you've just unlocked and move on to the next portion of the Leviathan raid.
Part 3 - Royal Pools
The primary goal in the Royal Pool is to destroy the nine purple censers that are in the middle room. The censers are separated into groups of three and are all protected by a shield that must be lowered if you hope to deliver any damage. Also in the middle room is a plate with an orb on it. When collected, this orb will provide Psionic Protection for 50 seconds, and the orb in the middle room will continue to respawn every few seconds.
There are four more "rooms" in the area, with two being on the right and two being on the left. These rooms each have an activation plate surrounded by four small platforms. The activation plate will have a symbol on it. These are the same four symbols that you encountered when opening the doors in the Castellum, although keeping track of the symbols on the plates isn’t essential here.
Each activation plate will also contain an orb that, when collected, provides the Psionic Protection buff. This orb will not respawn once the fight begins. The Psionic Protection buff will last for 50 seconds, at which point you’ll have to retrieve it again from the orb in the middle room. The orb in the middle room is the only one that will respawn. However, someone must be standing on each of the four activation plates in the outside areas to progress.
The reason you stand on an activation plate is to start moving the large chain that sits nearby. When you’re on the plate, the chain moves. When you’re off the plate, the chain stops. The goal here is to keep all four chains (one for each of the four activation plates) moving. The problem is, when your Psionic Protection buff expires, the water you’re standing in will hurt you. Therefore, it’s essential to rotate players. When your Psionic Protection buff is expiring, a Guardian from your fireteam needs to switch with you so they can hold your plate. You’ll then move to the center and retrieve the respawning Psionic Protection buff from the orb, and then move out to replace someone else whose buff is about to expire.
To begin the encounter, all five orbs must be collected at the same time. This means one Guardian on each of the outside plates, and one in the middle.
Currently, the best strategy for the activation plates is to split your six-person fireteam into two teams of three. One team handles the left and one team handles the right. Each team will have Guardian A, Guardian B, and Guardian C. Guardians A and B will work the activation plates on one side of the Royal Pools. Guardian C will retrieve the Psionic Protection buff from the orb in the middle room, and then swap with Guardian A. Guardian A will head to the middle-room orb and snag the Psionic Protection buff again, then replace Guardian B on their plate. Guardian B will head to the middle-room orb, get the Psionic Protection buff again, and then replace Guardian C. Continue to rotate in this manner until you hit the next phase of the encounter.
One problem you must deal with are the Ceremonial Bathers. Every now and then one of these enemies will crawl out from where your chain is moving, and they must be defeated quickly.
How to Kill Ceremonial Bathers
The Prospector exotic Grenade Launcher is a monster when it comes to killing Ceremonial Bathers. It fires fully auto, and there is always lots of Power Ammo around to reload with. You should also consider your grenade. Titans who are running the Striker subclass will want to use Pulse grenades, as these are devastating. A Pulse grenade and some follow up fire will destroy a Ceremonial Bather, but so will just shredding them with the Prospector.
When your fireteam manages to hold all four activation plates long enough, a sound will play that tells you it’s time to move to the middle room. Standing on the plate in the center of the room will give you the Force of Will buff. This is the buff that allows you to damage purple censers in the room. This buff will last approximately 45 seconds. If all the lamps are destroyed, you’re on to the next part of the Leviathan raid. If they are not, you must repeat the process with the activation plates and attempt to destroy the remaining censers on round two.
How to Destroy Censers
When the damage phase begins, have one Guardian clear enemies from the room. They should have a super ability that is good at clearing out waves of enemies, not something that is great at dealing focused damage. You don't want a Golden Gun on enemy clearing duty is what I'm getting at.
Your team in charge of damage should have picked a cluster of censers to focus on first. If you have a Golden Gun, that super ability can destroy a censer on its own. This is even more true if you're running Celestial Nighthawk. Either way, though, focus your fire to take out a group of three censers, then move on to the next. When all censers are down, you're on to the next portion of the Leviathan raid.
Part 4 - Pleasure Gardens
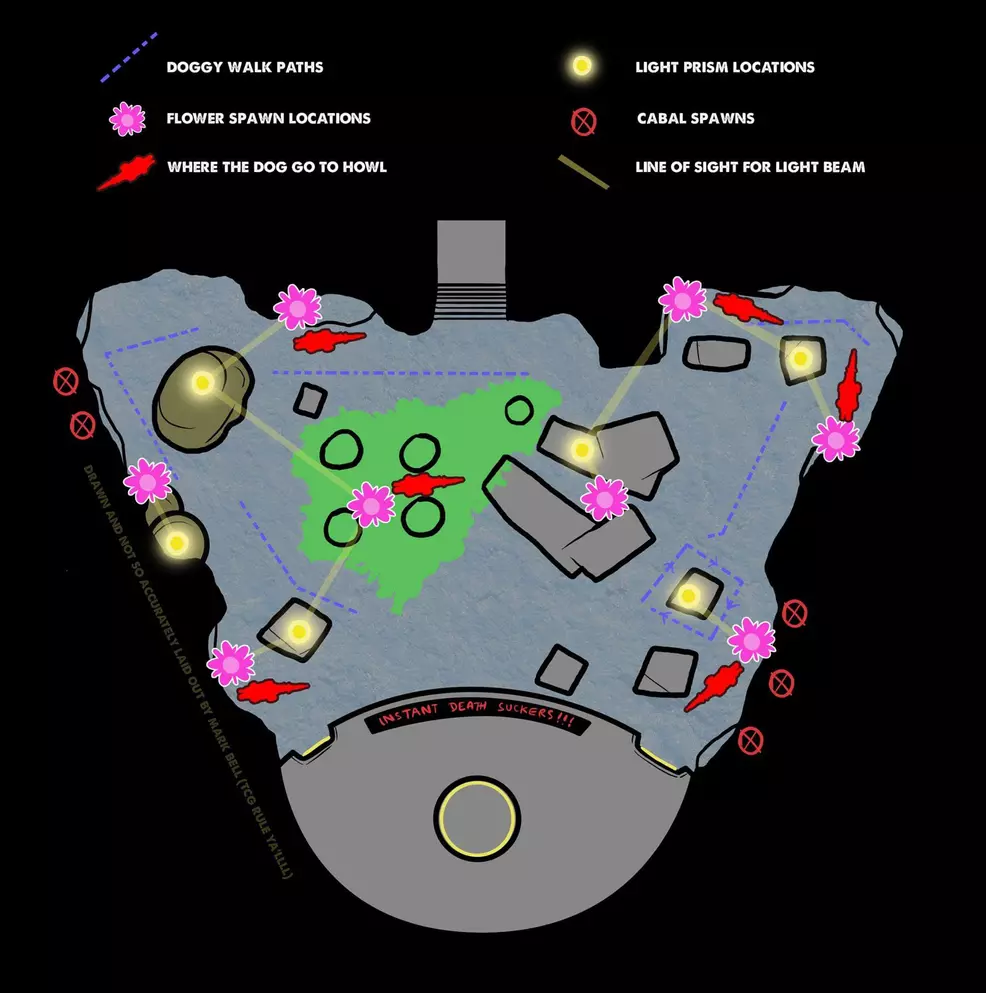
The purpose of the Pleasure Gardens encounter in the Leviathan Raid is to kill six named Royal Beasts that patrol the room you’re in. Each one patrols a sector, and each of them have quite a bit of health. They will not attack you, but if they detect you, they will howl, which triggers a status effect that will wipe your team in about 30 seconds. You must not allow them to spot you. Once you're spotted, or the Royal Beasts begin to howl due to being restless, a short damage phase will begin.
Here are the key elements to understand for this fight:
- Royal Beasts: All six must be killed to finish the encounter
- Safe Room: Protects you from the Royal Beasts’ howl. Can be used three times
- Prisms: Used to zap the Plants and grant empowerment
- Beams of Light: Allows players to fire the Prisms when standing in them
- Pollen: Must be taken to Plants to allow Empowering Spores
- Plants: Located around Pleasure Gardens. Only glowing Plants empower Pollen.
The general idea of the fight is that two players will pick up the Prisms that spawn on top of the Safe Room. Four players will head into the Safe Room and collect Pollen, then head to the ground level of Pleasure Gardens. The Prism holders will move to the pillars with the Beams of Light, and keep an eye out for Plants that are glowing, calling out the glowing Plants to the team below. The four players on the ground will then sneak to that Plant, avoiding detection by the Royal Beasts. When all four Pollen carriers are near the plant, the Prism holder will shoot the Plant, resulting in the players on the ground getting Empowering Spores x 12. This process should be repeated until you reach Empowering Spores x 48 or more on the first run, at which point the damage phase can begin.
Our advice is that you assign each of the six members of your fireteam to a Royal Beast. When a damage phase begins, each Guardian will damage their Royal Beast, but should not kill it. All Guardians will return to the Safe Room to avoid a wipe, and then the process of getting Pollen and Empowering Spores will begin again. If you're dealing adequate damage to your beast, they should be nearly dead after the first run.
The reason we advise you don't kill any Royal Beasts until the final phase, is that killing a Royal Beast reduces the amount of time you have to obtain Empowering Spores in the next round. If all six Royal Beasts remain alive, you will have much more time to work your way through the Pleasure Gardens and get Empowering Spores. Empowering Spores are what give you higher damage output. The more Empowring Spores you have, the more damage you can deal.
It's also worth noting that each member of youre fireteam can only revive one player during the entire encounter, so staying alive is vital to success here. Make sure you're getting back to the Safe Room in time. The damage you could deal by waiting a second or two longer is rarely more valuable than you being alive to start the next phase of Pleasure Gardens.
When all six of the Royal Beasts are down, you’ll be done with the Pleasure Gardens encounter and can head back to the Castellum. You will need to open a third door, and then you can move on to the final bit of the Leviathan Raid.
Part 5 - The Gauntlet
The Gauntlet is considered one of the easier parts of the Leviathan Raid due to the fact less enemies will spawn in. However, it requires Guardians who are proficient with jumping, and for your fireteam to work together as a proper team. Trust us when we tell you that Guardians that don’t play well with others will stand out like a sore thumb here.
The goal of the Gauntlet is to take Psionic Charges through an obstacle course and place them in a statue in the middle. Two members of your team will be chosen as course runners, and typically this would be the two lowest Power level Guardians you have, allowing the higher Power level Guardians to stay outside and do the shooting, where their Power is put to good use. Of course, you must make sure that the course runners are trustworthy and agile, so consider carefully. While the course runners are inside the obstacle course, four members of your fireteam will be outside and standing on pillars. Each pillar will have one of the four symbols: Sun, War Dog/Dog, Axes and Chalice/Cup.
To begin, have your four shooters stand on one pillar each, causing enemies to spawn in. Once the Centurions are dispatched, two Psionic Charges will appear. The two course runners will each grab one of the Psionic Charges, causing them to teleport into the obstacle course.
The two players who teleport into the obstacle course will have to call out the ring that they see illuminated. However, they must also call out the symbol that they see above the course. For example, you might see the War Dog symbol, with the green ring being at the top. The course runner would then call out, “War Dog. Top.” This is vital information to the four shooters on the outside of the course.
The shooter who is standing on the War Dog pillar would then shoot one of the arrows that was not called out, and one of their fireteam members would shouyld the other not called out. In the example we’re running with, the Guardian on the War Dog pillar (and their colleague) would shoot the middle and bottom buttons because the course runner called “War Dog. Top.” It’s essential that you have two players shooting at the buttons at the same time.
So, who shoots which button? Again, let's assume that the course runner called out War Dog and top. My fireteam handles it by having you always shoot the lower button while on your plate, and always shooting the higher button when assisting with a fireteam member's plate. I would shoot the bottom War Dog button, and my teammate would shoot the middle War Dog button, causing the buttons to turn green, and thus allowing the course running to grab the orb and go through. The orb prevents the Psionic Charge from exploding and kill the course runner.
Example: Going clockwise, the symbols on the plates are laid out as Chalice, Axes, War Dogs and Sun. Because it's a circle, it just goes on that way endlessly. One coure runner will begin at the Chalice, so here's how that is handled:
The coure runner grabs the Psionic Charge and enters the obstacle course after all the Centurions are dispatched. They call out Chalice and Top. The person standing on the Chalice plate would shoot the bottom of the three buttons. The person to their right, standing on the Axes plate, would shoot the middle button. If done at the same time, the buttons turn green, the course runner grabs the Orb and goes through the wall, and then the Chalice Guardian melee kills the Sol Councilor. The Chalice Guardian will then immediately turn to their right and prepare to assist the Axes Guardian.
Let's assume that the course runner calls out Axes and Bottom. The Axes Guardian would shoot the middle button, while the Chalice Guardian would shoot the Top button. The buttons would turn green, the course runner would jump through the wall and grab the orb, and then the Axes Guardian would melee kill the Sol Councilor. Before even getting back to their plate, the Axes Guardian would then turn to their right and assist the War Dog Guardian the same way the Chalice Guardian just assisted them. You repeat this process until a lap is done.
The course runner must complete a full lap of the obstacle course, passing over a gold finish line. This will cause them to teleport back to the main area. They must quickly approach the statue in the middle and dunk the Psionic Charge, not unlike the first phase of the King’s Fall Raid in the original Destiny.
This process needs to be completed a total of three times. Each run will get progressively more difficult for course runners, such as the floor disappearing. Once six Psionic Charges have been dunked at the center statue, all fireteam members will be teleported to the obstacle course and must complete a lap, picking up the black orbs to prevent the Psionic Charges from exploding as they go. Thankfully, only three Psionic Charges need to be dunked at the center statue during this stage.
Once all these conditions have been met, the Gauntlet phase of the Leviathan Raid will be complete and your fireteam should return to the Castellum to begin the next portion. Of course, you could always take a trip to the underbelly. We have the locations of every secret chest in the Leviathan Raid.
Part 6 - Emperor Calus Boss Fight
Regardless of what order the stages the Raid played out for you (it changes weekly), the Emperor Calus boss fight is always going to be the final stage. This fight is far less complicated than the Wrath of the Machine Raid from the original Destiny, so players that struggled there should be better off in here. Still, the one thing you need more than anything is effective communication, a common theme among the Leviathan Raid in Destiny 2.
You can begin the fight by being a jerk and shooting the chalice out of Emperor Calus’ hand. This will fill the room with Cabal, and progressing to the next stage of this fight requires you to kill all the yellow-health enemies in the room. This will cause four Sol Councilors to spawn in, but they should not be killed. Calus will clap, sending your entire fireteam into the purple mind realm where a giant Calus head will be floating.
Two players should run forward and grab a black orb each. This will cause them to teleport back into the throne room with Calus. The four players left in the purple mind realm will need to call out the symbols that they see. Two players will see different symbols, while two players will see the same symbol. Of the four symbols seen throughout the Raid (Chalice, War Dog, Axes and Sun), only three will be seen by the Guardians in the purple mind realm. They will call these symbols out to the two Guardians in the throne room. However, Guardians in the purple mind realm will need to be careful, as Calus will attempt to suck them into his mouth.
To avoid letting Calus eat you, you cannot jump in the purple mind realm. You must stay crouched or standing at all times. You must also look at the path ahead. If you see tiny ramps, you must not line up with those, otherwise you'll be propelled into the air and eaten. This will require you to constnatly adjust your position in the purple minde realm.
The two players in the throne room will take note of the four platforms, each with a Sol Councilor on it. Each pillar will have one of the four symbols we discussed. The two players in the throne room will figure out what symbol was not called by the Guardians in the purple mind realm, and they will kill only that Sol Councilor. Guardians in the purple mind realm can then safely move forward to the next barrier. This process will repeat four times until all the Sol Councilors are dead. Guardians in the purple mind realm will then kill the floating skulls that spew forward to increase the fireteam’s multiplier for the damage phase.
Tip: The two Guardians in the throne room can actually sit inside the bubbles with the Sol Councilors. This will prevent them from taking any damage. The only time they need to leave these bubbles is to kill the Sol Councilor not called out by the Guardians in the purple mind realm. Minion control can be handled quickly when all six Guardians are back in the throne room together.
The two players in the throne room will need to be clearing out the Cabal minions as best they can. It’s advised that your two most lethal and skilled Guardians be tasked with this. Don’t give the job to that Guardian who always seems to end up dead, even though it’s never their fault, right? Once the minions are dead, those same two Guardians will need to take down Calus’ shield, causing the four Guardians in the purple mind realm to teleport back into the throne room.
When all six Guardians are in the throne room, they need to stand on the same plate and begin a damage phase on Calus. Before that plate runs out of power, move to the next one, as Calus tends to blow up the plate you’re on when it’s out of juice. Move to the next plate as a team and continue to deal damage.
To ensure you’re doing as much damage as you can, Warlock’s Empowering Rift is useful. The Titan’s Rally Barricade is also valuable to avoid long reload times. Pulse Grenades and Coldheart will put the hurt on Calus in a big hurry, but if you lack those, the MIDA Multi-Tool isn’t a bad option, either.
Should you fail to kill Calus on the first run through the four plates, the entire process will have to be done again to trigger a second damage phase. It plays out exactly the same, so just repeat what we’ve already gone over.
Once Calus falls for good, you’re on your own. Raid complete. Enjoy the cut scene and see you next week!
That's the entire Leviathan Raid guide. All you and your fireteam need to know. If you feel you’re not quite ready for this activity, visit the Shacknews Destiny 2 complete strategy guide to become the most powerful Guardian you can.

