
How to set up a Valheim Dedicated Server
A comprehensive guide on how to set up a Valheim Dedicated Server, how to invite friends, as well as how to host other worlds.
Setting up a Valheim Dedicated Server can be a difficult process. There are a lot of steps and a lot of places where something could go wrong. However, if you want to avoid paying someone a monthly subscription just to host a server, then setting up your own is a great idea. The following aims to be a comprehensive guide that should (hopefully) answer all questions you have about creating a Valheim Dedicated Server setup.
Set up a Valheim Dedicated Server
Before you start, make sure you have some kind of notepad editing tool like Notepad++ and that you’ve enabled the ability to edit file extension types. You can enable file extensions by clicking View in Windows File Explorer and then checking the box that reads File name extensions. Here is a broad overview of the steps you must take to set up a Valheim Dedicated Server:
- Forward ports through your router (Ports 2456, 2457, and 2458)
- Download Valheim Dedicated Server (through Steam Library or SteamCMD)
- Edit a file in the Valheim Dedicated Server with server name, world name, and password
- Add your internal IP address to Steam Server list so you can join your own server
- Have friends join your server by inputing your external IP address into the Steam Server list
- Join the Valheim Dedicated Server and then, if you need to, troubleshoot any problems
Valheim ports to forward
The first thing you will need to do is forward the correct ports. This allows your friends to connect externally to your Valheim dedicated server. Depending on your router and setup, this will be different for everyone. Find your router on PortForward.com and follow the steps to forward the following ports: 2456, 2457, and 2458. Depending on your setup, you may be able to forward a range of ports by entering: 2456-2458. You should only need it to be a UDP Protocol.
It’s also worth noting that you will need to specify to your router which machine on your network will be hosting the server by selecting the machine’s internal IP address. You can find your PC’s internal IP by opening Command Prompt and typing ipconfig and pressing Enter. Your PC’s internal IP address is listed beside IPv4 Address. Depending on your router, your machine's name might appear instead of its IP address. You can check your PC's name by searching "About your PC" in Windows and looking for "Device name" under "Device specifications".
Download Valheim Dedicated Server via Steam Library
The first way you can acquire the Valheim Dedicated Server is directly from your Steam Library. This is a good method for those that don't want to use SteamCMD (more on that in the next section).
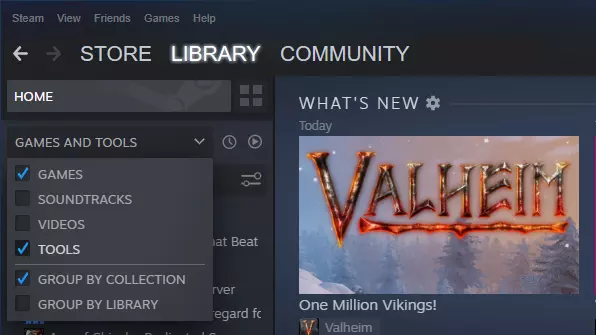
- Open Steam
- Go to Library
- In the dropdown box on the top-left, make sure Tools is selected
- Search Valheim Dedicated Server and select it
- Click Install
This will install the Valheim Dedicated Server. At this point, you must edit some files in order to actually set up a server for your friends to join.
To find these local files, perform the following:
- Open Steam
- Go to Library
- Right-click Valheim Dedicated Server, select Manage, and then Browse Local Files
You will now be looking at your Valheim Dedicated Server folder with several files, including a .pdf from the developers, a valheim_server.exe (you will not be using this), and the start_headless_server.bat (this is important). Now, you will need to edit some files to properly set up the server. But first, I'll cover how to download the Valheim Dedicated Server using SteamCMD or you can skip straight to editing the Valheim Dedicated Server file section below.
Download Valheim Dedicated Server via SteamCMD
The other way to set up your Valheim Dedicated Server is by using the SteamCMD. You can download SteamCMD from the Valve Software Developer site. This is Valve’s command-line version of Steam. This will be used to download, update, and create your Valheim Dedicated Server.
Credit to Steam user Gaston LeGume for some of the following information.
Extract the contents of the zipped folder to where you want SteamCMD to be stored. This can be anywhere on your PC.
Create a .bat file in your SteamCMD folder called update.bat. To do this, create a new Text Document and title it update.bat. It should change from a normal notepad icon to an icon with some gears. Right-click the .bat file and select Edit with Notepad++. Copy in the following code: C:\Users\USERNAME\Desktop\SteamCMD\steamcmd +login anonymous +force_install_dir C:\Valheim +app_update 896660 validate +exit
You will need to change C:\Users\USERNAME\Desktop\SteamCMD\steamcmd to wherever it is you extracted SteamCMD. For example: E:\SteamCMD\steamcmd
Change +force_install_dir C:\Valheim to wherever it is you want to install the server. For example: +force_install_dir E:\Valheim_servers
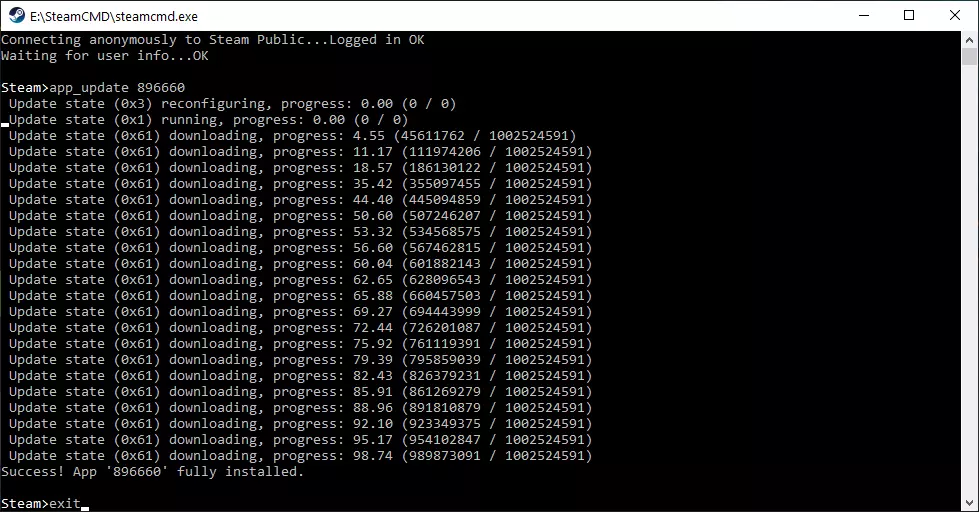
Save the Notepad++ file and close it. Now, double-click the update.bat file. It will run a script that will download the Valheim Dedicated Server and install it wherever you specified in the above code. Give this a few minutes as it must download and then update the program. When it is completed, you can type Exit and hit Enter to close the SteamCMD.
Cut the update.bat file and paste it inside your new Valheim Dedicated Server folder. This folder is found wherever you directed it to install in the above code. The update.bat file will be used to update the server whenever the developers release an update. Now, whether you downloaded the Valheim Dedicated Server using SteamCMD or through your Steam Library, you must do the next step.
Editing the Valheim Dedicated Server file
Whether you used SteamCMD to set up your Valheim Dedicated Server or downloaded it via your Steam Library, you will now need to begin the process of editing your server launch parameters.
Start by making a copy of the file start_headless_server.bat and renaming it to start.bat. This will preserve the original file.
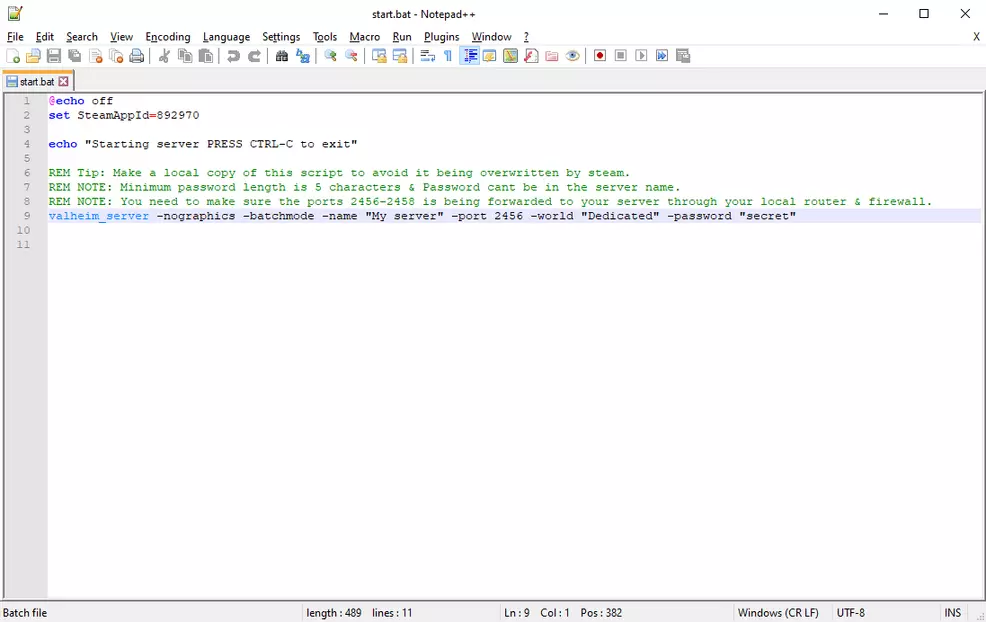
Right-click start.bat and select Edit with Notepad++. You will see the following code. You will need to edit the parts on the valheim_server line (Line 9) that are labeled “My server”, "Dedicated", and "secret" below. Change the words within the quotation marks.
@echo offset SteamAppId=892970
echo "Starting server PRESS CTRL-C to exit"
REM Tip: Make a local copy of this script to avoid it being overwritten by steam.REM NOTE: Minimum password length is 5 characters & Password cant be in the server name.REM NOTE: You need to make sure the ports 2456-2458 is being forwarded to your server through your local router & firewall.valheim_server -nographics -batchmode -name "My server" -port 2456 -world "Dedicated" -password "secret"
What you select for -world is not what people will see when trying to join the server. Instead, the -name is how it will appear in the server list. Pick something you will remember and is otherwise appropriate for your server. The -world name is what you can use to launch any worlds you have created in singleplayer or worlds you were previously hosting using the in-game server hosting, or even worlds your friends have sent to you (more on that below). When you're done, it should look something like this: valheim_server -nographics -batchmode -name "Sam's Awesome Server" -port 2456 -world "Valhalla" -password "CleverPassword"
You must also make a password for your Valheim Dedicated Server. The password cannot be in the server or world name and must be five characters long. I recommend making all the entries unique, that is to say, make -name and -world different, too.
When all the changes are made, save the file and close Notepad++.
Double-click start.bat to begin setting up the Valheim Dedicated Server. You will notice a Command Prompt box appear and begin scrolling with text. The server creation will be completed when you see Game server connected. This process may take a while depending on your machine.
At this point, you and your friends will need to add your server to Steam’s server list. This process can cause some problems, so arm yourself with that warning.
Add your Valheim Dedicated Server to Steam’s Server list
Before you begin this part, make sure your Valheim Dedicated Server is running by double-clicking the start.bat you created. Wait for the Game server connected text to appear. Now, this part is different depending on whether you’re hosting the server on your machine or trying to join someone else's server in a different house (this last one is listed further below).
Open Steam and select View and then Servers. This will open up a new dialogue box where you can browse a variety of servers across Steam.
Select the Favorites tab. It is here you will need to add your machine’s IP address followed by the port you are using. This is the same port listed in the start.bat file you edited. The default port is 2456.
Right-click inside the Favorites tab and select Add server by IP address or by clicking Add a server down the bottom right. In this new box, enter your internal IP address followed by a colon (:) and then the port you used in the start.bat. You should have something that looks like this: 192.168.1.7:2456
You can find your internal IP address by opening Command Prompt (search cmd in Windows or type out Command Prompt) and typing ipconfig and hitting Enter. Your internal IP address is listed beside IPv4 Address and might be something like this: 192.168.1.7.
This internal IP address is what you will use to connect to your own server. It is also the IP address anyone else on your home network will use to connect to your server. They will do the exact same: adding the IP address to Steam’s server list under “Favorites” along with the correct port.
To join the server, double-click the server and enter the password specified in the start.bat. You will need to enter the password again when Valheim launches. If the server doesn't appear, disappears, or will not let you join, check the troubleshooting section below.
How to get friends into your Valheim Dedicated Server
For those that want to play with friends who are not on the same network as where the Valheim Dedicated Server is hosted, they will need to connect via a different IP address. For example, if you are hosting the server and your mate in another city wants to play, they will not use your internal IP, they must use your external IP.
To get your external IP, simply Google “what is my IP” and it will be listed at the top as “Your public IP address”. It might look something like this: 123.456.789.101
Now, take this external IP address and add on the port you listed in the start.bat file. By default, it is 2456. This will give you a line like: 123.456.789.101:2456
Now, have your friend (or you, if you’re trying to join someone’s server) open Steam, select View, and click Servers. In this screen, select the Add a server button and input the external IP, a colon (:) and the correct port. There should be no spaces. It should look something like the example above.
Remember, if your friend is on the same connection as you (in your house), then they must join using your internal IP address. This is listed above in the "Add your Valheim Dedicated Server to Steam’s Server list" section.
You should see the IP address added to the Favorites list. Now, you can join by double-clicking the server and entering the password listed in the start.bat. Enter the password again when Valheim launches and you’ve selected your character.
If this does not work, your friend may be able to search for your server using the in-game search function. They will need to check "Community" not "Friends". Put in the first part of the server name to help refine the search results.
Valheim Dedicated Server not appearing
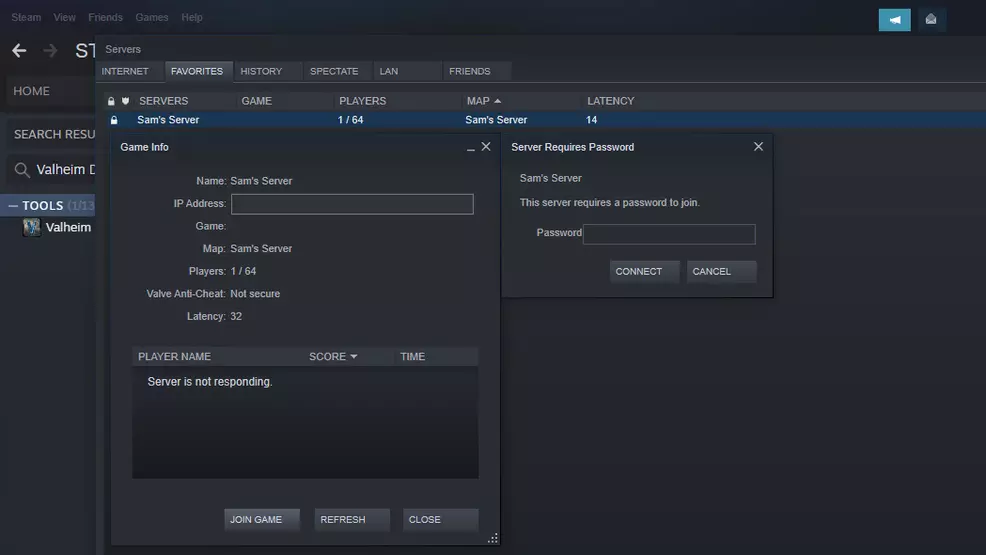
Sometimes the Valheim Dedicated Server will not appear or it might say < not responding > under the Game column. This always seems to happen. First, you may need to give Steam a few minutes. For some reason, waiting 5 minutes can solve the problem.
Alternatively, what you can do is click another tab (like History or Friends) then click back to Favorites – you may see your server flash on screen before disappearing. Double-click it before it disappears.
A dialogue box should appear requesting a password. Enter the password you specified in the start.bat and click Connect. Valheim should launch and you should select your character. You will then be asked for the password a second time.
This process is the same whether you’re trying to join your own server on your own network or for someone trying to join a server on an external network.
As mentioned above, if you cannot join via Steam, you can try searching using Valheim's in-game server search. Make sure to check "Community" not "Friends". Type in the first part of the server name to help refine the results.
Valheim Dedicated Server troubleshooting
As with all things related to setting up a server, sometimes you can run into issues. Here are some solutions I found to be helpful that may solve the problem you are having. If this does not help, make an account and let me know what your problem is in the Chatty thread below and I’ll endeavour to help. If you've found some solutions online, let me know and I'll update this guide with other useful information!
One potential fix is to change the port listed in the start.bat file. By default, this port is 2456 but it can be changed to 2457 or 2458, provided these have all been properly forwarded in your router. You will then need to ensure this port change is reflected in the Steam Server list where you entered your IP address.
Another fix is to ensure that Valheim has been allowed access through Windows Defender Firewall:
- Search Windows Defender Firewall and open it
- Select Allow an app or feature through Windows Defender Firewall
- Click Change settings
- Ensure all instances of Valheim have both Private and Public boxes checked
- Click Okay to finish
You might also need to ensure the ports are getting through your Windows Firewall. This can be done from within the Advanced Settings of Windows Defender Firewall:
- Search Windows Defender Firewall and open it
- Select Advanced settings
- Select Inbound Rules
- Choose New Rule…
- Select Port
- Select UDP and Specific local ports and type: 2456-2458
- Select Allow the connection
- Check all three boxes for Domain, Private, and Public
- Enter a name for the new rule (Valheim) and a description if you want and click Finish
How to host other worlds in your Valheim Dedicated Server
It is possible to host worlds you have created in single-player, worlds that were created using the in-game multiplayer creation system, and even worlds your friends have created and you were playing on. The process is simple and only requires moving a couple of files around and changing the name in your server start.bat file.
To do this, you will need to locate your Valheim world files. These are found inside the AppData location on your PC, not inside the Valheim Steam game folder. To find this location, search %AppData% in the search box on your Windows toolbar or by opening Run and typing it into that.
This will open the Roaming folder inside AppData. Back out of this folder and follow this pathway to find your Valheim world saves: AppData\LocalLow\IronGate\Valheim\worlds
In here you should see all the worlds you have created in Valheim. There will be a .db and a .fwl file. To host one of these worlds on your server do the following:
- Right-click the start.bat file and select Edit with Notepad++
- Change the -world to the title of the world inside the worlds folder you wish to host
- Save and close Notepad++
- Double-click the start.bat file
By simply changing the -world parameter, you are directing the server to fetch the world that matches that name.
This is also useful in hosting a friend’s world they have created. However, you will need to have your friend send you the two files (.db and .fwl), either by email, Google Drive, Dropbox or some other FTP. Save the files inside the worlds folder and then edit the start.bat file as above.
There is certainly a lot to cover when setting up a Valheim Dedicated Server. Hopefully, the above has ensured your server is up and running, and friends are able to join you for an adventure across the 10th world. If you have any problems or note any errors, please let me know in the Chatty thread below. In the meantime, take a look at our Valheim guides and walkthroughs page for more helpful articles.

-
Shacknews

 reply
replySam Chandler posted a new article, How to set up a Valheim Dedicated Server
-
-
-
Thanks for the well detailed article. I was never able to see the server in Steam, but I DID find it in the community list and I was able to join! I could see from the server CMD window that my character name showed up so I am definitely hitting the server. Thanks! This was the key for me, "As mentioned above, if you cannot join via Steam, you can try searching using Valheim's in-game server search. Make sure to check "Community" not "Friends". Type in the first part of the server name to help refine the results."
-
-
The steps in this tutorial are by far the most thorough. It would be perfect if you added this one additional information to get the server to work. For some reason Valheim listens to the port 1 more than the port set up. I followed the solution in this reddit post and it finally worked for me. I had to go back to my router settings at setup a TCP/UDP port dedicated for 2457 only. https://www.reddit.com/r/valheim/comments/li757j/dedicated_server_server_not_responding/
-
Great article! Setting up a Valheim Dedicated Server can be challenging, but your comprehensive guide provides a clear overview of the necessary steps. I appreciate the detailed instructions and troubleshooting tips you've included. It's great to be able to host your own server without relying on monthly subscriptions. I should add that instead of Notepad++, I used the alternative solution for Mac users from this article https://setapp.com/how-to/alternative-to-notepad++-for-mac which was great for editing necessary files. Your guide has been a valuable resource for creating a seamless Valheim Dedicated Server setup. I look forward to embarking on exciting adventures with friends in the 10th world. Keep up the excellent work!
-
